Monday, November 15, 2021

Broken Field Battles - PAL Practice - Massachusetts

 Hi all,

Just returned from a fantastic weekend of fighting with a good prep for 100 Minutes War next week.  I'd heard many great things about this practice and am glad that a small crew of us was able to make the 6 hour drive to get there.  

If you're new to reading this blog, this post marks my 109th post over a 6 year period, and is more or less my reflections over what went well, or what could have been improved in a particular practice or event.

So let's get to it.

Scenario #1:  7v7 Two Rez (three lives) Broken Field Battles

I believe we had 28 fighters which were broken up into four teams of 7.  Two teams fought each other while the other two teams watched.  After the battle was over, a new pairing would take the field and fight.


Decide Which Weapons to Bring

For our team, the very first tactical decision we had to make involved a collective assessment of the talents and weapon types on our teams versus our opponents.  We then had to consider how such a battle would pan out.  In a nutshell, the longer it takes to complete a battle, the more and more advantage goes toward having more spears on your team.  The shorter the battle, the advantage tends to lean toward more shields.

The reason behind this is that in order for a shield fighter to kill a spear fighter, they must charge.  Charging is very exhausting, and longer battles require more charging, which makes the shield fighters more tired, which makes them have to take more breaks, and taking breaks between the charges gives all the advantages to the ones with the spears (I can poke at you without fear of being run down).

Having said that, there is a balance point.  A team made up of 7 spears and no shields would have a tough time killing any of the shields as they would likely get mopped up in each wave of charges.

We ultimately decided to bring out three spears, and I believe every other team brought out either two or three spears (in a single death battle, you might see zero spears).


Field Area Responsibilities

The next decision, aside from picking a commander and a reform call ("two" was our call......despite the fact that we were team #4), was to decide who would go where.  I am a very big fan of controlling areas rather than some sort of buddy system where people decide to always fight together in pairs or triads.  "Buddies" is good for very new fighters in an overwhelming situation, like Pennsic.  But for fighters with experience, I'd rather them understand that their job is to "work the left side of the field" rather than, "Go find Larry."  

This doesn't mean that you shouldn't conceptualize the idea of a shield working with a spear (or two shields and a spear), but that a shield on the right side of the field should work with a spear on the right side of the field, and it might be a different spear than it was a minute ago.  Also, just because your role was to work the right side of the field, that doesn't mean that you can't shift your attention to the middle or the left if there's an immediate tactical need to do so.   For example, if you have a 3v1 advantage on the right, and the 1 is really good at retreating, and you see an easy oblique kill that can be made in the center, it may be a good idea to leave your area to go get the easy kill, provided that you understand that you need to keep an eye on the right side and return to it when needed.


We decided on a balanced approach with a left spear, center spear, and right spear, and then spread the shields out the same way.  I'm a big fan of having your best shields control the flanks with a notable exception that I'll talk about later.  We spread out the shields the same way;  left, center, right, and then allowed our pole to float to where ever he felt he needed to be.


Smart Kills, Don't Die

The tactics in this kind of battle are basically to die as little as possible while getting as many kills as possible.  This happens by finding good matchups and exploiting your advantages.  Better spears should attack weaker spears.  Weaker spears should be defensive.  Attack on the 2v1s, stall on the 1v2s.  Look for oblique attacks.  Pull back toward your rez point if you're outnumbered.  Use the terrain features to lure them into kill pockets.  

In our fights, we let the spears do most of the killing.  If the other side charged, the spears would run to safety while the shields and pole would run in to protect them.  Shield charges should generally occur only when the shields are confident that the net result will be more kills for their team.  Charging at a spear only to get clubbed by a pole is not a good decision.  

Note:  When a spear runs for safety, they need to immediately get back into the fight.  Don't run away and wait for things to clear out, but rather find a way to get yourself back into the fight.


Proximity to Rez Point

In an attrition battle, normally it is to your advantage to fight near your rez point and away from your opponent's.  Does that mean that you should just wait at your rez point and let them come to you?  If they aren't very smart, they may do just that.  However, more often than not, neither side will get too far away from their own rez point in these kinds of battles, and thus most of the fighting occurs somewhere in the middle of the field.  What this means for you is that one of the easiest ways to survive a fight when the other team has the advantage is to simply back up toward your own rez point (calling your teammates to come along with you).  

The reason why this gives you an advantage is that every kill that your team gets is a long walk for your opponent, and every kill they get is a short walk for your teammate.  This means that you will replenish your ranks much faster than they will.  

Having said that, if you are counting kills, it may be to your advantage to finish off your opponent near their rez point, but then you must immediately retreat back to the center of the field.


Scenario #2:  14v14 Unlimited Rez Broken Field Control Point Battles

Very similar fights to above, except now we have twice as many fighters on a similarly sized field, and the objective is to control the center of the field instead of attrition.  The battles were 5 minutes long, and a handful of points were scored at intervals within those 5 minutes based on which team had the center controlled.

One piece I particularly liked was that we combined the teams from the previous scenarios, and then switched them for the second half of these battles.  So at one point is was Teams 1&4 vs 2&3, and then later 1&3 vs 2&4 (or something like that).  That offered a little bit of variety in the fighting so that you didn't end up fighting across from the same people all day.  


Tactical Differences

Many of the same tactics as the previous scenario apply:  choosing weapons and where they go, picking a commander and a team name, getting kills while trying to survive, trying not to fight near their rez point while walking back toward your own rez point for safety, etc.

There were some key differences, however.  Since the objective of the battle is to control the center of the field, killing is no longer important except that it helps you move the line of engagement past the center of the field so that you can take control of it.  Also, because the numbers were so much greater, echoing commands becomes more and more important as someone yelling from the left side of the field likely won't be heard nor recognized from the right side of the field.

I had mentioned before that I prefer the best shield fighters to be on the flanks, as controlling flanks is critical in a melee.  In this scenario, however, one or more good shield fighters also need to be in the center in order to take and defend the objective.


Don't Fight at Their Rez Point

I pointed out above about the disadvantage of being far from your own rez point.  This is even more pronounced in this scenario because a kill is literally worthless if it doesn't lead toward moving the line of engagement forward.  If you are already at their rez point, there's nowhere left to go.  Every kill is immediately replenished with a short walk.  

Here's an example of the team from the right side of the camera pushing the line up to the rez point, and then calling a charge while already controlling the center point.  

Watch @0:45

PAL Video 3

Notice that a charge is initiated by the team on the right which pushes the left team all the way back to their rez point.  Once the charge is resolved, the left team is at full strength, while the right team only has one fighter left alive.  The left team then easily walked the line forward and took control of the field.

Given the set up of the field, there was never a reason to push beyond the choke point, which is a terrain feature that offers the best defense.


Edit to add:  Upon further review, I noticed that the charge was against a line of 4 spears, which put the right team in a bit of a predicament.  Normally you'd want to charge that, but the left team had backup to their left since they were beyond the obstacle, and even if they didn't, they were close to their rez point.  I still think a charge here is the wrong call (as evidenced by the result) but can certainly understand why that call was made.


Echo Commands

I remember one scenario where our left had pushed too far toward toward the rez point, and I kept yelling "Left flank, pull back!"  At one point I yelled, "what's our team name?!"

So a few problems here.  One was my fault.  I didn't know what our team name was.  One was probably the fault of everyone which was that I don't think many of us knew what our team name was.  One was the left flank pushing too far.  And finally one was that even though the left flank couldn't hear me, some people on our team could but didn't echo the commands.


Rolling a Flank When You Have the Advantage

In the same video, you hear the left team say, "roll that flank!"  What this means is that you aren't necessarily focussed on killing the enemy, but rather continuing to press forward while walking them backward, and curling the flank around in the process. 

Watch @0:55

PAL Video 3

Notice he says the command at least 4 times.  Some of the fighters turn to kill the fighters holding the control point, while the rest walk past and take control of the flank.  Not only does this move the line of engagement beyond the control point, but it also creates a kill pocket which gives a big advantage to the left team.  Also notice that even though they had a huge numbers advantage, they stopped pressing at the choke point.


Some Techniques to Rolling a Flank

There were several instances in the smaller battles where we'd have a 2v2 competitive spear battle on one side of the field.  Whenever one of their spears would get killed, I'd immediately tell my partner to start rolling the flank.  To do this, I would go on full defense against the spear, trying to pin his shaft so that he can't shoot at either one of us, and then start walking forward, ideally past his tip, to continue to get him to either a) die from a spear shot from my partner or b) keep walking backward so that we can take the flank.

In a control point scenario, this helps us move the line past the point.  In an attrition battle, it forms a kill pocket to allow the other spear either an easy kill on the one I'm tying up, or an easy kill on someone in the pocket.


Another technique involves getting a shield past the tip of the spear on the flank.  If the shield fighter is right handed, it would be on his or her far right flank.  Reverse that for a lefty.  

There's an example of this in the foreground of the following video.  The lefty shield initiates a charge and gets his shield into a position where he protects himself from the two spears on the flank.  For what it's worth, I'm always a big fan of having your shield either take the extreme flank position (as he is) or at a minimum be the second to last fighter on the flank.

Watch @0:28

PAL Video 3


I should probably say that it was Sir Sterling who initiated the charge, but the lefty was the key component to the success of that charge as he was in the perfect position for it.  Unfortunately, I think the backup shield got in a step too late as she was returning from rez point and took the first available spot as the spears ended up crowding on the flank.  Either way, the right team had a clear tactical advantage in this push.  

I should also note that in a 4v4, the team with one spear should normally charge the team with three spears, so good call on their part.  Also good on the three spear team to retreat and stay alive rather than to die trying to hold a position that they can't hold.


Commands Have to be Spoken in a Manner that Coordinates the Plan

There were some instances where commands were called to take the point.  Now, it's not a bad idea to yell, "c'mon, move forward and take the control point."  But understand the only thing this accomplishes is hoping that someone else will call out the command.

The problem with "everyone move forward," is that no one is going to move forward until they believe that everyone else is going to move forward with them.  A better command is, "Blue team, get ready to move two steps forward to take the objective.  That's two steps together.  Ready?  Step!  Step!"  

I gave a similar command to Gui on the far right flank.  I saw three spears with no shields and knew that if he was on the far right position (the opposite of the lefty pictured above) that he could move the whole line back.  I said in a tone that only he could hear, "They have no shields.  Get ready to charge.  You got that?"  "Yes."  "Okay....ready......go! go! go! go!."  And when he did that, I was sure to parry any spears that would turn toward him for side and leg shots.

Having said that, my yelling, "left flank," over and over again didn't accomplish anything.  Who's left flank?  And what are they supposed to do? 


Final Thoughts

I can't stress how much I enjoyed this practice and how well run I thought it was.  I've always been a critic of the "commanders lead, troops follow," approach.  By contrast, this practice encourages everyone to take as much ownership in the on field decisions as they are willing to take on, which has always been a philosophy of mine.  If you train someone to know what to do, then you won't have to tell them what to do.

I'd also like to apologize for sounding like I'm calling anyone out for any mistakes.  Every single fighter of every level makes mistakes at some point in the battle, including myself (didn't even know our own team name.).  We're rusty, we're constantly changing teams, we're tired, and not everyone can know every perfect decision to make in every moment of a battle.

Anyway, hope you enjoyed this write up.  Talk to you soon!


Video Links

PAL Video 1

PAL Video 2


PAL Video 3


-Bari of Anglesey


Tuesday, November 9, 2021

The Battle of Four Lakes Melee Scenario

 Hi to those who are reading.

In unusual fashion, I'm throwing this together very quickly as I need to share this scenario with a Master of Arms who will be running this weekend's practice.

After years and years of tweaking practice scenarios, I've come to really like limited resurrection broken field battles for learning basic tactics, group cohesion, and command.  I've come to find that this specific configuration works much better than the rest:


Basic Scenario

Each team has a rez point at the ends of the field.

Each team gets 2-3 lives depending on if you want shorter or longer battles.

Teams should be between 5 and 8 fighters.

Teams should be relatively evenly matched in ability.

I prefer to have one team with an extra fighter compared to the other.

Fighters can swing or thrust over the lakes.

If archers are used, they should stick to the lanes and not fire over the lakes.

Running into or getting pushed into a lake kills you.

Accidentally stepping into a lake does not kill you.

If there are more than 15 fighters, run three teams.  Loser stays on and picks up one more fighter.  The team that is sitting out goes in and picks up extra fighters as needed before beginning the scenario.


What Makes This Scenario Good?

Resurrection battles slow the fight down just enough that people can better process the tactics on the field.

Because of the lakes, both teams get broken up into small groups of 1-3 fighters.  This gives more people on the field an opportunity to lead.  It gives the fighters a sense of duty in that if they are 1 of 8 fighters, they may not feel that they are an important component.  If they are 1 of 3 fighters, they feel like it's critical that they fight well and make good decisions.

Advantages and disadvantages are easy to spot.  Shields should charge the spears.  Teams of 3 should charge teams of 1-2.  etc.

Disadvantages are easy to compensate for.  Teams can back up into more secure positions on the field, or stall a fight until reinforcements return from rez point.

The simplest tactical decision is made when returning from rez.  Do I go right?  Or do I go left?

There are many clear flanking opportunities and dangers on the field.  Every group of fighters needs to look for flanks to exploit, or to be aware of their own flanks and communicate to the team what is happening.

The battle is very fun!  It can literally be done for hours.


Revisit The Digram

 From this picture, you should be able to look at each fighter's position on the field and imagine what kinds of thoughts are going through their heads.


1 - I need to either help 8, or run to stop 5.  Or I should yell to 2 & 3 to watch their backs.
2 - Maybe we should jump 4.
3 - Maybe we should jump 4.
4 - Can I stall these guys long enough for 5 to come up behind them.
5 - Can I get behind 2&3 before they notice me, or before 1 gets back from rez?
6 - If I tie up 8, 7 can kill him, or 7 can run behind 9 & 10.
7 - What 6 just said.
8 - I need to hold them off so that 9&10 don't get it from behind. Maybe 1 will back me up.
9 - We probably should pull back to get reinforcements from 1&8.
10 - What 9 just said.
11 - Hold them here until 7 gets behind them.
12 - Maybe we're much better than these two and should kill them before 1 returns from rez.


Hope you enjoyed reading! - THL Bari of Anglesey


Tuesday, September 21, 2021

Small Teams part 2. 6v7

 If you haven't read the previous post, please do so, as that shows a nice tactical progression from 1v1 all the way up through 3v4 and 4v3.

By the time I had finished that blog, it was time for the next regional melee practice.  We did this one at a local renaissance faire and were able to draw a nice crowd watching us on the hillside, which was very nice.  On the day we did some singles, some 2v2 fights, and some drills, but I think the highlight of the day were several 6v7 single death field battles (I believe we had some 7v7, and 7v8, but to keep things a little simple, I'll focus mostly on the 6v7 for this post).

The Setup

Two teams with a defined field that was maybe proportionally a little bigger than what you see below.  The field was wide enough that it wasn't a bridge, wide enough that either side could break up into two separate units, but narrow enough that fighters couldn't really just run away from the fight and sneak around into the backfield.  

The green team (actually we were purple) consisted of three shields, a medium pole, a long pole (6'8"), and a 9 foot spear.  The red (yellow) team had four shields, a shorter axe, a medium pole, and a two sword fighter.  Sizes, speeds, and ability levels were varied across the field.


Some General Principles

This follows pretty well from the last blog post on smaller teams.

To quote from that post:

"Best Decisions (each one is a unique tactic):

     -Surrounding the enemy with all fighters engaged
     -Sticking together and amassing the unit around one flank
     -Spreading out and finding opportunities for mismatch kills (shield charges spear, 2v1, etc.)
     -Denying one flank while attacking the other"


"Worst Decisions

     -Turtling up and taking it
     -Fighters not staying engaged
     -Spreading out with no ability to stay engaged (a disorganized mess)"


Below are some hypothetical examples of how these battles often play out with my assessment of whether or not the team is applying a good tactic or a bad one.


Keep in mind, as I said in the previous post, that some tactics are usually bad, while the remaining "good" ones often only work if you can properly predict a bad response from your opponent.  For example, sending a mass of fighters around the right flank definitely works if the opposing team's left flank doesn't respond.  If they do respond with an envelopment, then it really comes down to which team executes better.  If both teams use sound tactics, then it becomes a chess match of figuring out what will work out best for you against your opponent.


Considering Weapons Mix

Let's revisit the setup picture.  Which team has the advantage with range weapons?


The green team has three long weapons compared to red's two long weapons.  Additionally, green's long weapons were longer (green had the only spear on the field plus the longest pole).  

Often times these fights will break down into some long weapons' dueling on either team, with the shields serving more of a support role.  Red had made the decision to push for an in your face engagement in order to neutralize the green team's long weapons, which I believe was the right decision and one that worked out well for them.  


Tactics Employed that Day

In every scenario, red was pretty aggressive at lay on.  They mostly attempted to either send all of the troops to the right, perform an attack right - deny left, or split up into two units on the edges of the field.

Green tried to get off ranged shots before the shields got into range.  If red went all in on their right, green would try to envelop.  If red left smaller numbers of fighters on their left, green would try to beat them quickly and then quickly rejoin the rest of its unit.  


Notes on Denying a Flank

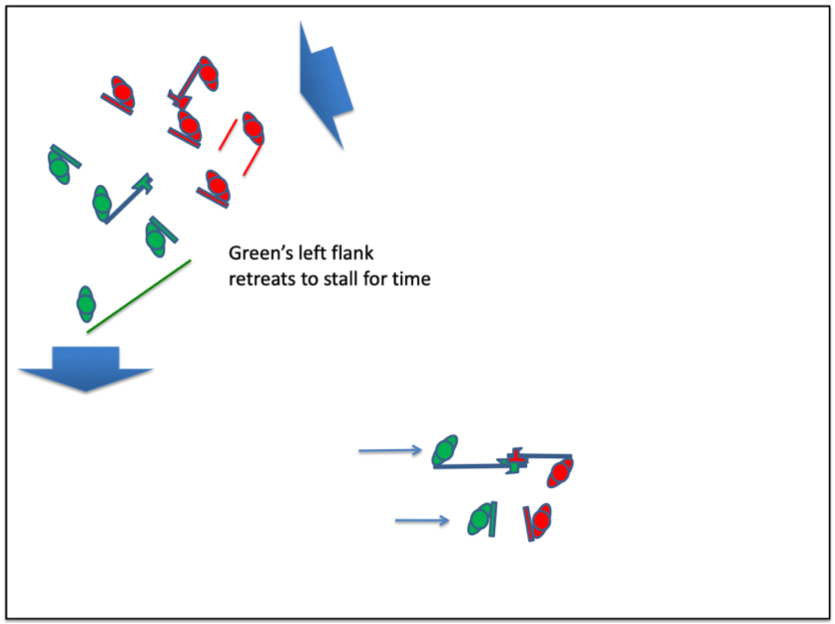
Green struggled to secure the left flank.  Later in the day Sir Galvin helped with the flank and got them to do a nice retreat which allowed the right enough time to win its flank and then join up with the left.

Remember, denying the flank doesn't mean that you need to win the flank, only that you need to keep the flank from getting around you and into the backfield, and if you do lose, that you lose slowly.  A slow retreat can accomplish the same goal.  You'll note in the picture below that though red has pushed the flank back, it never really got around it.


Spear Movement

A question came up yesterday about spearing in this situation.  The bottom line is the spear needs to be very mobile and always have a good idea where the enemy is coming from.  It's a bad idea to let the enemy out of your sight for too long.  

As the swirling tidy bowl often forms, you end up with this kind of S shape on the field (if you aren't familiar, a lot of battles end up with a counter clockwise rotation on the field, has both teams tend to be stronger on their right flank, and weaker on their left flank due to the right handed nature of most shield fighters).  The spear needs to be careful not to get caught with the enemy coming behind and from the left.  Often the spear needs to move either to its right or left to prevent this from happening.


Notes on Center Position

When talking about the "center" position, I'm really talking about fighting in the eventual gap that forms once the units break.  I had a discussion last night with a veteran melee shieldman (Arundoor) and we both talked about how we prefer this position as it allows us to better influence the outcome of the battle.

Having said that, it is probably a position for a fighter of a certain level of experience/prowess.  Most fighters would likely feel more comfortable fighting within a smaller defined group of people (like a triad, or the center of a small group of 4 or 5 fighting on a flank).  Fighting the gap requires good field awareness and mobility.  


Observed Trends

One thing I've noticed over the last 7 years since I've really started paying attention to tactics is provided that both teams have at least one experienced competent melee fighter and have the flexibility to make adjustments (ie they were not instructed by someone to use a specific tactic), these battles almost always end up with each side splitting into a left unit and a right unit on both sides.

Many years ago, as I said in my last post, we were taught that the flanking maneuver was "the way" to win these battles.  Again, I agree that that is an effective tactic provided that the opponent doesn't know how to counter, and often times they don't.  Especially if you are at a big war and your opponents are a collection of fighters who don't usually fight together, and half of them haven't put on a helmet in months.

But when you have a group full of active fighters who are motivated, it doesn't usually take long for one side to figure out how to counter.  If you bunch up and charge right, we're going to see that and should be able to get behind you pretty easily ("should" is the operative word).

Side note to this:  There was a point in time when I thought that a collection of fighters should be able to figure this out on the fly.  Over the years, I've been in situations where the best tactic really was to put them together in a block and point them at something, as the average fighter on the field just did not have the experience to move and adapt well on the fly.


Some Notes on 2v2

We did some 2v2s yesterday and discussed some of our tactics afterward.  I believe everyone realized that ultimately the 2v2s were going to break down into two 1v1s.  One of the teams said that when they fought, they focused on how they wanted to match their fighters up against their opponents to give them the best odds of winning one of the 1v1 fights quickly.

Another tactic that was pointed out to me was since I was fighting with a pole and like to thrust on the oblique a lot, one of my opponents made it his job to pull me away from his teammate so that I would not be within thrusting range.

There are lots of little nuances like this that are endless, which is part of what makes this game so fun.


Thank You

Special thanks to Myq and the Barony of Carilion for organizing and hosting us, to Sir Ryu for marshaling, providing feedback, and keeping the crowd engaged, and to Sir Galvin for leading and motivating the melee fighters throughout the day.  And, of course, to everyone else who keeps coming to these practices to make them happen.  Right now this is, IMO, the best game in town!


THL Bari of Anglesey
East Kingdom


Friday, September 17, 2021

Small Teams Melee Decisions.

Unfortunately I showed up late to the last Southern Army regional melee practice, but I got a little feedback regarding the small teams work that some of the fighters were doing and wanted to outline here the decisions that the fighters should be, in my opinion, making on the field.


Executive Summary (TLDR)


Below I include a lot of details and diagrams building up from a 1v1 to 3v4.  Each case has some nuances, but I think there are some general themes that carry through each one and it would be helpful to read through each example.

Having said that, I think I can summarize some general principles up front.


Best Decisions (each one is a unique tactic):

     -Surrounding the enemy with all fighters engaged
     -Sticking together and amassing the unit around one flank
     -Spreading out and finding opportunities for mismatch kills (shield charges spear, 2v1, etc.)
     -Denying one flank while attacking the other

Which tactical decision you make depends entirely on making an educated guess at what mistakes your opponents may make.  For example, running at a flank may be a bad decision if the opponent counters with an envelopment plan and can prevent the flanking maneuver.  On the other hand, spreading out and finding mismatches won't work if the opponent is better at finding mismatches than you are.


Worst Decisions

     -Turtling up and taking it
     -Fighters not staying engaged
     -Spreading out with no ability to stay engaged (a disorganized mess)


No Single Tactic is Best

There is more than one right way to do something, but there are even more wrong ways.  What this means is to not get bogged down with the idea that there is a single right way to do something, yet each tactic is going to depend on both the capabilities of your team, and a good estimation of what the opposing team will do.  Understanding this will help you pick a good tactic.

Part of the motivation of this post dates back to a regional melee practice in 2015.   We were being taught "the way for smaller teams to engage larger teams."  The method was for the smaller team to stick together and charge at a flank in order to get a numbers advantage on the flank of the larger team.

This worked very well, but only because the larger team was taught to "stick together."  

To be clear, this is a very effective tactic IF the opposing team sticks together and isn't very mobile.  It's actually even more effective if the opposing team doesn't stick together, yet still isn't very mobile, both scenarios being very common.


So on that day two tactics were taught.  The first was for the larger team to avoid the disorganized mess shown above, which is an important lesson to learn as a lot of fighters at these practices mostly fight singles and are prone to wander the field waiting for a single fighter to approach them.

The second was, as I said above, for a group of fighters to charge at a flank.

What I was initially doing that day was a little more dynamic than what they were working on, and something that I had been doing with a fair amount of success for about a decade.  When ever a team sticks together, there is a strictly defined finite space that an opponent will be.  Knowing that, I can position myself anywhere on the field that is not in their kill zone.  So the tactic I was using could be loosely described as an envelopment.  (note, I was fighting with a spear, so a spear is pictured below)


The downside to this tactic is the the spear can be run down on the flank (but not if the other team is forced to stick together).  In the second diagram, sometimes the shields get confused because they aren't used to a pear in front of them, or the spear can get run down if he doesn't know how to quickly get behind his shields when the charge comes.


Risk vs Reward

The risk of teaching any of these alternative tactics is that a team of low level fighters won't know what to do.  The simplest tactic to learn is "always do this."  The more complicated tactics are when decisions have to be made on the fly.  

The reward is facilitating learning, creating more advanced fighters, increasing the overall average experience of the fighters on your team, and at a minimum, understanding what your opponent is doing if they are applying these different tactics even if you've opted not to.

In my opinion, the fighters who show up to practice are motivated fighters.  These are your future leaders.  My suggestion is to help them learn as much as they can.


Best Way to Learn

 Fight a lot.  Give them the opportunity to make decisions on their own.  Certainly teach them tactics, but I much prefer that this happens after they've been given ample opportunity to figure them out on their own.  

This is certainly nothing I'd ever done as a basketball coach, but in those days I had the same 12 team members practicing 2 hours a day.  I really believe that the circumstances of our sport lends itself to different methods of learning how people fight and what they are capable of.  You never know who's going to be on the field on a given day, so a certain degree of flexibility and improvisation is going to be needed.


The Worst Tactic

Or at least one of the worst.  I see this a lot.  Please, please, please stop doing this:

Read through the scenarios below to figure out what better options are, but turning your backs to each other really puts you into a bad position, yet it is so common (often pictured in movies, in fact).


Specific Nuances of Each Scenario

Below I'll be covering in a little more detail the following scenarios:

1v1
2v1
1v2
2v2
3v2
2v3
3v3
4v3
3v4

This progression is intended to show you how we can take basic concepts from any small team matchup and build on them toward the next team matchup.


1v1 - Best to Avoid

More often than not, you should avoid a 1v1 fight in a melee.  All things being equal, you have a 50% chance of winning this fight, and I truly believe that everyone who's cares enough to show up to melee practices and/or read this blog has more potential than looking for 50/50 odds. 

There are exceptions to this rule when:  


-  You are MUCH better than the person you are fighting and can kill them quickly with little risk
-  You have a weapons mismatch:
         You have a shield and they have a spear or bow and you can easily run them down
         You have a spear or bow and they have a shield or pole and you can take low risk shots
-  Your options are getting much worse as the battle progresses (ie 50/50 might be the best odds you'll see in the scenario)

2v1 - Forty Fives

The general tactic for a 2v1 is for one fighter to break slightly left of the opponent, and the other to break slightly right.  The biggest mistakes I've seen in a 2v1 is either one of the fighters stepping in front of his teammate, or one of the fighters not engaging, but rather just watching the fight.


1v2 - Line Them Up

Only fight a 1v2 as a last resort.  You should normally be looking for numbers advantages, not fighting when you are at a disadvantage.  

If you find yourself in a 2v1, try to get one of your opponents in the way of his teammate.  It's normally better to move to your right, especially if you have a shield, as you're moving away from right handed attacks, and in a direction that your shield can protect you.  However, the better maneuver is to figure out which opponent has the worse field awareness, and try to either get him in the way of his teammate, or move away from him hoping that he'll disengage from the fight.


2v2 - Forty Fives

Hopefully by now you're recognizing a pattern.  Surrounding your enemy is good.  Getting surrounded is bad.  This is especially important with a 2v2 as both opponents become a target once they're surrounded.  

This is also the most common problem I see with a 2v2.  So many lower level melee fighters are taught to "stick together" that they immediately put themselves into a very bad position when fighting a 2v2.  While sticking together is great to avoid the "Drag Out a 1v1" shown above, it's not always the most effective tactic.  Breaking off into two 1v1s is better than getting surrounded.


3v2 - Keep Them Surrounded

Same as above.  When you have more people, you normally want to surround your enemy if you can.  Once the units start to get bigger, the keys are to make sure that you avoid 1v1 fights and take advantage of 2v1 opportunities.  Don't let your opponent get around either flank, and make sure that all of your fighters are engaged.


2v3 - Hit a Flank, or Spread Out & Find the Mismatches

In the 1v2 fight, you had two choices;  move to attack one flank and hope that you can get one of the opponents in the way of the other opponent, or that the other opponent would be slow to stay engaged.  The other choice was to try to draw out one one of the opponents into a 1v1 fight while, again, the other would be slow to stay engaged.  

In many of these smaller team versus larger team fights, you have the choice between sticking together and moving at one flank, or spreading out and trying to find mismatches and fights with better odds.  The better tactic is often going to depend on what you think your opponent is going to do.  

To visualize this, look at the diagram above and imagine yourself fighting on the red team.  Here your goal is to try to get the green team to use a bad tactics.  Can you surround them because they are focussing on sticking together without moving?  Can you get around one of their flanks?  Can you draw out a 1v1 while stalling for time in your 1v2?  Or on your 1v2 side, can you employ the 1v2 tactics shown higher in this post?  (line them up, or drag out a 1v1).


3v3 - Hit a Flank, Spread Out & Find the Mismatches, Envelop

As the numbers get bigger and bigger on each side, weapons styles, unit type, etc. become more and more important when determining what tactics to use.  Who has the spears?  Where's the archers?  Are you big and strong, or small and fast?  Do you have a mix of uber veterans and newbs, or all mid level fighters?

Nevertheless, better tactics tend to be to either move quickly as a unit to one flank, spread out and see if you can find some mismatches to take advantage of (your shield versus their spear?  Your veteran versus their newb?  Two of you versus one of them?), or to envelop the other side if they turtle up and take it.

The worst thing you can do is to turtle up and take it, which unfortunately one of the most common tactics used.


Here's an example of an actual 3v3 that I fought once.  Both teams had two shields and a spear.  The opposing team did exactly what you'd see in a movie, and what is often used in the SCA.  They formed a tight little shield wall in the front and put their spear behind it.  Our team surrounded them and picked them off fairly easily (this ALWAYS happens).  Eventually in the following battles, their team spread out to match our team, and both teams began using the "spread out and find the mismatches" tactic.


4v3 - Keep them Surrounded

Tactically this isn't much different than a 3v2.  Again, keep in mind that the larger these fights get, the more other factors come into play.  One of the big things I've been addressing lately is the idea that most small engagements come down to quick decision making regarding which side has the range advantage.  I've not really been addressing that in these examples, other than to point out clear mismatches.

Look at the 3v2 diagrams and employ all of the same principles.  Try to keep them surrounded.  Don't let anyone get around your flank.  Make sure all fighters stay engaged in the fight.  If things get spread out, look for the mismatches (shield vs spear.  2v1.  Veteran vs newb.  etc.).

3v4 - Denying a Flank as an Option

Once you've reached this size I believe the smaller team now has the numbers to deal with both flanks.  The same options as before are still available:

- Surround the enemy if it looks like they are going to stand in a tight group without moving
- Spread out and find mismatches if you see opportunities
- Go hard at one flank if it looks like they'll let you get around it without staying engaged on the opposite flank

Additionally you can peal off smaller numbers of fighters (in this case, a single fighter) to attempt to deny to opposite flank from enveloping your fighters.


Note, in this case the loan denier's job is to prevent the flank from enveloping.  He or she does not need to fight a 2v1, but rather keep them from wanting to turn the corner and exposing their flanks to this loan fighter.  If they do, then go ahead and kill them (it happens way more often than you'd expect).


Final Thoughts

This covers most of what I wanted to cover.  One last thought to keep in mind is that it is generally better to form an arc than a bulge.  Be the team that is surrounding the fight, not the one that is being surrounded.  If you decided to spread out and find the mismatches, make sure you can see all of the other fighters on the field, and place their backs to the fighting.


Hope you enjoyed!  Have fun.  Fight safe.


Thursday, July 15, 2021

Southern Army Sunday - July 2021 - Small Teams Field Battles and Bridges

 Man, it's great to be back to doing melees!  The heat and humidity weren't bad, and considering we haven't had a spring season to get us in shape,  I think everyone had a great time.  Best guess was we had maybe 35 fighters in total.  I just want to run through some thoughts I had during and after the fights.

10v10 Field Battles

We started off being split into three teams.  Two teams fought while one team watched/rested.  I was put onto a team with a bunch of fighters that I'm not used to working with, which was a good experience to have.  Within our group I would say that we had three "uber veterans" between myself, Sir Galvin, and Morde (not a single non-gray hair between us) and a lot of the planning and leadership came through us.  

We were given very little time to plan (again, great experience).  Normally I fight with a spear, but each of the other two teams had two veteran spears to just our one spear, so I opted to fight with a pole arm.

Assessing the Range Advantage

Whenever two opposing sides meet, one needs to always asses the range advantage and then develop a quick tactic based off of which side has range weapon superiority.  If the other side has spears/archers and you don't, you NEED to charge (unless you are a small piece of a larger battle,  in which case you may retreat or stall).

For our team, we decided to concede the range advantage altogether and build a charging team (in other words, instead of fighting 1 spear vs 2, we went with 0 spears, giving us an extra close range weapon).  Our tactics for most fights were two take a 3-4 man shield wall, and run it hard to the right, while I sat wide on the left flank with a pole.

Controlling the Flanks

Always have a plan for controlling your flanks.  A collapsed flank often leads to a quick death to your team.  With our plan for a hard charge to the right, I saw two ways that we can control our flanks.  Provided that the charge was hard enough, our right flank would be protected simply by sending a mass of fighters to the right, either getting outside of their left flank, or by having numerical superiority on their left flank.  

The left is protected either by running away from their right flank, or by leaving a floater on our left for them to have to contend with.

My concern with the first option was that the other teams had aggressive mobile spears and poles with lots of melee experience, and I was afraid that they'd chew up our left flank as we ran to the right.  


This can be countered with option 2, which actually worked very well in at least one of the battles.  


In the final scenario, we were met with a team that controlled their flanks better than we did.  I honestly think we were outgunned, so I don't know if we could have won anyway, but we still made some mistakes that I'll touch on later.

Having said that, this team went with two knights, both solid, quick melee fighters with shields, and they covered each flank and attacked aggressively.  I believe Sir Sterling yelled, "Sir Klaus, I'll go left, you go right, and we'll meet in the middle!"

Klaus took me out of the fight, not by killing me, but simply by running up that flank and preventing me from attacking their right flank.  He then turned back into the fight before I could, and by that point they had secured victory.


Doing What You Do Best

There were a couple of scenarios where our team didn't do as well as we'd hoped, and in some cases it was attributed to coming up with a plan that the team (which was a collection of fighters with little experience working together) was not really prepared to handle.

In one example we faced a team with more shields than us and were expecting a charge.  I called for a kill pocket and explained that we needed a shield to cover each extreme flank by going really wide.  It didn't work well because the shields were not used to this tactic, I didn't explain it well, and it's unlikely that even if I had, that they would have been able to execute something that they were not used to.


Now I can sit here and explain what every person on our team did "wrong," but ultimately the failure was in coming up with a plan that the team was not collectively able to execute.  So the failure fell on me.


Revisiting the "lets meet in the middle" scenario above, after the fight Sir Galvin (a teammate) approached me and said, "I'm not really a middle of the shield wall kind of fighter.  I usually do much better if I'm out on a flank with a lot more flexibility."  Once I heard it, it made a lot of sense.  The whole day we were hurting ourselves by removing one of our talents with him in a position where he couldn't use all of his skills.  Maybe it would have been better for him to take one flank, and myself to take the other, much like the red team did in the "meet in the middle" scenario?  Could we have pulled off the kill pocket if I went far left and he went far right, and we told everyone else to fill in in between?

Another critical mistake was made in the "meet in the middle" scenario.  I planned a shield wall charge to the right.  Red then redeployed one of their knights, and their spears moved into a different position.  I then changed the plan to "charge left," and then called the charge after lay on.  The shield wall began the charge, but then froze in the confusion.  


In hindsight, I think we would have faired much better if we just stuck with the original plan and executed it to the best of our ability.

Sir Ryu showed us a technique that assists shield wall charges, which is to have a pole fighter stand behind the shield wall, hold the weapon horizontally, and place it across their backs.  The pole fighter can then gently steer the shield fighters by gently pushing one side or the other forward.  When the charge is called, a little more pressure can be applied to get the wall to charge together.

 I've seen him do this before, and it is a very effective technique.  Are there any problems with it?  Well, he's very much a "middle of the unit, behind the shields" kind of fighter, where I'm more of a flanker.  So this goes back to taking a talent out of position to perform a different task.  

I'm not sure what the best answer would have been, other than to have done something other than what we did.  Go with two veteran flankers?  Stick with a shield wall charge to the right?  Pull a flanker out and have him guide the charge from behind?

Effective Reforms

Reforms are important, but they must be done effectively.  Reforms can also, in some cases, hurt your team.

There was an instance where I felt like I was facing a 1v4.  Usually this spells doom for the team that I'm on, because if I'm facing 4 fighters, that means that they're probably up on numbers at this point.  I looked around and saw a bunch of my teammates disorganized and not really engaged with anyone, so I called a reform.  "Yellow team, reform!  Yellow team, reform!"  As it turned out, the opponents were also in the middle of reforming.  Once reforms were complete, we had the bigger team.

Under normal circumstances, I think the opponent should have taken advantage of a small localized numerical superiority rather than call a reform.

Looking at the picture below, the green  team needs to call a reform.  The red team, on the other hand, has a clear advantage on its left flank, and should take out the green team in several 3v1 fights before the reform is called.


This is also true when there is a range weapon mismatch. 


In the above case, again, red should not call a reform but, instead, take out the spears before they get support.

Caveat:  We discussed this after the battle and realized that the reform was called because one of the shields had lost an arm.  Additionally, I was their target and even though I couldn't beat the three of them, I'm fast on my feet and the fight would have likely tired all three fighters out.  It may have also tired myself out, but that's one tired fighter on our team in exchange for three tired fighters on their team.


Bridge Battles

I don't have much to say about these, other than that they were fun, which is the most important piece.  The other team had Vlad Iliescu commanding, and he did a fantastic job.  There were a few instances where we thought he should have called a charge, but he didn't because he wanted to give our team a chance to fight.  Sometimes this happens in a practice, or a war where winning isn't nearly as important as making sure everyone is having fun.  They had easily pushed us off of the back of our bridge, effectively establishing that they were the better team.  There was no need to fight us at our rez point, demoralizing us, and maybe making people want to quit fighting for the day.

Likewise, in another bridge battle, we had an archer on our team while they did not.  The best strategy is to form a kill pocket at the end of our bridge and shoot at them.  They might, however, respond by standing off the back edge of their bridge and waiting until the archer runs out of ammo.  We counter by not firing any arrows until they come closer.

Everyone loses due to boredom.

As a general rule, I like to meet in the middle and fight it out instead of capping the bridge.  Which ever team gets pushed back to their side of the bridge is the effective "loser."  They can save face by trying to neutralize their opponent by pulling them into a kill pocket at the end of the bridge, only after they've lost the battle for the middle.   Everyone gets to fight.  Everyone gets better.  It's a win win provided that the commanders know how to utilize the best tactics when it's important.

Again, it's not the best tactic for winning the battle, but it's a more fun way to fight for everyone involved.  I've been in battles where both sides decide to cap their end of the bridge and refuse to engage hoping that the opponent will give in and walk across the bridge and into the kill pocket.  We stood their for an eternity, and everyone hated it.

Thoughts for Alternate Bridge Battle Rules in Practice

I find that training for bigger bridge battles with small numbers to be a bit of a challenge as a small bridge (meaning 10-15 people on a side) and a large bridge (50-150 people on a side) are very different battles.  In my opinion, one of the main keys to winning the large bridge battles is organization.  Mainly this revolves around the balance between spear fighting on the front line,  charging and counter charging with your shields, and the transition between the two.  That's very hard to replicate with small numbers.

We often try to do this by throwing in 3 lives per fighter, hoping that a 15v15 might feel more like a 45v45.  What ends up happening is that it feels more like a longer lasting version of an 8v8 because of the constant flow of fighters to and from the resurrection point.

I'm wondering if maybe this could improved by calling periodic short holds, just enough to allow the dead fighters to return to the front so that the numbers can be bolstered back up to 15v15.  I might be completely wrong on this.  This might be a terrible idea because, as we know, everyone hates a hold.

I also think it would be beneficial for dead fighters to actually fall dead in the middle of the bridge so that we can practice fighting over them.  But who wants to do that in 90 degree heat during practice?

Final Thoughts on What We Hope to Accomplish

I've said this a couple of times already.  We aren't going to effectively train 100 fighters in a region when 25 show up to practice. but what we can do is train commanders, sergeants, mini-sergeants, future commanders, etc.  as well as increasing the density of effective fighters within the region.

In other words, instead of a goal of making everyone able to follow incredibly simple commands, like walking in a line while sticking together (not that there's anything wrong with it) I think we should help make the people who show up to practice into the best fighters and leaders that they are capable of being, and then give those who don't show up to practice good role models to follow on the field at war.  

I think this is the direction that we've been going in and I like it.