Wednesday, March 23, 2016

Gulf Wars 25 - Lessons Learned

Hey all,

I just got back from Gulf Wars and had several learning moments I wanted to share.  All were related to fighting with a spear, but I think are good concepts to think about regardless of the weapon type.


Pacing During a Resurrection Battle

My fitness was higher this year than its been in a long time.  I was working out ~10 hours a week for the two months leading up to Gulf Wars, including a large amount of cardio.  I still got exhausted during the town battle on Tuesday.  Why?  Because no matter how good my fitness is, I can always push the red line for too long.  Its not a fitness issue, but rather a pacing issue.

After wearing myself out in the first 45 minutes, I had a brief conversation with Atlantian Crown Prince Sir Dietrich.  His recommendation was to treat it like an interval workout.  Go hard for 10-20 seconds, and then stand and recover for 1-2 minutes.  By doing this, I can still be aggressive, get lots of kills, and keep the enemy in check while still lasting the entire battle.  Taking this approach, I performed much better in the second half of the battle.


Avoiding Archers - Never Light 3 Cigarettes with One Match

Some people refer to this as Archer Wars.  Archers are absolutely everywhere!  My previous approach to archery was simply to go to the front and try to get as many kills as possible before getting shot.  Historically I'd get about 2 kills before getting shot when there is this level of archery on the field.  

This time I took a different approach which seemed to be much more successful.  There's an old superstition believed to have come from World War One;  never light 3 cigarettes with one match.  The first lit cigarette grabs the sniper's attention.  The second allows him to take aim, and the third gets shot.  Likewise, if you stand in the front and take too many shots with your spear, its not long before the archers spot you, take aim, and fire.

In this year's ravine battle, I made sure that I never spent too much time in the front line.  I'd sit back well behind the front rank and rest on my knees, watching the battle.  If I saw an opportunity for some action, I'd low walk up to the front line and take a handful of shots with my spear.  I never fired more than 3-5 times, killing 1-3 fighters, before I'd head back behind the ranks and take a knee again.

I probably had about the highest kill ration I'd ever had before in a battle with a lot of combat archery.


Finding Effective Positions in the Line Based on the way the Battle Plays Out

The job of a good spearman is not simply to get kills, or to stand there and wait for opportunities to present themselves.  A good spearman always needs to read the battlefield and determine the best way he or she can effect the battle.  The following is an example of what I did during the second field battle in an attempt to make myself as effective as I could:

I began the battle supporting Atlantia on the far right flank.  As Atlantia engaged, they began to push and roll the flank.  As this occurred, I sat in the second rank and looked for opportunities to open up in the gaps between the shields.  At one point, however, the flank started to fold so fast that I found that my help really wasn't necessary anymore.  I looked to my left and noticed a big kill pocket forming, so I moved over into the kill pocket in order to help whittle down the part of the line that had not yet collapsed.


As the battle progressed, however, the opponents sent in reinforcements to attempt to take back the right flank.  Recognizing that they likely had the numbers to now roll our flank back onto us, I repositioned myself again, this time back to the flank in order to help reinforce our flank against the new threat.

The bottom line really is simply to always be thinking about ways to position yourself to have to most positive impact on the battle.


Wednesday, March 2, 2016

Press or Deny? Engage or stall? 3 on 2 fighting.

To quote Sir Thorson (who was quoting someone else), "don't fight if you can't win."  I can also quote Anglesey Kensman Arundoor, "Never fight a fair fight."

This concept is, I think, one of the hardest to get across for individuals within a melee scenario.  Aggressiveness is a good thing, but you need to be smart about it.  "Float like a butterfly, sting like a bee," is something I've been saying a lot, lately.  Floating like a butterfly is another way of me saying that sometimes you need to stall the engagement.

I can explain below with the 3 on 2 fight as an example.


How to Engage when Outnumbered

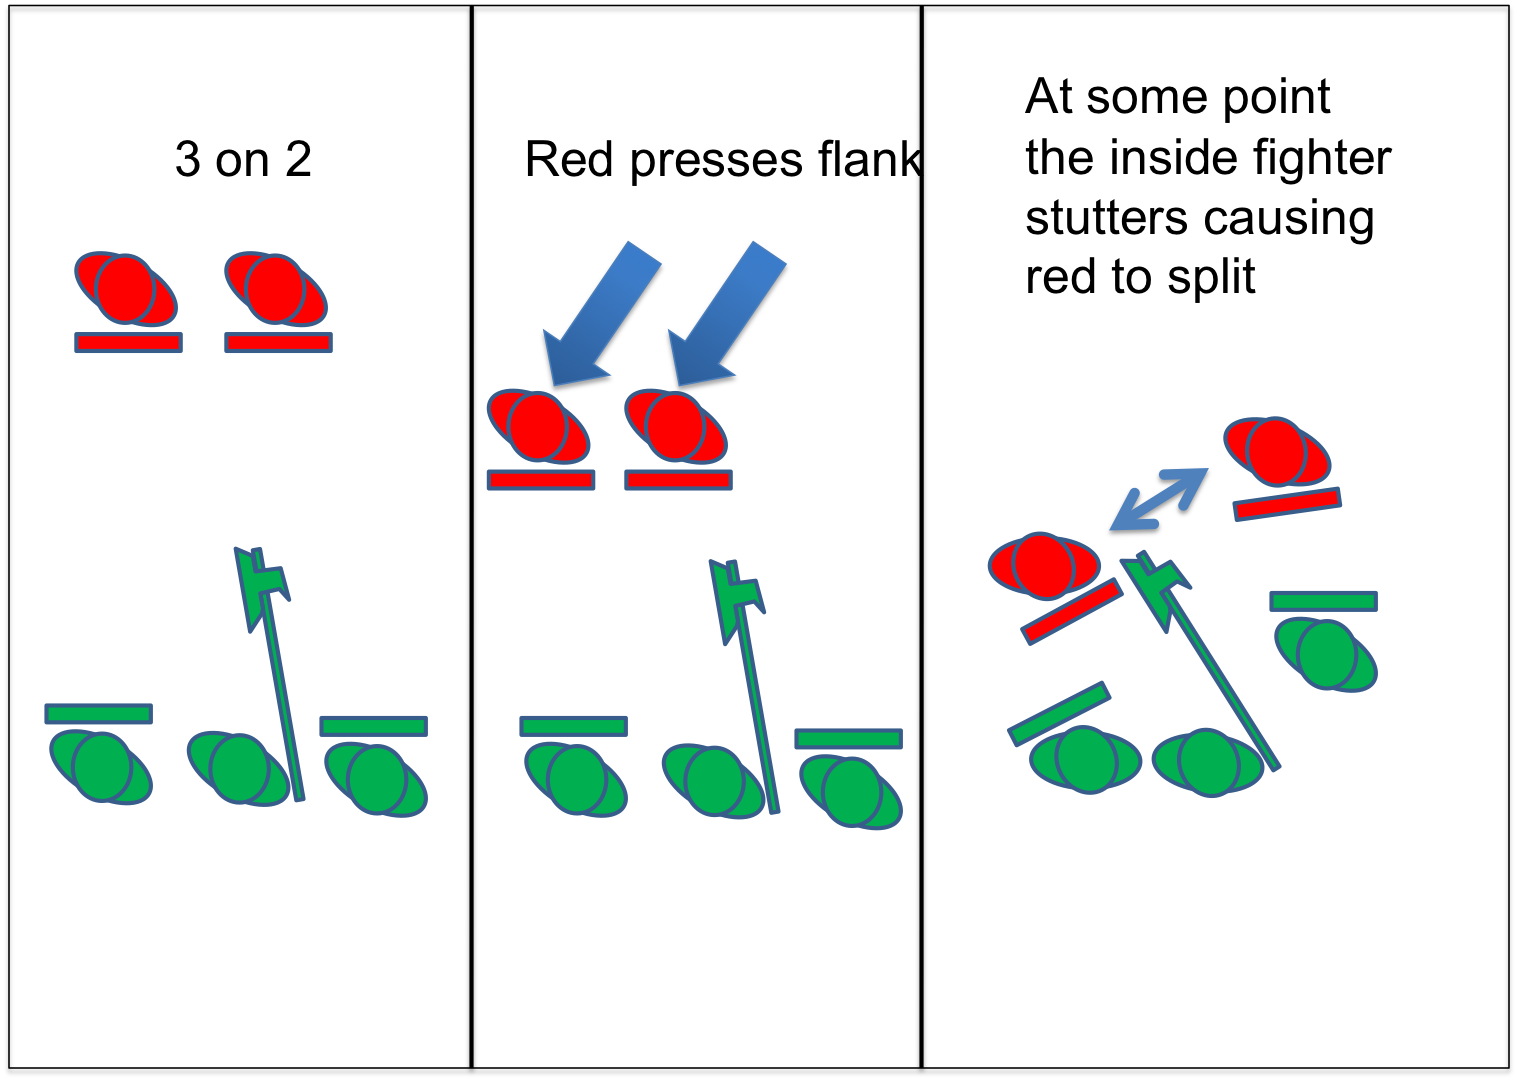
We did several 3 on 2 engagements last Sunday.  One of the things we've been working on at the Southern Army practice is how to engage when you are outnumbered.  In short, you press the attack to one side.

I'd like to add a few more levels to this.  In my opinion, the first thing you do is you asses which side has the range weapon superiority.  If you have a spear, and they don't, then you actually don't want to press at all, but rather, lull them into a static fight, if possible.

The other option is not to engage at all.  If the odds are against you, it is often in your side's best interest to have a small number of fighters stall the engagement of a larger number of fighters.

Having said that, it is certainly worthwhile to practice taking a smaller unit and pressing the flank of a larger unit.  For example, maybe your small unit has all of your best fighters, and the larger unit isn't very good.  In this case, you'd want to quickly win the engagement so that your best fighters can move on to other parts of the fight.  Its also possible that you might be the last fighters left on the field, or maybe all of your units are outnumbered and you have no choice but to try to take a gamble in hopes to regain the numbers advantage.

More importantly than anything, practicing these engagements teaches tactical thinking and working as a unit.


3 on 2

The 3 on 2 is an interesting combination, and one that I've been putting a lot more thought into recently.  I've noticed that this, more often than not, turns into a 2 on 1 and a 1 on 1.  I've been on 3 man teams where its been done by design, but even if not planned, they almost always seem to break down into this configuration.


Now the question is, once we end up in this almost inevitable situation, what should both sides do.  In this example, lets assume that all fighters are of equal abilities.  Provided that all 5 fighters are relatively competent in melee fighting, the green pair against the single red fighter has a significant advantage while the singles facing each other have even odds of winning their engagement.

Green's best strategy:  The pair should engage with the intent to win quickly, while the single green fighter should try to stall until his two teammates win and can come to his aid.

Red's best strategy:  The fighter with a single opponent should press to win the engagement quickly.  Even though the odds are even, and this would violate Arundoor's "never fight a fair fight" rule, it is the best chance of success for red.  The red fighter facing the pair should, of course, stall the engagement.


Example from Sunday

A handful of times I faced off against Adam Greatsword on the flank in a 3 on 2 situation in which I was on the team with 3.  I stalled the engagement, and he pressed.  Since I was fighting with a 7.5' polearm, and he was fighting with a 4.5' greatsword, once he was inside on me, the odds of me winning the engagement dropped to well below 50%.  What did I do?  I went into full defense and tied him up since that was my greatest chance of surviving and prolonging the fight.

Had we switched teams, I would have had no choice but to change my tactics.  I would have thrusted more aggressively from the outside, and if he closed on me, I would have been left no choice but to fight.  Though the odds would have been against me, they would still have been greater than for my teammate who'd have been fighting 2 opponents.


Failed Attempt at a 3 on 1

To mix things up, Sir Thorson suggested that our team of 3 try to gang up on a single fighter in a 3 on 2 engagement.  We pressed hard to the right.  I was on our far left, so it was my job to deny the fighter on their left.  I failed my job and exposed my back to Wulf as I attempted to join the others in an attack on Magnus.  Magnus did his job of stalling the engagement by circling back behind Wulf, allowing Wulf to get a second kill as the pair moved past him.

I think its for this reason that these often break into a 2 on 1 and a 1 on 1.  You simply can't leave an opponent unthreatened


Final Thoughts

A lot of this is very dependent on the space in which you are fighting.  Sunday was on an open field, while Tuesday was in a much more confined space, so there was little room to really stall any engagements since there was nowhere to disengage to.


Tuesday, March 1, 2016

Philadelphia Regional Practice - A Few Thoughts on Small Tactics Melees

We had a great practice with 17 fighters showing up, plus some youth fighters.  We did several rounds of singles, and then did a few rounds of melees.


5 on 5

The melees were 5 on 5 in a relatively confined space.  One side had 2 shields and 3 polearms while the other side had 4 shields and 1 polearm.  We decided not to use spears because of the tight space.  We also didn't balance the sides because we wanted to see how the tactics would pan out.

The biggest difference between the two sides, tactically, was that the side that was pole heavy went with a traditional shield wall, while the side that was shield heavy set up one rank deep, and spread wider.  This is actually kind of unusual because normally you'd want the tactics to be reversed with this set up.

The other piece that was interesting was that the side with only two shields always initiated the charge.  It was actually relatively successful at first because they were able to penetrate and get into our backfield, and with the small space they were able to pin us against the walls.  Having said that, I am generally a fan of the idea of letting the range weapons work when you have a range advantage.


Leading with the Range Weapon

I am a big fan of this tactic, and we employed it on the very last 5 on 5 engagement.  This accomplishes two things.  First, it allows the range weapon to get at least one free shot on its opponent before engagement, but it also baits in the charge.  In other words, the charge has to start out away from the shield wall far enough that it gives you time to read where the point of impact will be and to make adjustments.

This last engagement was our most successful one, allowing us to ultimately surround and kill the other side.  I believe we were left with 3-4 alive after the engagement.


The counter tactic that was discussed was for red to present 3 poles forward to counter the one green pole (me).  We then said that in this game of rock, paper, scissors, green would have to respond with a charge.

In my opinion, whenever playing these tactical games, you have to set up the best tactic given your circumstances, and then be aware of what the obvious counter is for that tactics and be prepared for it.

Anglesey (the mercenary group that I'm the warlord of) and the Bog Troopers (our alliance with Galatia and The Concusare) would typically have spread wide with the shields protecting the flanks if we were the red team.  The obvious counter to that would be for green to charge.  Red would then have to pinch hard on the flanks, and the poles would have to give in the middle.

Ultimately the tactic that is the best is the one that the players on the field can pull off successfully.  There is never a single tactic that beats all other tactics.  The reason why green was effective in the above scenario was largely due to the level of fighters present on green's team, and the ability to follow through on the plan.


3 on 3

We did several 3 on 3s at the end of the night.  Again, I lead with the pole out in front on our team.


I think this is a great example of employing tactics that work to the strengths of the members on your team.  I have a good range game/thrust and am mobile, so I work well in the front.  Red really only has two choices.  Their pole (Colin) can come out and meet me, and make this a static fight, or he can stay in the back.  If he's in the back, then red has to charge.  Because I'm more experienced with the pole at range, the odds are not in favor for Colin to meet me out front.  Also, the red team had Sterling, who was the best shieldman of the 6 of us, so it was to red's advantage to charge and engage in close range.

If I remember correctly, the results were fairly even in these fights.  With regard to the green team fighting with the pole out in front, in ~25-30% of the engagements, I scored a kill before red was able to charge.


Charging through the Spears

Sir Thorson showed us a tactic to charging through your own spear line.  Too often when charges get organized, the play is given away to the opposition by making it painfully obvious that the charge is coming.  I can't remember the last time I was ever killed in a charge as I generally knew it was coming 10 seconds before it happens.

In this tactic, the shields stay in the second rank and find the gaps between the spears.  As the press through, they lead with their shield sideways, and stick the inside of the shield right in the face of the spear in front, and to the right of them.  As a shieldman in these drills, it was instantly clear to me that the guy behind me was coming through the line as soon as I saw that shield.

The charge finishes up with the poles following the shields to fill the second rank, and then the spears fill in the third rank.

What we didn't discuss was how the charge is supposed to end.  Push until you die?  Retreat and let spears come to the front? At what point?  Etc.

More to discuss on this later.


Hope you enjoyed reading!


Sunday, February 28, 2016

Caer Adamant Fighter Practice - Working Together


Excellent practice today.  We had a total of 13 fighters on this fine 60 degrees and sunny afternoon.  After doing some warmups and some singles fighting we got together for some melees.  In general, everyone did well and I thought the practice was very effective and enjoyable for all.

Having said that, as usual, I'd like to focus on a couple areas where improvements can be made.


Spear Superiority vs Spear Inferiority

We had several 5 on 5 (give or take) melees in which one side had significantly more spears than the other.  In this situation, there is a very clear strategy for each side.  The side with the spears wants a static battle, so they should wait for the other side to come and fight them, hoping that their opponents will be ineffective in the press.  The side without the spears needs to press, usually at the point where the spears are located.

I was normally on the side without the spears.  We did a decent job of pressing, but it probably could have been better.  There really needs to be full commitment to the attack, knowing that once inside, the fight is going to be 5 on 3, with the spears being taken out.


Spears on the Flank (bad)

I saw this happening a few times, and this is almost always a bad position to be in.  The blame lies on every individual in the unit.  The spears should know that they should not be out on the flanks, yet there should also be at least one person in the unit to say something to the spears when they see this happen.  Here's one example of why this is a bad idea:


In this instance, it really wasn't too difficult for the pole to get two quick kills.  Had there been a shield facing the two spears, it would have been even more effective for the green team.


2 on 1:  Match the Foot Speed of your Partner

Part of why we practice is getting used to how our friends fight.  One thing I noticed today is something that I've noticed in just about every pair of fighters that does the 2 on 1 drill for the first time in their life.  Both fighters in the pair just rush in as fast as they can with little concern for what their partner is doing aside from maybe understanding that one will be attacking on the left while the other attacks on the right.

We had too many fighters standing in line and waiting their turn to really address it as it happened, which is something I hope we can do in the future.  In the past, I've actually stood in place and not moved at all just to see what my partner does.  Clearly I'm doing the wrong thing in that scenario, but if my partner leaves my side, well, that is wrong as well.


The whole point of the 2 on 1 scenario is to be able to engage the single fighter as a pair.  What the single fighter wants is to be able to fight each fighter in the pair one at a time.  Sprinting into the fight faster than your partner only allows the 1 on 1 to take place.


2 on 1:  Forming the V just before Contact

The last point I want to talk about is is something that Sir Thorson brought up, and that is at what point does the pair form the V to attack on the 45s.  Many fighters will form the V too soon, which is actually not really a V at all.  Its two single fighters hoping to engage their opponent at the same time.  The problem here is that it allows their opponent to move toward one side or the other and, again, creating the 1 on 1 that he wants.


Anyway, I think we accomplished a lot today, but I also see a lot of potential for accomplishing so much more in the future.  It really was exciting to see everyone work so well together, learn, fight, and have a good time.  I certainly get at least as much out of these practices as everyone else does.  Thanks to all of those involved!


Monday, February 22, 2016

Fifty Spear Tips Video Tutorial


Check out the spear tutorial video here.


1)  Stance:  stand completely sideways to your closest spear threat.  It creates the smallest profile to hit.  Opening up just 20 degrees opens up a kill pocket in the arm pit.

2)  Stance:  Keep the knees  at least slightly bent.  Find the sweet spot where you can fire your spear as quickly as possible. 

3)  Fire from the hip:  half of the power and speed comes from pushing the hip that is furthest away from the target toward the target.

4)  Avoid lunging:  taking a big step forward with the front foot is slow and telegraphing.  It gives the opponent time to see that the shot is coming, and it gives other opposing spearmen the chance to counter attack.   The return to a defensive position is also very slow.  Learn how to safely get within your opponent’s range so that minimal forward movement is needed.  A small step forward is ideal in order to move into range, but keep this movement as small as possible while still being able to hit your target.  Sometimes a bigger lunge may be appropriate, but be aware of your vulnerability when doing this.


5)  Use the full range of your weapon.  Fight at a range such that you can step in, hit your target while fully extended, and step right back out of range.  Don’t get caught dancing inside too much.

6)  Move your arm, hips, and legs at the same time.  The shot will get to its target in half the amount of time with twice the power than if your arm follows after the hip has rotated.

7)  Fire a spear with one hand:  Removing the “guide” hand off the spear allows you to rotate the body quicker and to extend 6-8” further.   Don’t worry if your spear tip hits the ground after your shot.   Step back just out of range and recover.

8)  Recoil to a defensive position as quickly as possible.  Once your shot is fired, you are exposed (assuming that another spearman is within range).  Get out of range as quickly as possible.

9)  BE THERE!  A spearman who stands a foot behind his fellow spearman might as well not be there at all.  Simply being a threat by being in range of your opponents protects your line.

10)  Fight from the front:  Get out in front of your line and use your spear.  If your opponents charge you, retreat behind your line before they get to you.

11)  Trade shifts with other spearmen.  If you are on the front line, you should be working for a kill and keeping 100% focus.  When you are tired and need a break, step back and let another spear take your spot.  Don’t hog the front line, its bad for you and for your side.

12)  See the whole line in front of you.  Don’t get tunnel vision.  Your potential targets and potential threats to you are not always only the guy right in front of you.

13)  Take good spots on the front line, not just available spots.  This means you will need to figure out how to communicate with random fighters and convince them to move so that you can take a good spot.

14)  Two spears spread apart with a gap in between them are better than two spears next to each other.  This places the two attacks at wider angles on the opponents making it more difficult for them to defend. 

15)  Don’t crowd the front line.  Too many spears crowded together can’t move to attack or to defend.

16)  Sometimes its best to find a spot where no spears can kill you so that you can get lots of free shots on poles and shields.  When in this situation, kill them as quickly as you can.

17)  Sometimes  its best to be in a position against lots of spears.  You might be the only thing keeping these spears from killing your line.  In this situation, be very careful.  Even a great spearman will have a difficult time fighting 2-3 opposing spearmen by himself.

18)  Often simply looking intimidating will keep people from attacking.   A line that is ready to press can be stopped by simply stepping forward with confidence and getting in to a very aggressive stance.  Most fighters are actually very afraid of a good spearman.

19)  Deflect an incoming spear with minimal movement.  It usually only takes a slight movement with your shaft to deflect their shot out of the way.

20)  When facing a spearman, you can control where his spear is pointing by pushing it slightly out of the way with your spear.  In general, try to keep your spear pointed at his body while keeping his spear pointed away from your body. 

21)  If he tries to over power your spear, you can disengage by dropping your spear tip just below his shaft which causes him to swing past the position he was fighting for, and you can re-engage on the other side of his shaft with your tip, again, pointed at his body and his tip pointed away from yours.

22)  Draw and counter:  sometimes you can allow him to have the straight  line pointed at your body hoping to get him to shoot at what he thinks is an open target.  When he does, deflect his spear off target so that he misses, and then fire your spear at him immediately after.

23)  Disengage and fire.  While pointing your tip at one side of the body, if he tries to push your spear away from that target, disengage by dropping your spear tip beneath his shaft, and immediately fire to the other side of his body as his spear moves out of the way.

24)  Disengage and disengage and fire.  This is the same as the previous maneuver, except after the first disengagement, you anticipate him to swing his shaft back to knock your spear  back off of line.  When he attempts that, simply move the spear below his shaft again to move it back to the side that you started on and immediately fire.  Both of these maneuvers should be done very quickly.

25)  Feints:  Pretend to fire a spear shot to one side, then immediately fire somewhere else.  A slight head fake and a slight foot stomp can help.  The previous two maneuvers can be done as feints instead of engaging with his shaft.

26)  Try to shoot around the opponent’s spear shaft. Most shots need only to be straight, but some shots can go around the shaft.

27)  Shooting around from the inside:  if your right hand is back, step out  and to the left with your front foot as you fire your spear (step out to the right if your left hand is back).  Move the hand holding the back of the spear across your body, and rotate your back hand so that your elbow is facing the ground when finishing the shot.  This will give you the greatest angle of attack to get around your opponent’s shaft.

28)  Shooting around from the outside.   When you fire, move your back hand in a direction that swings out and away from your body to get the tip to move up and over the opponents’ shaft.  Beginning with the spear tip a little higher will help move it around the shaft.  As the back hand moves up, the tip will drop onto its target.  When fully extended, the elbow should point out or even up toward the sky.

29)  If you anticipate having your spear deflected in one direction, aim to hit a spot that far to the other side of your target.  For example, if you think he will deflect your shot 8” to the right, then aim 8” to the left.

30)  Watch their eyes.  If your opponent looks away from you, hit him!  (or hit the guy next to him).

31)  Pump and shoot:  This is effective against shields in a static line when you are not threatened by other spears.  Shoot for the face but pull the shot right before it hits your opponent.  He will raise his shield to block.  Hold the spear tip a foot from his face.  When he drops his shield to look, finish the shot.  Because you are only a foot from his face, he will have no time to react once he drops his shield.

32)  If you can, sneak attack good spearmen from the side.  Instead of taking them straight on, try to attack them from a few spots down the line.  They will be less likely to notice you, and their spear will not be in a good position to defend.

33)  Protect your friends.  If the spearman across from you is killing the people to the left and right of you, then you are not doing your job.

34)  Slap me low – too slow.  Ever play the game “Give me five, slap me high, slap me low…too slow?”  Eventually you learn that in order to slap the hand that is low before they pull it away, you have to be quick and sneaky.  This is how you should approach fighting with a spear.  Be quick and sneaky.  Try to hit your opponent quickly and when he doesn’t expect it.  

35)  After firing a spear and hitting your target, sweep the hand left holding the spear  up in front of the face as you recoil for defense.  This will knock incoming spears out of the way.

36)  Target practice often. Hit something that has a little give in it (not a thick tree.  Not a brick wall) but not too much give (not a tennis ball on a string).  A tire swing, weighted pell, or thick vine hanging from a tree all work.  Also, a cardboard box stuffed with cardboard will work provided that the surface is reinforced (a plastic tote lid works).  Place dots on your target for you to aim at.

37)  Practice against your target as if you are really fighting.   Pretend you have an opponent in front of you, and that you need to be quick and sneaky to hit him, and when you do, you need to get out of the way before getting hit.   If you can do this is in practice, you can do it for real.  If you don’t practice in this manner, you will develop bad habits.

38)  Sometimes look at an object away from your practice target, and then turn your head to spot your mark and hit it has quickly as possible.

39)  Sometimes aim for one mark on your target, but hit a different mark as quickly as possible.  Don’t forget to recoil for defense as soon as you do.

40)  Sometimes hit multiple targets in rapid succession as quickly as you can.

41)  Practice recoiling from the target while sweeping the hand holding the spear in front of the face for defensive purposes.

42)  Practice against other spearmen at fighter practice.  Spear dueling, 1 on 2, 2 on 2, 5 on 5, etc. are all good practices.

43)  3 on 3 counter attack practice:  3 spears face 3 spears on a “bridge.”  The spears on the ends can only attack each other.  The spears in the middle can only attack the spears on the ends when those spears are in the process of firing a shot.  This drill is intended to teach the spears in the middle to look for counter attack opportunities on people not directly in front of them and it is to teach the spears on the ends how to be quick and sneaky when multiple spears are watching them.

44)  Practice fighting another spear over a line that can’t be crossed by either spear.  Without this, spear duels often devolve into running each other down and choking up.  That’s a fine technique to win an actual one on one spear matchup, but it occurs less than 1% of the time in actual combat.  Using a line that can’t be crossed teaches the spears how to make those attacks at range, which is more practical.

45) Be aggressive in battles that don’t last long.  Especially with archery so prevalent these days, a spearman may only last a few minutes in the front rank of a battle.  Make those minutes count and get lots of kills!

46)  Pace yourself in long resurrection battles.  If the battle is won in the last five minutes, make sure you have enough left over to be able to hold your ground and get kills in those 5 minutes.

47)  Stay off the extreme flank.  It is very difficult for a spear to defend himself against a charging shield man.  A spear should never (almost never) be at the end of a line unless there is a terrain feature to protect him. 

48)  Use your spear to control the shape of the lines.  You almost always want to be surrounding your enemy by making your lines concave and their lines convex.  When they turn their backs to each other and bulge out in the center, you can get more spears on them in better attack angles.  Be like a sheep dog with that spear.  Make them move to where you want them to be to kill them.

49)  Follow your shields when they charge.  Look for gaps to open up, and dead people to start to create obstacles to fight over.  


50)  If someone charges you, use your shaft and press it against their body to guide them away from you.  A cross check is fine if you are big enough to knock them over, but it doesn’t really take much leverage just to push one man charging into another.

Sunday, February 21, 2016

Blow by Blow Analysis of the Best Spear Duel I've Ever Been In


Spear Duels against Sir Dietrich at Adult Swim:  Video found here.

To be fair, I had two other duels at Adult Swim that day that were just as good, but I got this one on video (also its against the Crown Prince of Atlantia and winner of the Known World Spear Tourney, which gives it a little credibility)  =)


Blow by Blow:  Sir Dietrich vs Barri of Anglesey (me)

Pass 1:  0:00 - 0:02  I attempted a quick "disengage and fire" maneuver coming under his spear and around to the inside.  He easily parried and countered with a straight shot to my face, sneaking it in just before I could block.  The key, IMO, was how quickly Sir Dietrich could transition from a block to a thrust.  I also think I made it too easy for him to read when I was going to shoot.

Result - Sir Dietrich scores counter attack kill to face


Pass 2:  0:06 - 0:18  This time I tried setting Sir Dietrich up with a lot of feints so that the delivery of my shot was less predictable.  I finished by shooting to the inside again, and again he parried.  This time his counter was much slower, I think due to my set up, and I was able to block it.

Result - No kills


Pass 3:  0:22 - 0:28  Sir Dietrich took the initiative with a direct attack to the outside.  He fumbled his spear on the recovery as he tried to grab it with his lead hand, which allowed my an easy counter to his chest.  I deflected kind of hard without losing control of my point, which helped causing him to lose control.  Had he gone for a one handed sweep block, instead, I believe he would have gotten the block.

Result - Barri scores counter attack kill to the chest


Pass 4:  0:38 - 0:42  Sir Dietrich feints left and attacks right.  I parried.

Result - No kills


Pass 5:  0:42 - 0:50  Same exact scenario as pass 1 with same result.  I disengaged and fired inside and Sir Dietrich parried and countered to my face.

Result - Sir Dietrich scores counter attack kill to face

Note:  Guppy stepped in for several passes before I came back in.  I cut the video and put them at the end.


Pass 6:  0:53 - 1:00  Same exact scenario as passes 1 and 5.

Result - Sir Dietrich scores counter attack kill to face


Pass 7:  1:03 - 1:12  Sir Dietrich makes a couple of feints, and then tries a quick direct attack to the right.  I parried hard (similar to pass 3) and counter to the chest.  Again, the block was missed because he was trying to recover the left hand.

Result - Barri scores counter attack kill to the chest


Pass 8:  1:18 - 1:19  This time I went for a direct attack to the outside before throwing any feints.  I've been told that my timing can be predictable, so I intentionally tried to get a shot in much sooner than normal and doing something different than the patterns I'd shown before.

Result - Barri scores direct kill to face


Pass 9:  1:23 - 1:37  This was our longest pass so far with both of us hoping to counter.  Lots of feints were thrown.  I eventually threw under and to the inside as Sir Dietrich was moving back.  He parried and countered, and then followed immediately with a second counter after only pulling his spear back part of the way (I call this pump and shoot).  I blocked both with one handed sweeping defenses.  I think the key to blocking his counters on this pass was getting him to move backward with aggressive feints.  Notice he slipped as he tried to change direction to counter.

Result - No kills


Pass 10:  1:40 - 1:47  I slipped a shot in on the inside as Sir Dietrich feinted high and to my outside.  On this particular shot I was intentionally trying to look like I wasn't ready to shoot (something that was inspired by watching Guppy fight earlier in the day).  The power on the shot was borderline, but Sir Dietrich was gracious enough to take it.

Result - Barri scores direct kill to chest


Pass 11:  1:52 - 1:55  This time Sir Dietrich changes up his timing and comes in quick and early.  He smacked my spear out of the way and went for my open hip.  I managed to get my gauntlet down in time to parry the attack and then countered twice.  Sir Dietrich went for the one handed sweeping defense and parried both shots.

Result - No kills


Pass 12:  1:58 - 2:07  After some jockeying for position, Sir Dietrich went for a quick shot at my face.  He hit the side of my helmet, instead.

Result - No kills


Pass 13:  2:10 - 2:13  This time I went for a quick disengage and fire inside.  I felt I landed a hard enough shot to the chest.  He countered and hit me in the chest, but not very solidly as I was moving back.  He was pretty generous with one of the early kills I had on him so I'll take his word that my shot didn't have enough power on it.  I tend not to follow through enough when I try to sneak a quick one in.

Result - No kills


Pass 14:  2:16 - 2:23  Sir Dietrich tried to sneak a quick shot to the inside at my lead shoulder.  I parried and countered to his chest, which he blocked with a one handed sweep.

Result - No kills


Pass 15:  2:26 - 2:29  He smacked my spear up.  I expected him to immediately shoot.  When he didn't, I fired for a quick shot at his chest.  He parried and counted to my face and then pumped at the face again.  I was able to block both with a one handed sweep.

Result - No kills


Pass 16:  2:33 - 2:36  This was a bit of luck on my part.  We both went for our moves at the same time.  He went for a high fake, just as I went for an attack that I just developed last week.  I essentially take a big step that's intended to either look like an attack to the right or a feint to the right, but actually circles under his spear in one motion as I finish on the left.  I intended to hit his right hip, but hit him in the cup instead.

Result - Barri scores kill to the cup


I think its fair to point out that though I got more kills than Sir Dietrich in this session, he would have beaten me in a best of 3 or best of 5 tourney as he was ahead on kills earlier.  Also, this is practice, and there's really no way to tell if he was tired, or working on new maneuvers. etc.  Plus I got a nice break while he and Guppy fought a few rounds.  As I said ,thought we had a good give and take session.


Blow by Blow:  Sir Dietrich vs Guppy of the O.L.B.

NOTE:  I found it interesting that not only do the three of us have different styles, but that Sir Dietrich's style appeared to change when fighting Guppy instead of me.  Some of that may be due to the fact that he had to change his strategy against a different style of fighter, but some may simply be a matter of fighting a lefty (me) versus a righty (Guppy).

Pass 1:  2:43 - 2:48  Sir Dietrich lands direct attack to Guppy's leading hip.

Result - Sir Dietrich scores leg wound


Pass 2:  2:52 - 2:57  Guppy lands direct attack on Sir Dietrich's upper chest / face.

Result - Guppy scores chest/face kill


Pass 3:  2:59 - 3:01  Sir Dietrich attempts a smack and shoot.  Guppy parries.

Result - No kills


Pass 4:  3:01 - 3:05  Both fighters are keeping their points high.  Guppy circles high and drops his tip on Sir Dietrich's face/head.  Sir Dietrich asks Guppy where he thought it landed and Guppy told him that it hit the face.  I'm not certain of the rules (I should know better) but it appears by looking at the video that about half of the spear tip in on the helmet, and half on the face grill.  Sir Dietrich took it as a kill.

Result - Guppy scores kill to face.


Pass 5:  3:09 - 3:12  Sir Dietrich goes for another smack and attack to the hip.  He landed the shot on the hip, but then dropped the spear.  Maybe he would have landed the kill if he'd had his own spear and had not lost the butt of it.

Result - No kills


Pass 6:  3:20 - 3:22  Sir Dietrich goes straight in for the face.

Result - Sir Dietrich scores kill to face.


Pass 7:  3:25 - 3:31  Guppy goes for direct attack to Sir Dietrich's left shoulder and glances off.  Sir Dietrich counters to Guppy's left shoulder and glances off.

Result - No kills


Pass 8:  3:34 - 3:39  Guppy disengages and fires to the outside as Sir Dietrich tries to dodge.  Its unclear if he hit the face grill or the side of the helmet, and its also unclear to me if Sir Dietrich took it as a kill.

Result - unsure.

Adult Swim: What I Learned


I attended the first day of Adult Swim practice yesterday.  If you don't know what it was, essentially Duke Timothy (and others, I assume, but I don't know who all should be thanked) arranged a fighter practice that gathered ~300 fighters, 100+ of them being knights, masters, counts, and/or dukes coming in from ~10 kingdoms.

Everyone came in with their own goals in mind, but in general it was expected that everyone should be open about teaching and learning what they can, and that this was the place to test yourself against the best of the best.


What I did

I'll quickly walk you through my day.  I began with a spear duel against Kieren, a friend of the Bog who resides in NYC.  From there I moved onto seeking some advice on Pole vs Shield fighting from Duke Vladimir of Atlantia, which began as a conversation between the two of us which quickly turned into a clinic to a crowd of people who were drawn to this impromptu informal class on polearm fighting taught by the duke.  Next I dueled a young, quick shieldman while Vlad watched and critiqued.

Then onto testing my skills.  I called on the best spearmen (and maiden) I could find and dueled Atlantian Crown Prince Dietrich, Aethelmearc Princess Ariella, mercenary spearman Guppy of the OLB, and did a 5 man 2 on 2 spear bear pit (5th replaces the dead guy) with Sir Randall of Atlantia, Guppy, and two other guys.

After all of that, Sir Thorson got me hooked up to fight Sir Simon (I believe of the East) pole on pole, and I finished the day spearing with a barefooted master who goes by the moniker "The Oderus."


What I Learned


Pole:

1)  Don't tie up with shields for to long.

2)  Butt spike to the face hard and repeatedly.

3)  My footwork has to completely change.  Work on big strides.

4)  Learn to attack at the shieldman's head and use my body and weapon against him to leverage myself.

5)  Crash and roll in and away from the shield.

6)  Move in and past the shield, not back and around.

7)  Against other pole, work on my transitions from thrust to the inside game.


Spear:  I'm at a much higher level with spear than I am with pole, so everything I learned was based off of experience rather than tutelage.

1)  Extending the front arm out does really offer a solid defense (learned from facing Princess Ariella's defenses).

2)  I'm fast, but I'm not fast enough to kill with a direct attack against top level spearmen.  As soon as I'd flinch, they'd move to defend (Guppy, Princess Ariella, and Prince Dietrich).

3)  There's room to improve my counter attack form.  Prince Dietrich has a much more efficient and better timed approach to the counter attack than I do.  I'm fortunate that I have video!

4)  Guppy has a very sneaky style that I can learn from.  Its very difficult to tell when he's going to attack.

5)  I was best when I would set up the shots with multiple quick feints.  As I said in #2, as soon as I'd flinch, they'd move to defend.  If I came at them with multiple quick feints, I had a better chance at opening them up.


How I Did

Pole vs Shield:

I'm a solid fighter, but this is probably the area I need the most work in.  I do well against older guys with a large field, but fast guys who are at least average or better give me a lot of problems (and don't even get me started on lefties).  I fought Hugo, a young, quick shieldman from Atlantia, and he more or less killed me in every fight (I won one).


Pole vs Pole:

Here I held my own against Sir Simon.  He's the better fighter, and certainly the more knowledgable fighter, but I was able to counter that with my point game.  I can't remember how we did, but I'd say I probably won 40-50% of the fights (my sincere apologies if I'm inflating my results).  I'm happy with the results, but definitely need to improve some aspects of my fighting.


Long Spear:

I tracked down the best I could find, including both the winner and the runner up of the Known World Spear Tourney.  I considered the prince and the princess as well as Guppy to be 3 of the best spear fighters I have ever fought.  Rough order of magnitude, I went about 50/50 with all 3 of them.

Randall and his friend were also very good, but we never matched up 1 on 1.  Having said that, in the 2 on 2s, I also thought they were excellent fighters and would say we also went about 50/50.


All in all it was an excellent experience and I hope to do this again some day!


If this is your first time reading my blog, please check out my older posts and like my Facebook page.