Wednesday, April 19, 2023

Souther Region Army Practice - April 2023 - Field Battles

 Hey all,

Just a quick blog post with some thoughts from last Sunday.

We ran a series of field battles with about 15 heavy melee fighters per side plus an additional unit of 6 heavy combat archers that would swap sides every battle or so.  The objective was to kill everyone on the other team.  Each battle had a different unbelt captain chosen, some with no command experience at all.

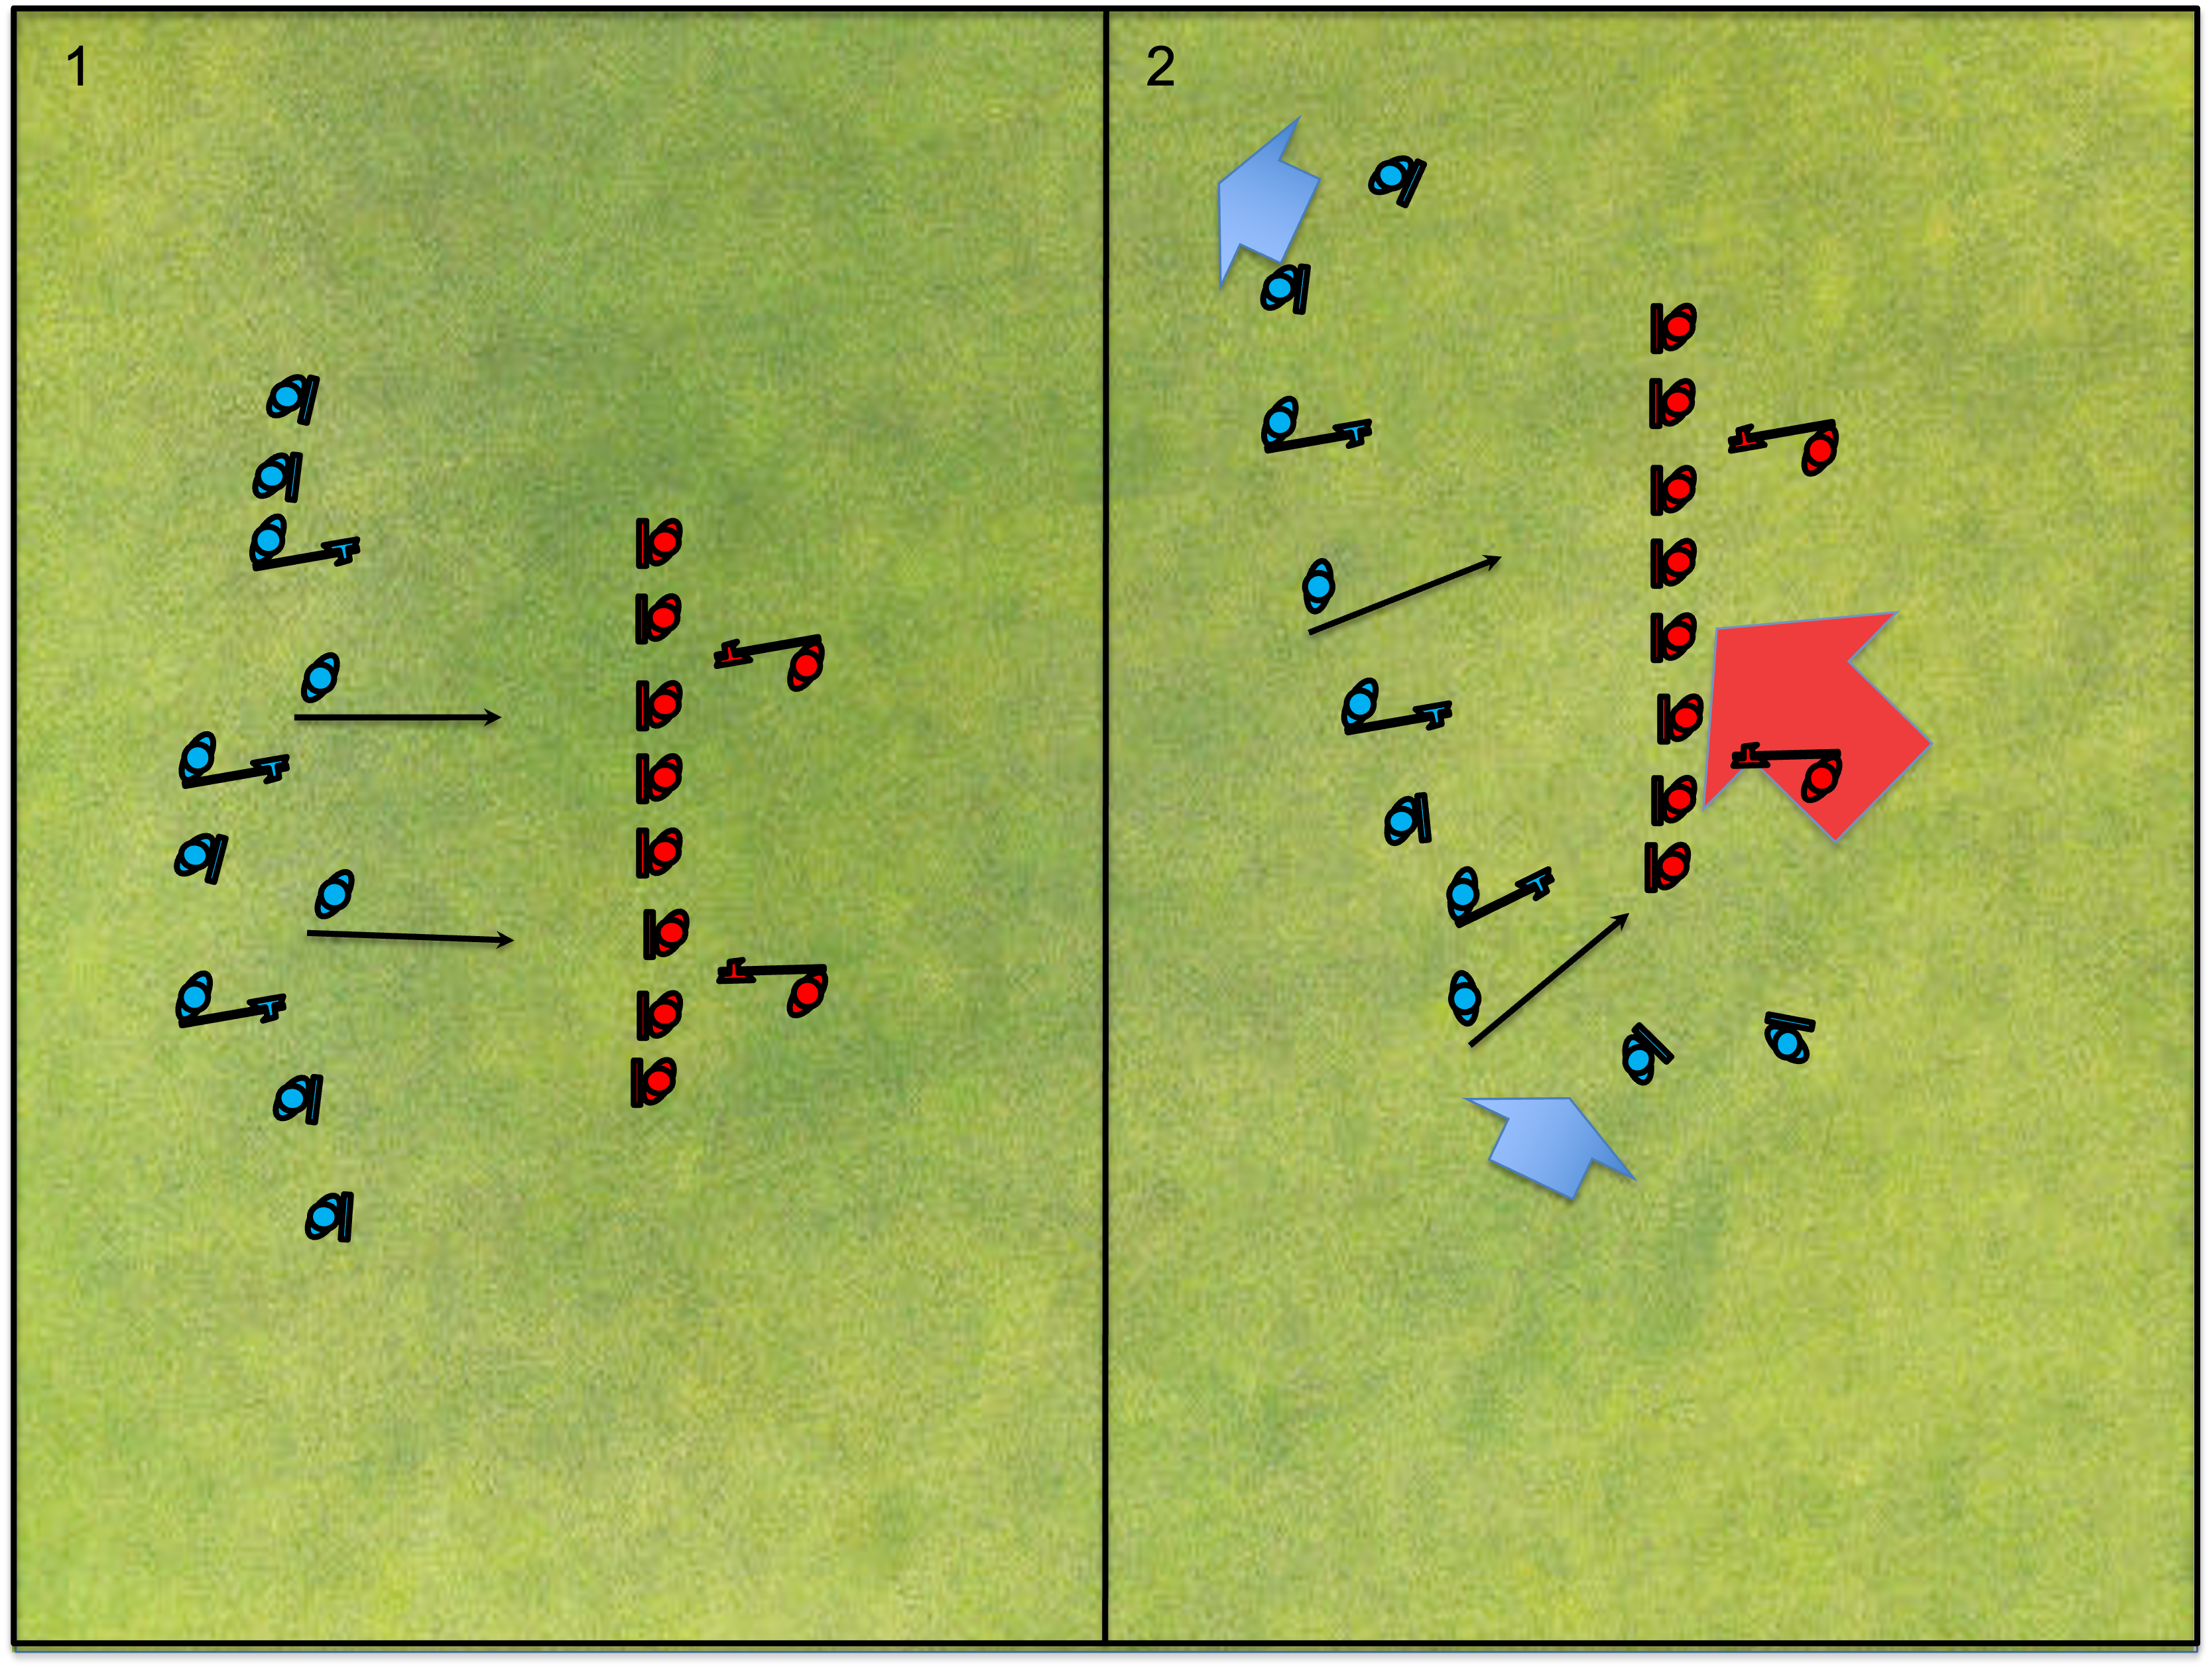
In a nutshell, I think everyone figured out the basics.  Split your non-archer units into two to three different units, one covering the left flank, one covering the right, and if there's a third unit, they cover the middle.  Sometimes a person or two would be left in reserve, with a fighter or two who's job was to protect the archers, or to hunt the archers depending on what team the archers are on.  The team that did not have the archers knew that they needed to press the attack so that they don't die from archers' fire, while the team that had the archers were not in as much of a hurry.  


Both teams pretty much had a unit run right, and a unit run left, which is pretty common as neither team wants to get outflanked.  There were usually some people hanging out in the middle as well.  The formations were mostly what I would call a "mob" rather than any sort of organized unit.  Mobs, or packs, or prides, or swarms (whichever analogy you want to use) tend to be more flexible and move faster than strict formations.  With a 15 v 15, skirmish tactics become more effective.  If we had, say, 700 on a side, it might make sense to have some large blocks of units in formation.


Once units got engaged it pretty much came down to deciding what the best tactic to employ would be.  The options are to engage or deny (deny means to refuse the engagement, and hopefully draw the opponents out of the fight).  If an engagement is decided, then do you engage at range, or press the attack with a charge?

Generally speaking, assuming equal skill, you attack if you have the numbers, and deny if you don't.  If you attack, then you charge if the other side has the range advantage, or you attack aggressively with your spears if they don't.
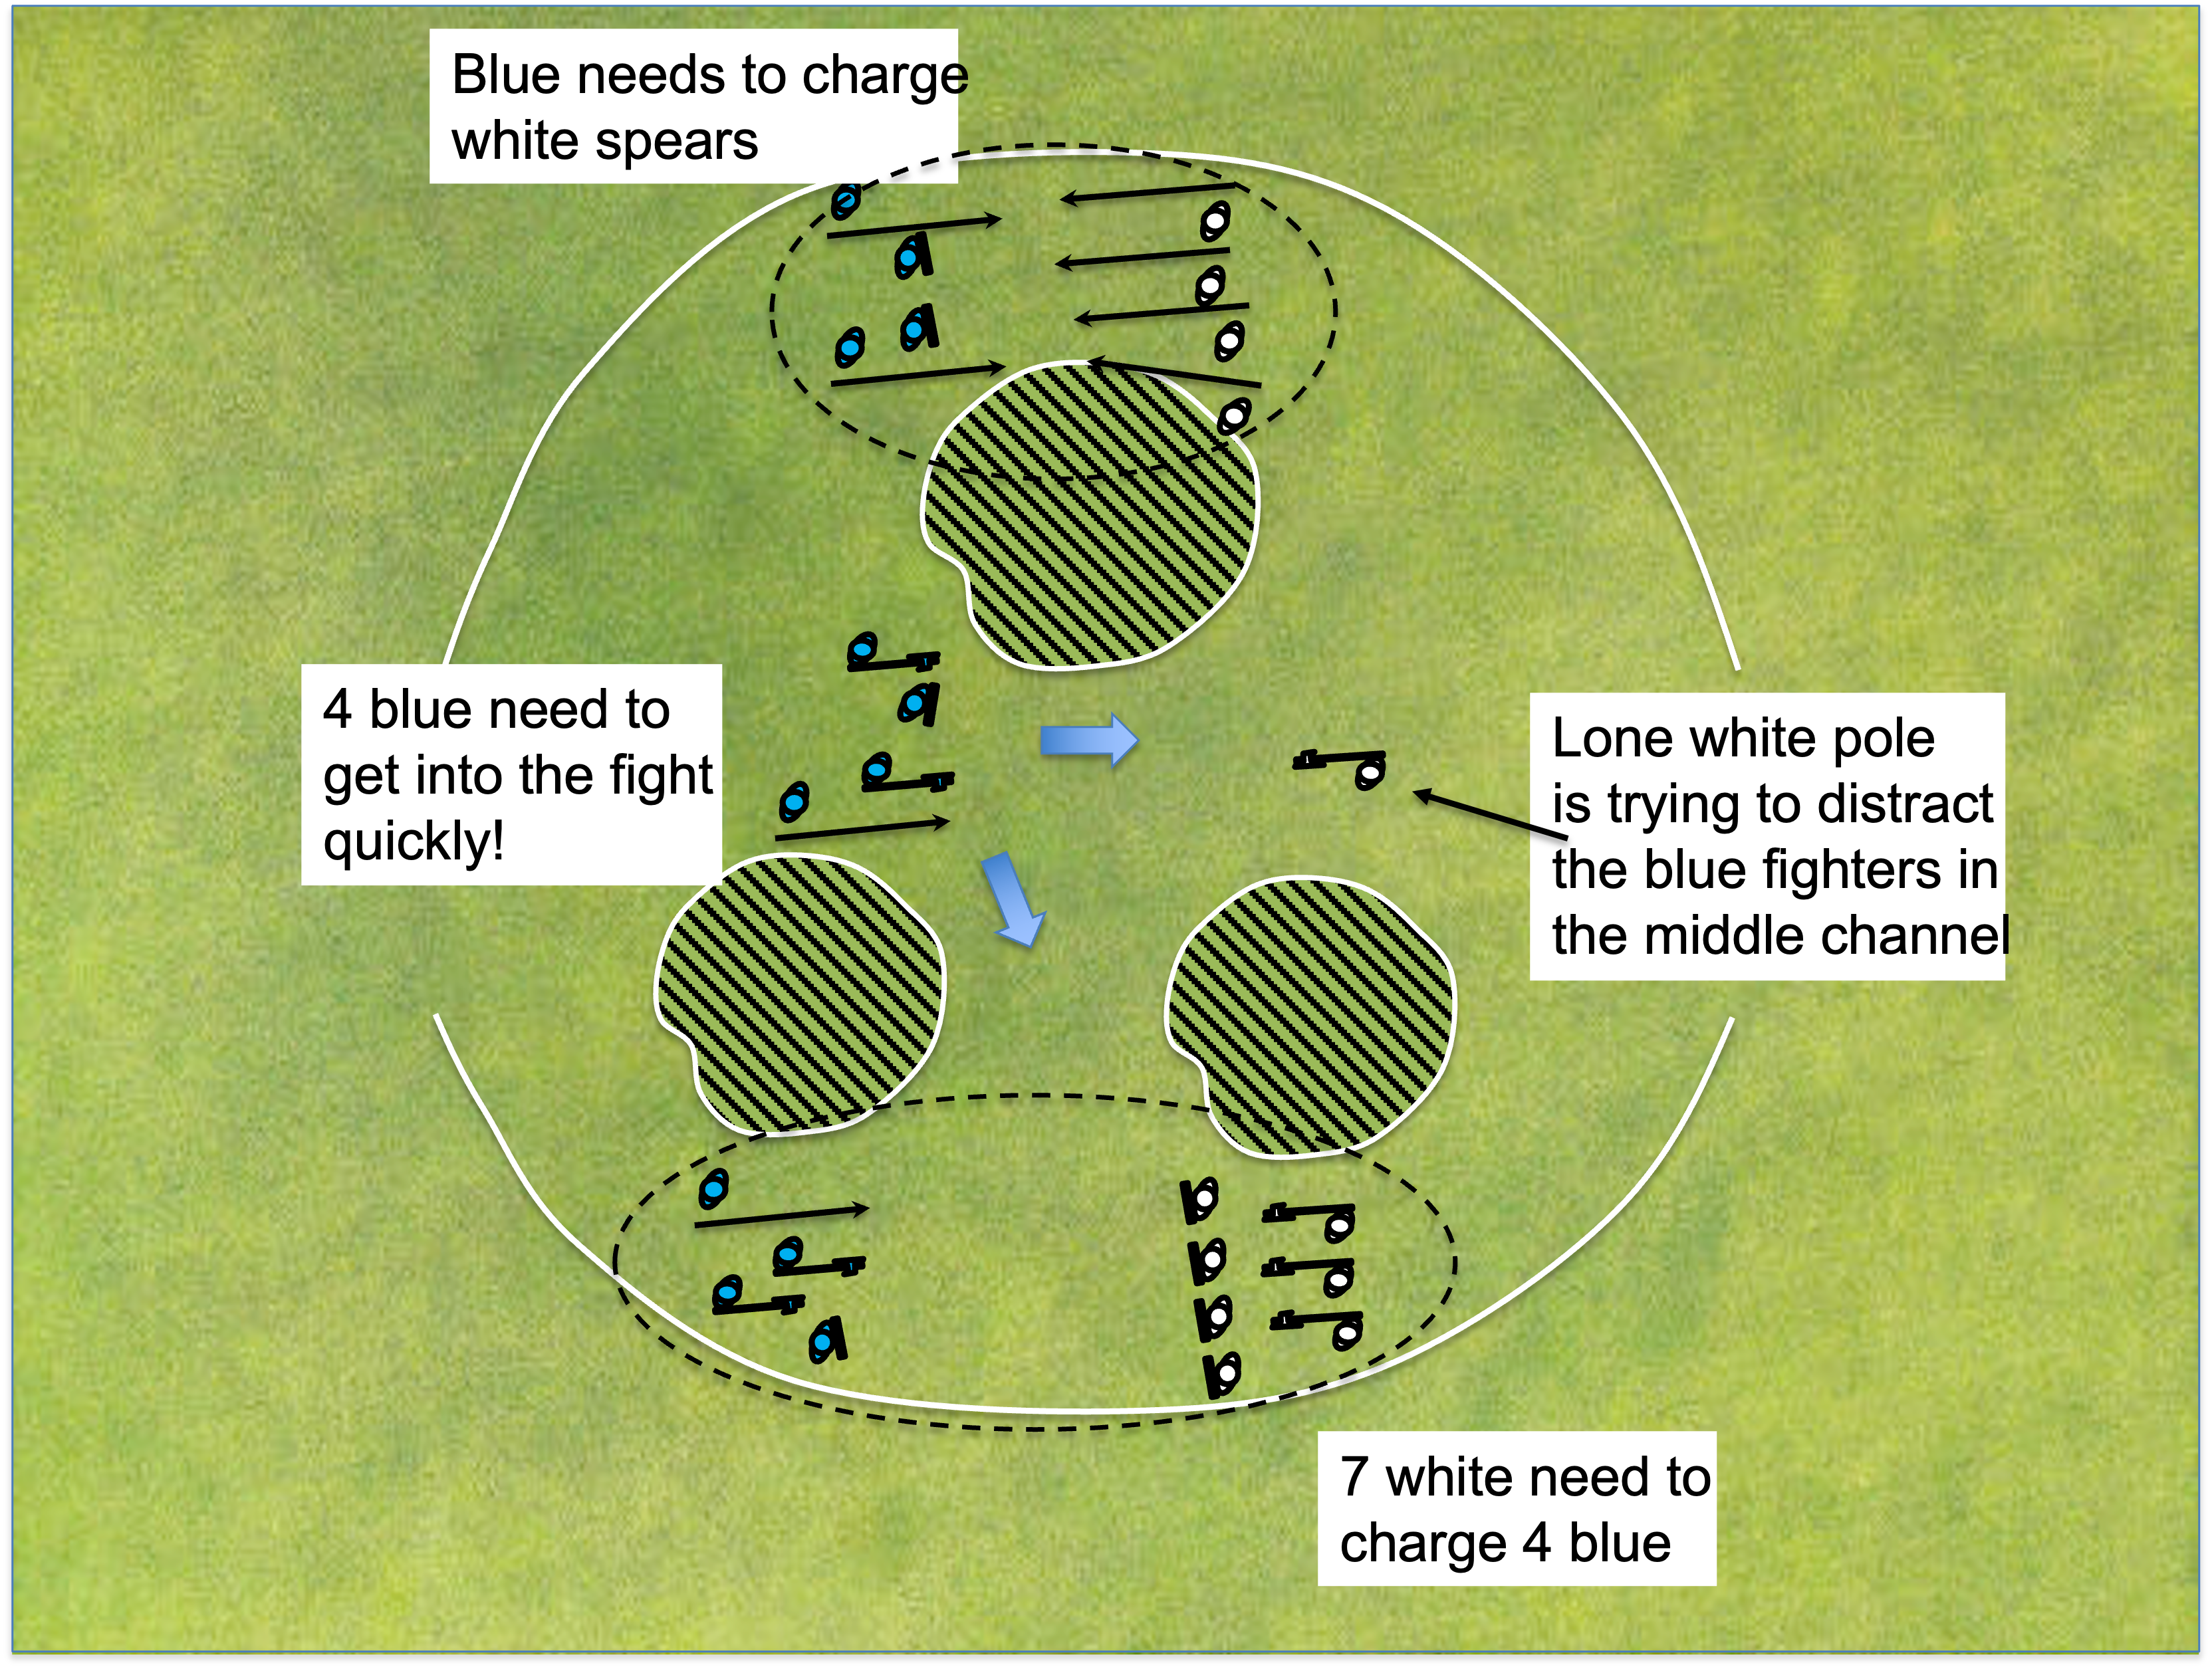


F.L.A.N.K.S.

I personally teach the FLANKS mnemonic to help remember what to do.  Consider this with each unit of 4-6 fighters in the diagram above.

F - Control your flanks, usually with your strongest shields (rarely with a spear or archer).  Don't let anyone get behind you.

L - Leg 'em and leave 'em

A - Assess which team has the range advantage and act accordingly (charge if they do, stab if you do)

N - Never fight a fair fight.  Always look for an advantage, or refuse the engagement

K - Know who are your killers and who are your supporters.  Are you charging with your shields?  Or are you stabbing with your spears?

S - Spread out your talent.  Don't group your spears together, or put all of your new fighters into the same unit, or same part of the unit.  


Special Plays

Sometimes it helps if you come up with some special tactics, like taking a person out of the fight, or having a team run right at the archers.  These clever plays can work, but there must be a foundation of good fundamental tactics laid down first.


The Team with the Archers Often Lost

Strange.  I think what happened here is that teams were picking too many people to guard the archers, which pulled them out of the fight.  Or they were not being aggressive with the engagements and ended up losing to more aggressive attackers.

Keep in mind, archers are not as deadly as you might think in a field battle (while they can be incredibly deadly in a static fight).  In battles like these, I'd expect most archers to only get off 1-2 shots before it's over, and with each team so heavy on shields, the entire archery unit may not get many kills.  Don't get me wrong, I ALWAYS want the archers on my team, and find them to be a critical part of the army.  But don't expect them to kill everyone in a small team field battle. The rest of the unit has to do much of the killing as well.


Sunday, April 9, 2023

Joint Kingdom Melee Practice (Atlantia/East)

 Hello all,

Tegan of Anglesey and Alric O'Connor put together yet another amazing practice with closer to 40 heavy fighters just south of Baltimore, MD.  Much fun was had, swords were sharpened, rust was knocked off, and lessons were learned.  


Format

We mostly stuck with the same teams all day, with the East Kingdom on one team, the Barony of Storvik and "The Bog" on the other, with the remaining Atlantians shifting around to keep things mostly balanced.

The numbers were not always even, nor was the skill level, but the fighting remained fairly competitive.  In my opinion as long as one team isn't just getting run over all day, there's not really a need to rebalance teams, though it's always important to ask and get a feel for how people are doing.  Sometimes the losing team wants a chance to redeem itself by switching up tactics, while other times people get discouraged and either give up trying, or quit for the day.

In a nutshell, we fought a scenario several times, let each team figure out how to change their tactics, and then would get together and discuss some key points about the scenario.  There was enough experience on the field that there wasn't a need to stop any scenarios and give a grand lecture. 


List of Scenarios

Single Death Field Battles (large teams)
3 Life Broken Field Rez Battles
Kill the King Broken Field Rez Battle
Control Point Timed Bridge Battles
Single Death Field Battles (medium sized teams)


Single Death Field Battles (large teams)

We started off the day by splitting into two teams of 15+ fighters.  Our team had a rally call ("blue") and picked a commander.  Both teams decided to split into two units, one being a faster flanking unit, and a slower infantry unit.  This set both teams up for a basic "hammer and anvil" tactic.

From Wikipedia:

"The hammer and anvil is a military tactic involving the use of two primary forces, one to pin down an enemy, and the other to smash or defeat the opponent with an encirclement maneuver."

Our team (blue) really struggled in our first three battles.  The opponent offered to send a fighter to our team to balance the forces, but we elected to keep the same teams and try to improve our tactics.  Initially we were relying on our flanking force (where I was) to make a bigger impact than we were capable of because we kept running into units that were out matching us.  It seemed that we split into about a 6 fighter hammer unit, and a 10 fighter anvil unit, while our opponents were 8 and 8.  So our flanking unit kept finding ourselves at a disadvantage.  Additionally, despite electing to "deny" the engagement (this is a tactic where you attempt to merely stay alive, rather than engage and die quickly as the result of a numerical or skill disadvantage), the commitment to that denial was weak and our flanking unit was losing too quickly.

The anvil/infantry unit was (if I remember correctly) running a standard shield wall and attempting to rely on using its long weapons to do the killing.  It appeared that the shield wall was slow to engage, and that it was outmatched on range weapons.  The tactic they were using is often not a bad tactic as the anvil, but we needed to rely on it to do the killing as the hammer was not able to get the job done.

We changed our tactics up and made a bigger commitment to the denial by just running away from our opponents and taking them out of the fight while our shield wall charged into the unit they were facing against.  As a result, last two fights were very close, with our team actually winning one of them.


Additionally, in one of our battles, we managed to get around both flanks and get our enemies to turn back into each other.  As a general rule of thumb, it's better to fight with your backs to the boundaries while facing the center of the battle rather than to be facing the boundaries with your backs to the center of the battle.


I was really happy with how we managed to improve our results by making these changes.  


Lessons Learned:

  • Commit to the tactic, whether that's killing or denial.  Tactics can change throughout the course of battle, but once the decision is made, full commitment to that tactic should be implemented.  
  • Commit to the attack when numerical superiority had been seized.  Commit to denial when the opponent has seized numerical superiority (though skill should also be considered).
  • Always consider which side has the range weapon advantage and strategize accordingly.
  • Fight while facing the battle field, not with your back to the battle field.

Final note; is it a good idea to put so many poles in a flanking unit?  No.  But we wanted to keep our units together, and that's what we brought.  


3 Life Broken Field Rez Battles

These are pretty straight forward.  After 3 deaths, you're out of the battle.  The team that runs out of people first, loses.

The main tactic that we discussed was the advantage of fighting close to your rez point instead of away from it.  Often in these battles people get stuck in the mindset of controlling the middle of the field, so they try to take and hold ground.  Since this is an attrition battle, it's actually far better to fight close to your rez point so that your dead fighters respawn more quickly.

In the picture below, blue has the advantage.


Additionally, the small groups of fighters need to use those choke points to their advantage.  If possible, it's better to create a kill pocket and entice your opponent to fight into it.

Pictured below, red creates a kill pocket in the choke point.


It's also a good idea to control the left most boundary with a solid shield fighter to prevent the opponent from punching through that position and into your backfield.

In the first picture below, red tries to form a small shield wall in the center of the gap.  In the second picture, there is a shield with his foot on the border to prevent penetration by the blue team.


Lessons Learned:

Try to make the fight happen closer to your own rez point.

Use choke points to your advantage.

Protect the left flank with a strong shield


Kill the King Broken Field Rez Battle

This battle is similar to the scenario above, except that the lives are unlimited.  The goal is to kill the "secret king" of the opposing team.  This was a fun little game to break up the day.  It still teaches you how to work together in teams, but also to pay attention and communicate with your teammates.  Gradually, as you kill each of your opponents, you have to communicate to the rest of the team who has been killed and who you think might still be a potential king.

On our team, we had a strategy of having one of us behave like a king.  That was me, and all I did was play a little more passively than usual, and then when people would attempt to charge me, I would run away really quickly.  Ultimately it worked out for us.


Lessons Learned:

Observe and communicate.


Control Point Timed Bridge Battles

These battles had unlimited resurrections.  The goal was to control the middle of the bridge after 90 seconds.  There was a miscommunication in the first iteration, and the marshal never stopped the battle.  Instead he was counting a point for each team that controlled the bridge at 90 second intervals, yet kept the clock running.  After about 5 minutes we were all pretty certain that far more than 90 seconds had elapsed.  

Regardless, it was good practice for moving a unit forward on a bridge.


Both teams had archers.  The red team had 5 spears, while the blue team had only 2 spears. 

The most common successful tactics in bridge battles, from my experience, is to bring the spears out in front of the shields to duel the spears on the opposing side.  At some point, one side should realize that they are losing the spear fight and call a charge, which brings the shield rushing out of the second rank, past their own spears, and into the opponent's spears.  If the opponent is well trained, their shields will come out of the second rank to oppose the charge.  At this point, normally the poles will move into the second rank, with the spears looking for opportunity kills from the third rank, either over the top, or at about the waist line looking for belly shots when the shields come up.

Eventually people will either get tired, or the dead will pile up.  Either way, the charging stops and the battle becomes static again, which brings the spears back to the front.  

In this particular battle, we (the blue team) recognized that we only had two spears and would be facing 5 veteran spear fighters, so we never brought our spears to the front.  We had to rely on, instead, keeping our shields in the front rank as long as possible.  The shields would either hold their position, advance slowly to take ground, or charge.  


Lessons Learned:
  • Commanders are necessary to coordinate the units to either, "stay the line and maintain position," bring "spears to the front," bring "shields to the front," "step forward," "charge," or "fall back."
  • When charges are called, it's the shields who lead the charges so they should expect to move past their own spears when charging.
  • Charges are best called when the other team has their spears in the front rank, while your own team has enough shields ready to implement the charge.
  • Avoid solo charges, unless a really good opportunity presents itself.
  • Keeping track of time and coordinating a big push past the objective near the time limit is a good strategy.
  • The longer a battle lasts, the more advantageous range weapons become.  Shorter battles give the advantage to the units with more shields.

  • Weapons mix relative to the opponent should always be considered when forming a strategy.

Single Death Field Battles (medium sized teams)

We finished off the day by breaking up the group into three equally sized units of roughly 10 fighters each and fought two round robin fights.  So team A fought team B.  Then A fought C.  And then B fought C.  We repeated the whole process again so that each team fought each other team twice for a total of four fights each.

There was an interesting amount of variety in the different groups.  Team A was young and fast and comprised of two poles while the rest were shields.  Team B had a lot of old veterans, many with a very hight level of skill, and contained two spears, a few poles, and a lower proportion of shields.  Team C was a collection of fighters who don't practice together very often, and had a low number of shields, but no spears.  

As for tactics, team A would typically want to perform a coordinated and cohesive charge in each fight.  Team B would normally want to spread out, keep their spears alive, protect the flanks, and try their best to draw their opponents into a kill pocket.  If team A would go for a flank, team B would need to drag out that flank while attempting to envelop on the other.  Both tactics are good.  The winner would be determined based on skill, commitment to the initiative, and whomever performs more effectively in that battle.


In theory, Team C should be able to play the envelop tactic against A, and the charge tactic against B.  I was on team C, and we struggled with either tactic.  Our best showing was in our last fight where Sir Tash had asked me and Galfred to be a flanking kill team and commit to hitting the flank hard and scoring some kills.  We were actually fairly successful.  We ran hard and found two quick 2v1 opportunities, which we won, and then were able to get back into the fight behind our enemy.  


Lessons Learned:
  • Groups that train together and train often will have an advantage regardless of the tactics used.

  • Weapon mix should largely determine what kind of tactics you'll use.

  • Sometimes you have to think outside of the box and look for mismatches to take advantage of.

  • I really need to build an Atlantian legal polearm that is longer than six feet!

Final Thoughts

I really like this style of practice, and it is very similar to what we do up in the East Kingdom.  Many years ago I attended a practice where we got in half the amount of fighting, and each side was micromanaged and told exactly what tactic to follow.  Yes, sometimes you do need to take some time to work on a specific drill or technique, but I also strongly believe that there needs to be a certain amount of free play.  Let each team figure out what to do on their own.  If they lose, maybe they'll adjust.  If they keep losing, give them some hints.  And with the limited amount of melee practice that any of us actually get, helmet time is really important.

I'd also like to add a big thank you to our commander, Baron Cormac.  Being commander is a thankless job and it tends to take on all the blame (we lost because of a bad plan) and none of the credit (we won because Me/Myself/&I got so many kills!).  I personally don't think I'm a great commander, but rather a better analysts and teacher.  I can tell you what you should have done after you already did it, but not always what we should do.  Regardless, every army needs an executive decision maker and I'm always happy when someone steps up to take on that role.

Finally, I'd like to thank absolutely everyone who helped make this happen.  That includes the organizers, the marshals, the people who came to watch and socialize, the fighters, the people who helped set up, break down, pick up trash, etc. etc.


Until next time!

Sir Bari of Anglesey, East Kingdom


Wednesday, January 18, 2023

Central Region War Practice - January 2023

Hey all, 

Happy New Year!!!  War is only 6 1/2 months away and the time to prepare is NOW!!!

I'm half joking.  I'm willing to fight in a melee anytime there's a good one available.  Last weekend we had a long day of fighting in New York state.  It was, quite possibly, the highest average quality of fighter I've ever had the pleasure to fight with.  We had 25 fighters, which included 10 knights, and 6 additional members of the Order of the Tygers Combatant, all melee specialists.  

The Format

It was pretty simple.  Run some scenarios.  Let each team figure out on their own what strategy to adopt, who to command, etc.  Run through several iterations and then regroup and discuss.  Rinse and repeat.


The Scenarios

3v3s, 4v4s, 5v5s, 7v7s, 10v10s, etc.  all single death field battles. 
Breach battles with a single resurrection for each fighter.
Breach battles with a "goat path" with a single resurrection for each fighter.
Control point timed bridge battles with different numbers of lives.
More small team single death field battles.


Looking for Mismatches

One of the problems early on was that a number of fighters were finding matched, 1v1 situations and fighting them as if they were in a singles practice.

What you want to look for in a melee, particularly in fast paced single death field battles, are mismatches where you have a clear advantage.  Examples of these are:

- Numbers Advantage; You have more fighters than them at the point of contact
- Skill Advantage; You have a BIG mismatch in skill
- Range Advantage;  ie a spear hitting a shield, or a shield within striking distance of a spear
- Positional Advantage; Hitting them on a flank, or when they are distracted by something else
- Momentum Advantage; They are on their heels


So in the flow of the battle, the goal is to identify when you have these advantages, and when the other side has them.  If you have an advantage, execute quickly.  If you don't, then deny the engagement and look to find an advantageous situation.  

The only time you should really fight without a clear advantage is when your team has no better options available.  

Note:  This is only one piece of field tactics.  I don't want to leave the impression that fighters should run out onto the field and look for mismatches without a cohesive strategy for the entire unit.


Don't Fight with Your Back to the Fighting

If at all possible, position yourself so that you are facing the main fighting with your opponent's back to the fighting.  In the diagram below, each blue fighter can see the entire arena of battle, while each white fighter cannot.  When possible, try to turn your opponents so that their backs are to the fighting.


Field Battle Tactics

The tactics in the field battles, in general, can be summed up pretty simply:

- Everyone run to one flank or the other
- Most people run to one flank while leaving a small number to deny the other
- Split into two units and run at both flanks

There were also some specific tasks given to individuals:

"You, run down the archer/spear in the backfield."
"You, don't get caught in a spear duel with their spear."
"You, hang in the middle and try to hit these internal flanks."
etc.

The above list is not the only way to execute a field battle, but they were all good ways to do it given the level of experience and weapons mix.


Shield Wall vs Mob

A shield wall provides a (mostly) impenetrable front to lead your forces into action.  When it moves, there's not really any opportunity kills from the enemy as everyone is very well protected.  In theory, a shield wall can move into position and crash through a less organized group of fighters.

Pictured below is a shield wall that is charging hard to its right flank, well protected, with the expectation that it will have a numerical advantage once it arrives (9v5 on the flank).


The benefit of the mob is that it can move faster as a tight unit cohesion does not need to be maintained.  It also allows the fighters the flexibility to avoid the front of the slower moving shield wall.

Pictured below you can see that the white mob move's around blue's flank while avoiding the front of the wall giving them a flanking advantage as well as greater numbers at the point of contact.  Moving as a mob allows them to move faster than moving as a wall.


Note:  This is not an either/or situation.  A unit can move as a tight shield wall, a loose shield wall, a tight mob, or a loose mob.  To what the degree the shields are in the front or a different mix of weapons are in the front is also variable.  

In most of our engagements this weekend, the units moved in what I wall call a shield lead mob.  The right tactic entirely depends on a lot of variables including the abilities of both your team and the opponent's team.  


Hope you enjoyed reading!

- Sir Bari of Anglesey, East Kingdom


Wednesday, October 26, 2022

Joint Kingdom Melee Practice (Atlantia/East)

 We had a fantastic practice this weekend!  I fought until I could no longer hold up my spear.  I had to repeatedly stand up at dinner because my body kept cramping up.  Lots of positive feedback.  We're hoping to do this again in the spring.

What was this?

Lady Teagan of Anglesey and Master Alric the Mad had been working on a plan for quite some time to put together a cross kingdom practice in the Baltimore, MD area in order to bring together different groups of people to test each other's mettle against.  They let me and Sir Arundoor of Anglesey run the scenarios and lead the feedback sessions, with THL Ozwin (sp?) stepping on to marshal the last scenarios.


The Format

1)  Bring everyone together for a SHORT discussion about the format for the day.

2)  Run a short scenario.  Give both sides a chance to work out among themselves what did and didn't work, make changes, and then run the scenario again.  Offer short, simple observations but don't stop and lecture.  Give them a chance to figure it out on their own.

3)  Once everyone is tired, give them a break.  Bring everyone together to talk about big ideas, lessons learned, etc.  Let the fighters give feedback, but keep it short.

4)  Repeat steps 2 & 3 until the fighters are out of gas for the day.  

5)  Give people a chance to do some singles fighting, or work on some specific skills.

6)  Bring everyone in for one last talk where each person gets their chance to say what they liked about the day, and what they thought could be improved.  This really makes everyone feel a sense of ownership of the practice, while giving the people who run the practices some good feedback.  


The Scenarios


1)


2)


3)


Variations on a Theme

Before I get into the details, I want to talk about how different each of these scenarios were despite looking very similar on the surface.

1)  Need for an immediate plan.  Quick execution.  Even quicker reform and reengagement.

2)  Pacing and timing.  Learning how to take and hold ground.  Watching and protecting the flanks.  

3)  Even more pacing.  Making smart, low risk decisions.  Using terrain to establish kill pockets.  Drawing the enemy toward your own resurrection point.

Throughout the day, we went from short, fast battles, toward longer battles.  The length of each fight went from ~45 seconds in the first scenario, to 90+ seconds in the second scenario, to 5 or more minutes in the third scenario.  Throughout the day, the trend went from more immediate action toward more pacing and need for constant communication.  


Scenario 1

When I say there is a need for quick execution, this does NOT mean "charge right into the enemy."  Sometimes it does, but sometimes it doesn't, and the whole point of this exercise is to be able to identify the differences.  

In a nutshell, each team had three channels to cover.


At lay on, each team would normally send a number of fighters through each channel which would result in some combination of numbers, skill, and weapon type.  This would normally lead to some sort of mismatch in one or more of the channels.  Within a given engagement, the team that has the advantage would need to identify that advantage and capitalize on it (attack), while the team that was at a disadvantage would need to "slow the bleeding" as much as possible (deny).  


Examples of mismatches


Once an engagement was won, it was critical for those who survived to reform and move on to the next engagement.  

Reforming after first engagement


Notes on reforming:  Reforms must be done as quickly as possible.  The number of survivors will determine how long it should take to reform.  The two biggest mistakes I often see are fighters who move so quickly to the next engagement that they leave all of their teammates behind, and fighters who take way too long to reform.  Generally speaking, small numbers (2-5 fighters) should be able to reform and run to the next engagement almost instantly.  Large numbers (10, 20, 40 fighters, etc.) will need a slower, more concerted effort to pull the survivors together before finding a direction in which to move together.

Notes on speed to first engagement:  Most fighters over estimate the need to sprint into a fight.  More often than not, a slow walk is all that is needed.  Having said that, why didn't either team wait at their rez point and form kill pockets at the choke points, instead of rushing right into the fight?

Because of the curved shape of this field, it was pretty important for both teams to quickly get to the flanks.  It is usually better to have a front line that is enveloping your enemy, than to have them enveloping you.  Even when taking into account the disadvantages of fighting in kill pockets, it's often better to be in a position to see the whole battle, than to have fighting happening outside of your field of vision.


Scenario 2

Because the control point was going to be scored at 90 seconds, there was no need to rush right into the fight and kill people.  In these kinds of fights, the team with better spears does a good job of slowly taking ground, but a not so good job of holding ground.  The team with the better shields tends to be able to take ground whenever they want, provided that their charges are coordinated, but they only have so much gas in their tank.  They can't charge for 90 seconds straight without resting.

Both teams were able to figure out how to look for opportunities to take control of the middle of the field.  They were also good at looking for flanking opportunities, but not good at defending against flankers.  Often times people were getting into their backfields because no one was watching the flank, nor communicating to their teams about any weaknesses they may have spotted.


By this point in the day, both teams had worked out most of their communication problems and were able to get a good feel for where the strengths and weaknesses were on both sides.  The lack of flanking awareness was the only real soft spot in this scenario that I saw.


Scenario 3

In these 3-life rez battles, being efficient with your killing is critical.  The pace of the fight tends to be slow, with each team looking to take advantage of forming kill pockets at the choke points.  They are also both looking for mismatches, which normally result in either a superiority is spear numbers and skill (get to work, spears!), or a soft spot in the line where there is a lack of shield or pole support that can be exploited by charging shields.  If a shield can break through the line and into the backfield, they may be able to score 3-4 kills before either dying or returning to their side.

One of the key pieces of these battles that one of the Atlantian knights felt their team failed at in the first run through of this scenario was the value of drawing the fight toward your own resurrection point.  When close to your rez point, each death is replenished quickly because of the short walk, while each opponent's death is replenished slowly.

If you ever find your unit overwhelmed, simply back the fight up toward your rez point to help replenish your numbers more quickly.


Why not refuse to fight beyond your rez point?

The problem with this tactic is that it makes it obvious to the other team that this what you are doing, and then they refuse falling into the trap.  The following situation is likely to occur.


If you are familiar with singles fighting, imagine a fighter who keeps backing away from you every time you go to attack.  It becomes pretty clear that that fighter wants you to over commit so that they can counter attack.  If it becomes too obvious that that is their plan, then you can employ the same tactics.

At this point one of two things happens.  Either you both learn that you need to be a little more subtle about baiting your opponent (for example, you might throw a quick, safe shot to bait them into committing), or the marshals step in and explain that you need take a more chivalrous approach toward your fighting ("hey, you two are holding up the whole tournament!").

So, in a nutshell, if your opponent is completely willing to walk into the choke points and fight near your rez, then let them do that.  Just because the opponent SHOULD figure out the obvious solution, doesn't always mean that they will.  Otherwise, figure out how to make sure that good fighting is occurring, while keeping in mind that you can still back out of a bad situation.


2v1 Drills

These never happened.

I had planned on starting off the day with some 2v1 drills and teach newer fighters how to surround a single fighter, but a lot of fighters showed up early and, before I got my armor on, 15 people were ready to fight, and they were mostly veterans.

Teagan and Arundoor made the call to just get the scenarios started.  There's nothing worse than slowing up a large group of veteran fighters by having them stand in line to watch a bunch of people work on some skills that most people already have developed.

THE most critical goal of any practice is to make sure people want to return to the next one.


See You at the Next One!

Overall the feedback for this was pretty positive.  People felt that the biggest improvements on the day was an increase in on field communication.  

We're hoping to do another one in the spring.


-Sir Bari of Anglesey


Wednesday, October 5, 2022

River War - Weapons Mix, Melee IQ, and the Need for More than One Shield

 Last weekend Sir Sterling hosted his annual River War in South Jersey.  I believe roughly 25 heavy fighters participated with Sir Rory doing a fine job of running the heavy activities with the help of a few others.

Bear Pit Tourney

I've always been critical of mixing melees and tourneys in the same day because what ends up happening is that one often ends up from detracting from the other.  A bear pit tourney seemed like a great way to warm up, make sure everyone got in a lot of good fights, give the duelers a chance to show their skills and meet up with people from other regions, and to do it all without taking up a whole lot of time.

In 30 minutes everyone managed to get in somewhere between 10 and 20 fights.  We had four pits running.  Loser got a point, winner scored 2.  The fighter with the most points won the tourney. 


Capture the Flag Resurrection Battles

In one set of scenarios we needed to capture a flag in the middle of the field, and then move that flag to a "goal" (traffic cone) in the field to win.  Both teams had resurrection points away from the goal.

This is a pretty common scenario which usually looks like this:


This weekend had an interesting twist.  Instead of a resurrection point, an entire side of the field was a resurrection line.


In this scenario, both sides began at their resurrection points with the flag in the middle of the field.  Our team figured out two fundamental tactics to this battle.  

1)  A quick way to lose is to let the other team grab the flag and run right to the goal, so we needed to make sure that a number of us lined up near their goal to protect it.

2)  When you grab the flag, stay to the side of the field where your resurrection line is, as that is where your fighters respawn, while their fighters will have a much further distance to travel and return from the resurrection point (note the "sweeps left" comment in the picture above).

Some more thoughts about this scenario.  One of the fighters described it as a "soccer game," meaning that it favored mobile fighters with foot speed and endurance.  The field was big, and our fighters were sort of spread out in a skirmish.

The way this played out seemed to favor spears and fighters who knew how to skirmish together.  If we had a little more experience with this scenario, I feel like the blue team would have figured out that once they grab the flag, instead of moving straight toward the goal, they should move directly to their rez line.  Then move the flag down the field and set up a coordinated push with the shields.  They also had a couple of pole fighters who could have swapped out and grabbed shields.  I imagine this tactic looking a little like this:


Shields as Hunters vs Shields in a Wall

The latter is when the shields group up together as they are in the above picture, moving as a single block of fighters.  The latter is when a shield fighter goes off on their own, hunting down mismatches (ie killing archers and spears, lower level fighters, or 2v1 opportunities).  While we often teach people to stray away from hunter style fighting, there's really nothing wrong with it when done appropriately.  When facing a unit with 50% spears spread out across the field, a hunter or two would not be a bad idea.  For the orange team, however, all five spears were very mobile and had a great sense of field awareness, so hunting them down would be a lot more difficult.

I'd also like to point out, for those that are fans of the shield wall approach, that may work when your team has the flag.  When the other team has the flag, however, you really have no choice but to spread out and cover the whole field (much like a soccer team, rugby team, football during kick offs, etc.).  Bunching your fighters together provides more channels for the flag carrier to run toward the goal.

Several fighters had asked about forming triads.  Again, while it may be a good tactic for large scale battles, or even smaller scale single death field battles (I worked with one at Pennsic in a 10v10 fight that was great), the problem here is that they get broken up pretty quickly and the person returning from the resurrection point needs to get back into the fight where a fighter is needed (attacking a flag, defending their fighter with the flag, defending a goal, getting a quick kill opportunity, etc.) rather than to find their triad partners.


Resurrect in Groups, or Return Immediately?

Some people are fans of resurrecting in groups.  There are a couple of reasons for this.  One being that single fighters are easy to kill and a lot of less experienced fighters don't know how to avoid threats that they can't handle.  Walking out of the resurrection point in a group of three is much safer.  The other is that we really want to foster this idea of working as a team instead of as an individual in a melee.  A lot of less experienced fighters get caught up in picking out singles fights in the middle of a melee rather than to look for tactical advantages.

The problem is in a scenario like the one laid out this weekend, you really can't afford to let fighters hang out at the resurrection point when simply having warm bodies on the field is so critical.


Broken Field Resurrection Battles
    -Shield Team vs Spear Team

These have become a real staple in our region, especially for melees with 10-20 total fighters.  It's a really great way to work on so many aspects of melee fighting.  Teams were 9v8 with a shield heavy team (5 shields, 2 spears, a 2 weapon fighter, and an archer) and a shield light team (1 shield, 3 spears, 3 poles, and an archer).  Each fighter had three lives.  

Note:  I've been to so many practices where they attempt to make sure that both teams have the same weapons mix and similar talent levels.  Personally I prefer to have different mixes provided that the fights are competitive, as this allows both sides to identify each others strengths and weaknesses and apply tactics appropriately.  


Note:  archers could not fire over the field obstacles.

Given the layout above, victory was completely at the hands of the blue team.  If they allow themselves to get disorganized, or stand around and let the orange spears get to work, they lose.  If they charge in organized fashion, they win.  They did the latter, and won quite easily.  They'd pick a choke point on one of the flanks, bunch up 3-4 shields together, and run down the spears.  Once they cleared the spears out, they'd call a reform and pull themselves back to the choke point.  With only one shield on the orange team, they had nothing to slow down the shield mob.


After losing badly, the orange team switched out one of its poles for a shield (technically a spear went to a shield, and a pole went to a spear).  Just having a second shield on the field allowed the orange to team to manage both flanks well enough to slow the blue team down and allow the spears to go to work.


Remember, when shields assess the field, spears kill.  When shields rest, spears kill.  When shields reform, spears kill.  When shields attack someone else, spears kill.

Spears can't win a fight all by themselves as the shields will just run them over.  But if you can have enough support to slow the shields down, you have a chance to survive and win.  My experience tells me that, at a minimum, you must secure both flanks with at least one solid shield fighter in these small battles.


Hope you enjoyed reading!
-Sir Bari of Anglesey, East Kingdom


Thursday, September 8, 2022

Multiple Control Point Battle - Should You Concede a Point?

 Yes?  No?

The answer isn't clear, but I can speak to some things to consider.  


Northern Region War Camp - Three Flags

I'll begin with an example.  The scenario was a broken field unlimited resurrection battle with three flags to control at random time checks, with approximately 21 fighters per side.


The green team's plan (the team I was on) was to begin by sending 7 fighters to take each flag and that we should be, "flexible with our plan as we learn more about the fight."

The red team's plan (based off of my best guess) was to concede the banner on the left (their right), keep the green fighters who are fighting over that flag occupied with a minimal force, and then to focus the remaining fighters on the other two flags.  The basic strategy is to lose one flag, but then control the other two with greater numbers.

Assuming equal prowess on both teams, this will work provided that the opposing team doesn't adjust appropriately.  In the following example, green sends 7 fighters to fight over each flag, while red sends 3 fighters to defend the left flag and 10 each on the other two flags.


Here red gives up one of the three points to green (positions exaggerated a bit to illustrate who has which flag) in hopes of holding the other two points by maintaining a 9 to 7 fighter advantage on those flags.  This has a good chance of working provided that green does not adjust.

What if red occupies one of the flags with a single fighter?  Will this now give them a 10 to 7 advantage on the other two flags, almost guaranteeing that they will score 2 of the 3 points?


An easy win for red provided that green doesn't adjust, which is entirely possible that they won't.  The problem with the single red fighter on the left flag is that the tactic becomes pretty obvious, and it won't take long for the bored green fighters to look around and find something else to do.  In this case, they'll either redistribute their numbers to make a competitive fight on the other two flags, or they'll just shift onto the flank of the middle flag.


Redistributed Numbers


Shifting on to the flank:  Green moves 5 fighters from the left flag
to the flank of the center flag

In the first case, green makes a fair play for both the center and right flags, while in the second case, green makes a strong play for the center flag while making a weak play for the right flag.

Keep in mind, in either case, green already has one point.  Red is just giving it to them.  So in order to win, green only needs to control one of the other two flags while red needs to control them both.

Let's consider the "redistribution" tactic, once again.  


Assuming all else is equal, the left flag goes to green, while the other two flags have a 50% chance (roughly) of going to either green or red.  Given random time checks, this gives green a 75% chance of controlling at least two flags during any time check, while red has a 25% chance*.  This gives green a clear advantage.

*Odds explained:  imagine the center and right flags have coin flips, red on one side, green on the other.  The left flag will always go green because red is just conceding the point.  So there are four possible scenarios, each with an equal chance of occurring.  GGG, GRG, GGR, & GRR.  Only in the 4th case does red control two flags.  


How Did it Go at War Camp?

One of the keys for green is making absolutely sure that they don't lose the flag that the other team is just giving them.  So it is easier to control that flag and concentrate more numbers to the middle flag than it is to do a large scale redistribution across the field. 

Effectively green kept enough people to keep the left flag, with the rest floating toward the middle flag.  Occasionally red would move some fighters toward the left flag to make a play for it, and when that happened, green's floaters would shift back to defend.  One of the key people in all of this was a veteran spear (Sir Gowain) who floated between the two flags.  He was important because with a 9 foot spear, he could easily attack people on both flags without much movement.


 So here it looks like green has the left flag, a small advantage on the center flag, and a little bit larger disadvantage on the right flag.  Again, I want to reiterate, while the center flag is not guaranteed to be controlled by green, they get the left flag for FREE.  

Ultimately green controlled the battle that day.


So What is Always the Right Play?

I keep reiterating that in this scenario, green gets a free point.  That isn't to say that that is a bad tactic for red.  In some cases, it may be the best tactic.  I only want to drive that point home so that people are aware that if they concede a point, that they are taking a risk.  It is much like a blitz in football, or a half court trap in basketball.  Both are great plays when utilized correctly, but there's always a risk involved.

So there is no answer for what is always the right play, only that the risks and rewards must be understood when drawing up the plan, and that people need to read the battle as it progresses and make adjustments.


Remaining Flexible

Duke Edward was the captain of our team and said, "Lets start with the right 7 going right, the middle 7 going center, and the left 7 going left.  This is only our starting strategy.  As we learn more about the battle, we'll adjust."  I was on the planning team for the Town Battle at Pennsic (also a control the flags battle) and I made a similar comment.  "So we've agreed on the strategy, but let's remember to allow ourselves room to adjust as we learn about the battle in the first 20 minutes," which was an obvious statement to make and that everyone seemed to already understand and agree with.

And to be fair, the red team did make several adjustments throughout the fight at the war camp.


Hope you enjoyed reading!


-Sir Bari of Anglesey - East Kingdom


Friday, August 19, 2022

Pennsic 49 Belted/Unbelted Champions Battles

 For those not aware, the war point battles begin on Sunday with the unbelted champions battle, which is a selection of the best unbelted heavy fighters from the East vs those from the Midrealm.  Each year the format is slightly different, but it is always a single death field battle and it is always fast, hard hitting, and usually over in under a minute.  This year had 30 per side. 

The belted champions battle is often a similar format, but with knights instead of unbelts.  This year had 15 per side.  

And then many years they will allow the alternates (those chosen to be available to fill in a spot on the unbelted team if someone can't make it due to schedule or injury) fight an exhibition battle with ~10 on a side.

Additionally there is a rapier battle, a Heroic Champions tournament, and an Allied Champions battle.

For this post I want to talk about one key flaw with how the belted and unbelted champions often fight.  For the sake of showing proper respect to the people who fought that day, I won't say specifically who I saw make this mistake this year.  There were three battles, and two teams in each battle, so I could be talking about only one of the six teams involved.  Additionally, I could be misreading the videos of the fights, so it is entirely possible that no one made this mistake, but I do see it in these kinds of battles a lot so it is worth talking about at least in a hypothetical sense.


Throwing a Bigger Rock

I've been saying this for years.  There are two ways to win in a game of rock, paper, scissors if your opponent throws rock.  You either throw paper, or you throw a bigger rock.

Rock, in this case, is running fast, charging hard, plowing right into the enemy, and swinging as hard and as fast as you possibly can until either there are no bodies left, or you hit the ground.  

This will almost always work provided that your opponent does not do the same thing to you.  And if you are on either one of these teams, you are probably used to this kind of success fairly regularly.  

The problem with the champions battles is that your opponents have a similar skill level to your own. You aren't beating up on the rabble, but rather you are fighting other champions.


Getting Out of a Bad Situation

When identifying a local threat, you often have two tactical options; attack or deny.  Attacking is pretty straight forward, though there are nuances to exactly how you will attack.  You can charge left, charge right, charge the middle, envelop, use range weapons, etc.  When you deny, you essentially want to avoid the engagement while keeping the enemy occupied.  This might be done by simply moving slowly toward them so that the engagement doesn't happen until you get reinforcements from somewhere else on the field, yet fast enough so that they are still focussed on fighting you instead of moving to engage a different unit. 

I personally like to use the "dance and run" approach.  The best way to describe this is to think of a pack of dogs encountering a grizzly bear.  The dogs will get close enough to keep the bear's attention, but will run away when the bear comes at them while their pack mates come up from behind.  Then, when the bear turns, the pack mates run away while you come up from behind.  Etc.

What Does a Bad Situation Look Like?

A bad situation is usually any fight that your unit will lose.  Your best options in these situations are to either stall until you get reinforcements, keep the opponent occupied while refusing to engage, leaving the situation altogether, or dying slowly and away from the main fight (meaning that you try to position yourselves so that when you finally die, it took them as long as possible to kill you, and it will take them as long as possible to reform and get to the next fight).

Below is an example of what often happens in these kinds of battles.


In this hypothetical case, the yellow unit on the right had the goal to outflank the enemy.  The enemy, however, moved to the far border preventing the flanking maneuver.  They also have a larger unit, and were able to get their reserves to quickly assist the main unit.  If yellow charges, they'll be at an 8v13 disadvantage, and they will be hit on their front as well as their flank.

The best decision yellow can make, IMO, is to refuse the engagement, at least until they receive reinforcements.

Instead, what often happens, is that yellow will plow right into the enemy and hope for the best, which is usually a quick death. 


Is it Possible to Deny?

Never push on a rope.

This is an adage that has stuck with me for years.  What it means is that regardless of what you want people to do, there are many times when people are simply just not wired to do what you want them to do.  

I don't have enough experience with these teams to know if it is even possible to teach a unit to deny in these scenarios. They are often a collection of skilled, aggressive, athletic fighters who spend very little time actually practicing together as a unit.  To give them the task of denying might be asking them to do something that is simply not in their nature and will fail even worse than charging.

If that's the case,  then the best solution might be to keep this in consideration when drawing up a plan and understanding that once lay on is called, that the fighters are going to do what the fighters are going to do, and to put them in positions where chances of success are high, and failure is low.

I don't what that would look like, but it might be the best answer.  The other is, of course, to figure out how to train the fighters so that their instincts are different in these battles.


Hope you enjoyed reading!

Sir Bari of Anglesey - East Kingdom