Hello all,
Tegan of Anglesey and Alric O'Connor put together yet another amazing practice with closer to 40 heavy fighters just south of Baltimore, MD. Much fun was had, swords were sharpened, rust was knocked off, and lessons were learned.
Format
We mostly stuck with the same teams all day, with the East Kingdom on one team, the Barony of Storvik and "The Bog" on the other, with the remaining Atlantians shifting around to keep things mostly balanced.
The numbers were not always even, nor was the skill level, but the fighting remained fairly competitive. In my opinion as long as one team isn't just getting run over all day, there's not really a need to rebalance teams, though it's always important to ask and get a feel for how people are doing. Sometimes the losing team wants a chance to redeem itself by switching up tactics, while other times people get discouraged and either give up trying, or quit for the day.
In a nutshell, we fought a scenario several times, let each team figure out how to change their tactics, and then would get together and discuss some key points about the scenario. There was enough experience on the field that there wasn't a need to stop any scenarios and give a grand lecture.
List of Scenarios
Single Death Field Battles (large teams)
3 Life Broken Field Rez Battles
Kill the King Broken Field Rez Battle
Control Point Timed Bridge Battles
Single Death Field Battles (medium sized teams)
Single Death Field Battles (large teams)
We started off the day by splitting into two teams of 15+ fighters. Our team had a rally call ("blue") and picked a commander. Both teams decided to split into two units, one being a faster flanking unit, and a slower infantry unit. This set both teams up for a basic "hammer and anvil" tactic.
From Wikipedia:
"The hammer and anvil is a military tactic involving the use of two primary forces, one to pin down an enemy, and the other to smash or defeat the opponent with an encirclement maneuver."
Our team (blue) really struggled in our first three battles. The opponent offered to send a fighter to our team to balance the forces, but we elected to keep the same teams and try to improve our tactics. Initially we were relying on our flanking force (where I was) to make a bigger impact than we were capable of because we kept running into units that were out matching us. It seemed that we split into about a 6 fighter hammer unit, and a 10 fighter anvil unit, while our opponents were 8 and 8. So our flanking unit kept finding ourselves at a disadvantage. Additionally, despite electing to "deny" the engagement (this is a tactic where you attempt to merely stay alive, rather than engage and die quickly as the result of a numerical or skill disadvantage), the commitment to that denial was weak and our flanking unit was losing too quickly.
The anvil/infantry unit was (if I remember correctly) running a standard shield wall and attempting to rely on using its long weapons to do the killing. It appeared that the shield wall was slow to engage, and that it was outmatched on range weapons. The tactic they were using is often not a bad tactic as the anvil, but we needed to rely on it to do the killing as the hammer was not able to get the job done.
We changed our tactics up and made a bigger commitment to the denial by just running away from our opponents and taking them out of the fight while our shield wall charged into the unit they were facing against. As a result, last two fights were very close, with our team actually winning one of them.

Additionally, in one of our battles, we managed to get around both flanks and get our enemies to turn back into each other. As a general rule of thumb, it's better to fight with your backs to the boundaries while facing the center of the battle rather than to be facing the boundaries with your backs to the center of the battle.

I was really happy with how we managed to improve our results by making these changes.
Lessons Learned:
- Commit to the tactic, whether that's killing or denial. Tactics can change throughout the course of battle, but once the decision is made, full commitment to that tactic should be implemented.
- Commit to the attack when numerical superiority had been seized. Commit to denial when the opponent has seized numerical superiority (though skill should also be considered).
- Always consider which side has the range weapon advantage and strategize accordingly.
- Fight while facing the battle field, not with your back to the battle field.
Final note; is it a good idea to put so many poles in a flanking unit? No. But we wanted to keep our units together, and that's what we brought.
3 Life Broken Field Rez BattlesThese are pretty straight forward. After 3 deaths, you're out of the battle. The team that runs out of people first, loses.
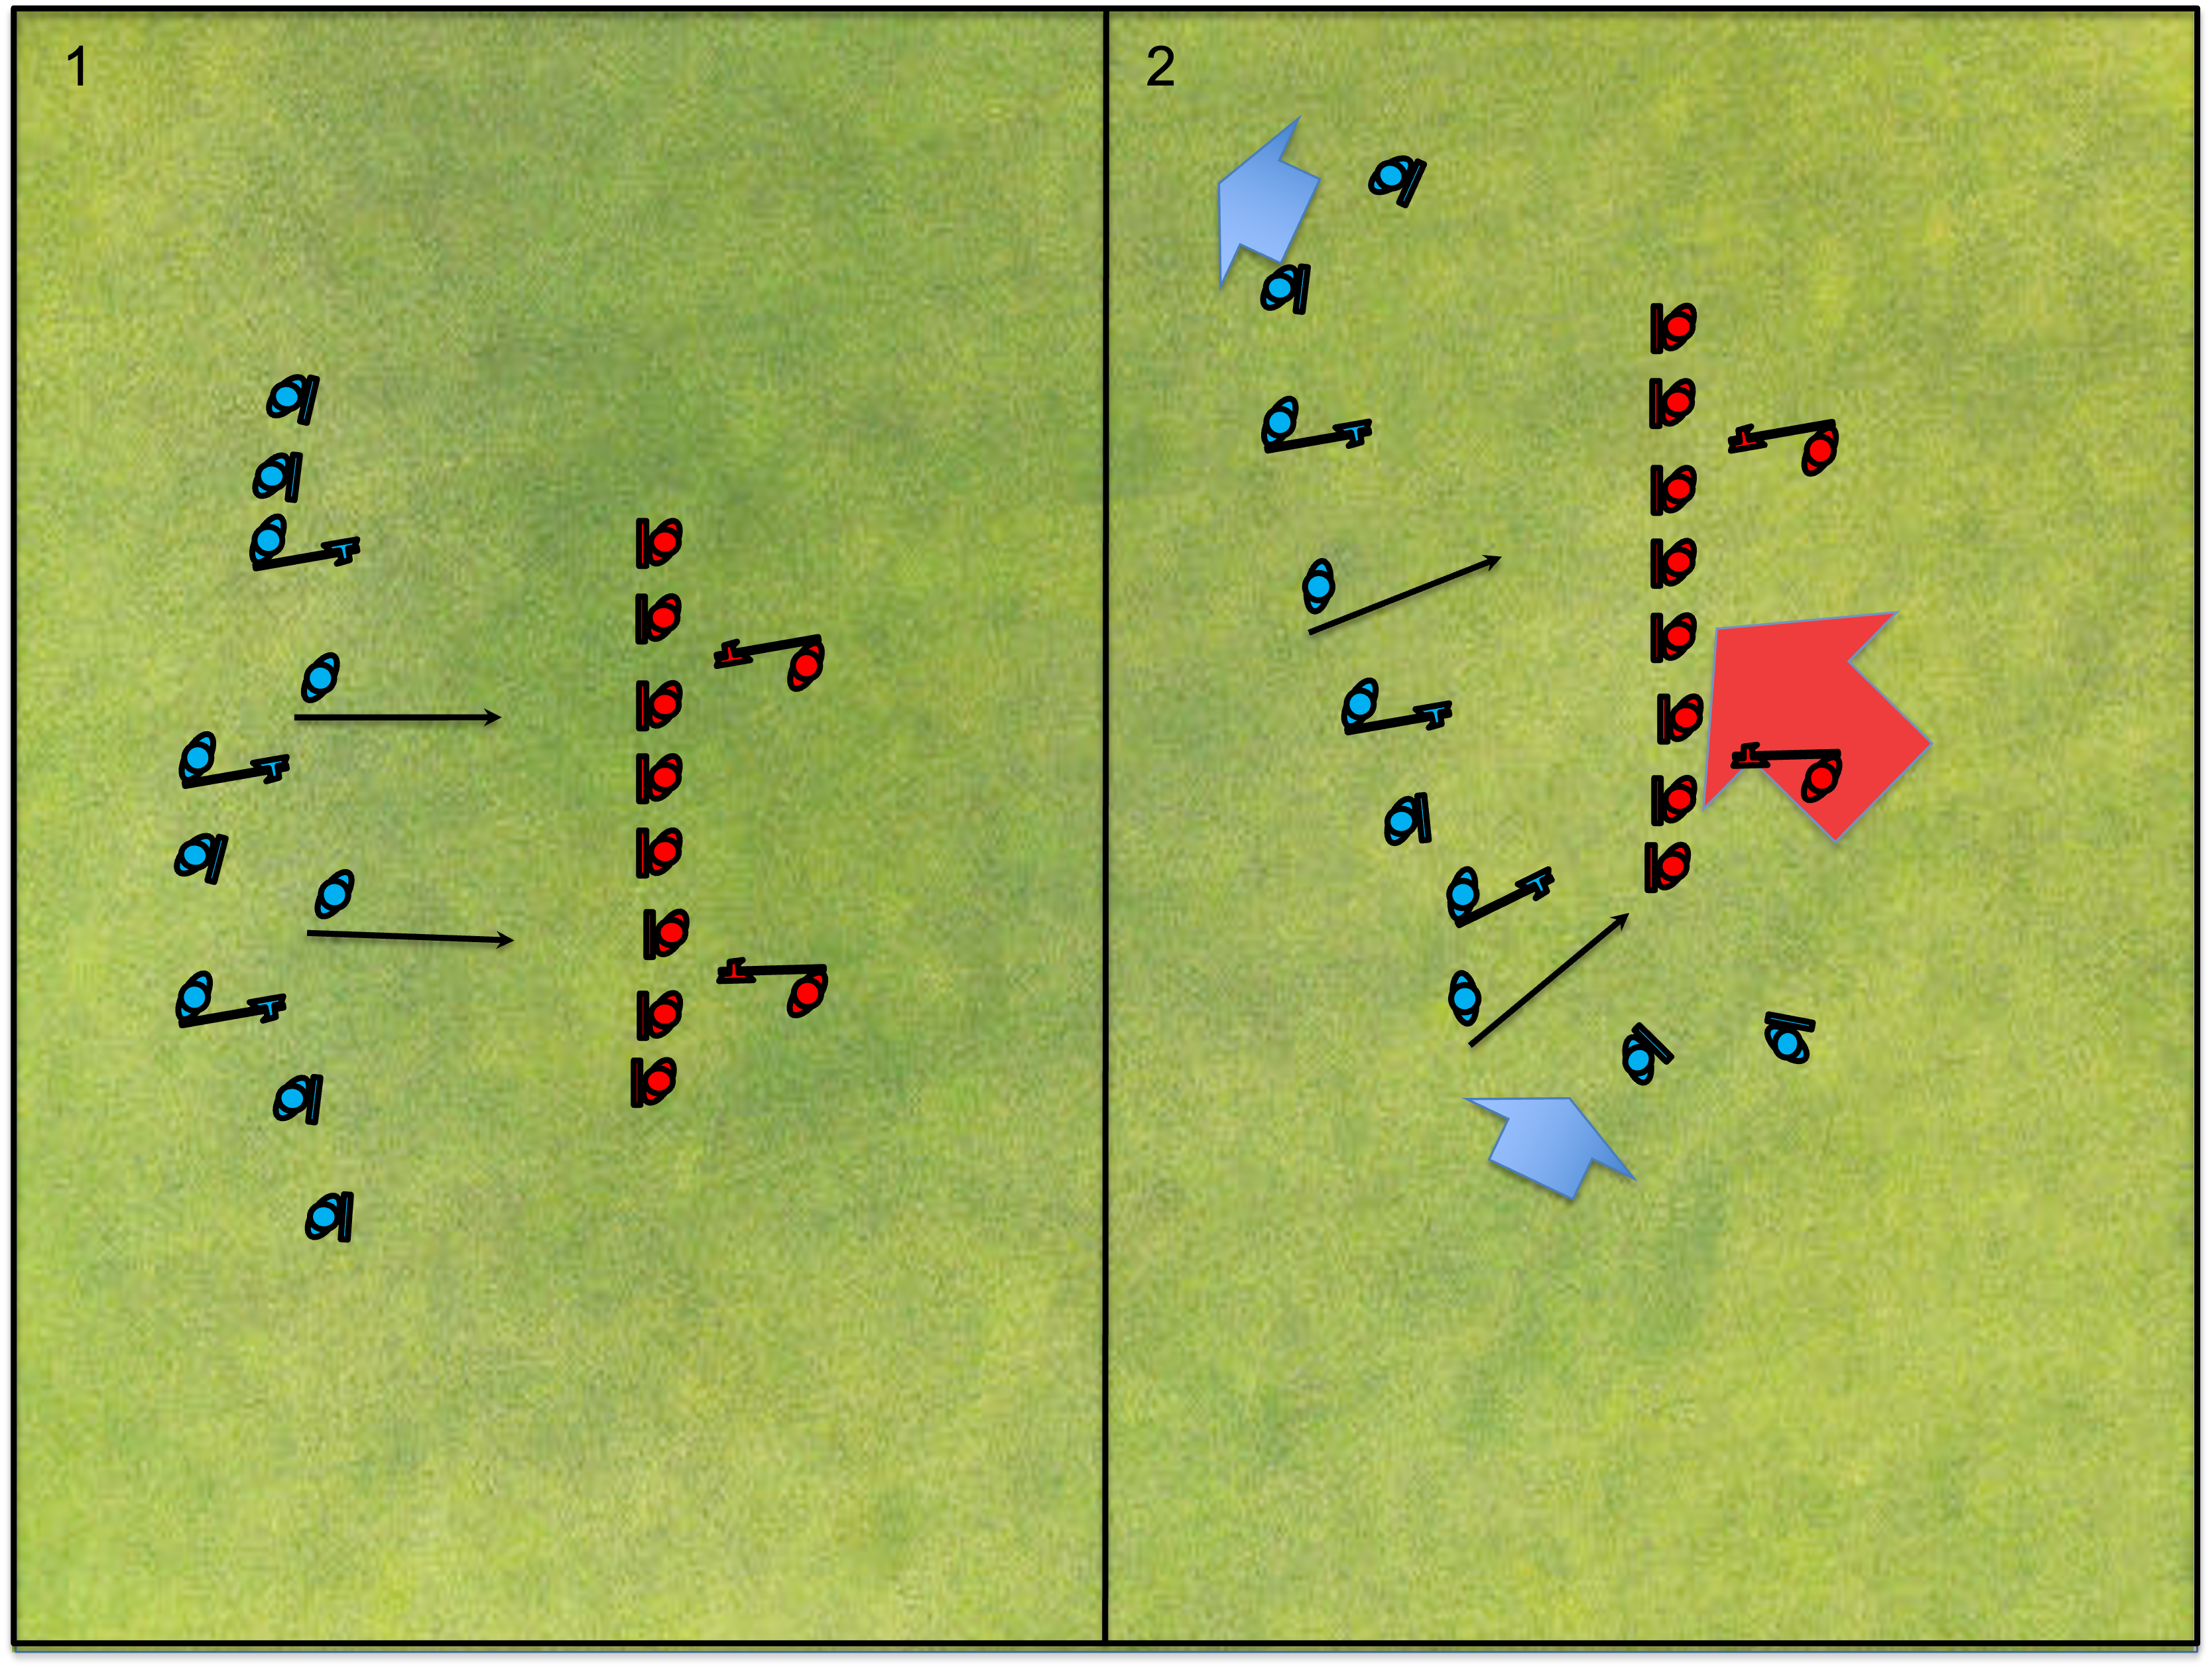
The main tactic that we discussed was the advantage of fighting close to your rez point instead of away from it. Often in these battles people get stuck in the mindset of controlling the middle of the field, so they try to take and hold ground. Since this is an attrition battle, it's actually far better to fight close to your rez point so that your dead fighters respawn more quickly.
In the picture below, blue has the advantage.
Additionally, the small groups of fighters need to use those choke points to their advantage. If possible, it's better to create a kill pocket and entice your opponent to fight into it.
Pictured below, red creates a kill pocket in the choke point.
It's also a good idea to control the left most boundary with a solid shield fighter to prevent the opponent from punching through that position and into your backfield.
In the first picture below, red tries to form a small shield wall in the center of the gap. In the second picture, there is a shield with his foot on the border to prevent penetration by the blue team.
Lessons Learned:Try to make the fight happen closer to your own rez point.
Use choke points to your advantage.
Protect the left flank with a strong shield
Kill the King Broken Field Rez Battle
This battle is similar to the scenario above, except that the lives are unlimited. The goal is to kill the "secret king" of the opposing team. This was a fun little game to break up the day. It still teaches you how to work together in teams, but also to pay attention and communicate with your teammates. Gradually, as you kill each of your opponents, you have to communicate to the rest of the team who has been killed and who you think might still be a potential king.
On our team, we had a strategy of having one of us behave like a king. That was me, and all I did was play a little more passively than usual, and then when people would attempt to charge me, I would run away really quickly. Ultimately it worked out for us.
Lessons Learned:
Observe and communicate.
Control Point Timed Bridge Battles
These battles had unlimited resurrections. The goal was to control the middle of the bridge after 90 seconds. There was a miscommunication in the first iteration, and the marshal never stopped the battle. Instead he was counting a point for each team that controlled the bridge at 90 second intervals, yet kept the clock running. After about 5 minutes we were all pretty certain that far more than 90 seconds had elapsed.
Regardless, it was good practice for moving a unit forward on a bridge.

Both teams had archers. The red team had 5 spears, while the blue team had only 2 spears.
The most common successful tactics in bridge battles, from my experience, is to bring the spears out in front of the shields to duel the spears on the opposing side. At some point, one side should realize that they are losing the spear fight and call a charge, which brings the shield rushing out of the second rank, past their own spears, and into the opponent's spears. If the opponent is well trained, their shields will come out of the second rank to oppose the charge. At this point, normally the poles will move into the second rank, with the spears looking for opportunity kills from the third rank, either over the top, or at about the waist line looking for belly shots when the shields come up.
Eventually people will either get tired, or the dead will pile up. Either way, the charging stops and the battle becomes static again, which brings the spears back to the front.
In this particular battle, we (the blue team) recognized that we only had two spears and would be facing 5 veteran spear fighters, so we never brought our spears to the front. We had to rely on, instead, keeping our shields in the front rank as long as possible. The shields would either hold their position, advance slowly to take ground, or charge.
Lessons Learned:- Commanders are necessary to coordinate the units to either, "stay the line and maintain position," bring "spears to the front," bring "shields to the front," "step forward," "charge," or "fall back."
- When charges are called, it's the shields who lead the charges so they should expect to move past their own spears when charging.
- Charges are best called when the other team has their spears in the front rank, while your own team has enough shields ready to implement the charge.
- Avoid solo charges, unless a really good opportunity presents itself.
- Keeping track of time and coordinating a big push past the objective near the time limit is a good strategy.
- The longer a battle lasts, the more advantageous range weapons become. Shorter battles give the advantage to the units with more shields.
- Weapons mix relative to the opponent should always be considered when forming a strategy.
Single Death Field Battles (medium sized teams)We finished off the day by breaking up the group into three equally sized units of roughly 10 fighters each and fought two round robin fights. So team A fought team B. Then A fought C. And then B fought C. We repeated the whole process again so that each team fought each other team twice for a total of four fights each.
There was an interesting amount of variety in the different groups. Team A was young and fast and comprised of two poles while the rest were shields. Team B had a lot of old veterans, many with a very hight level of skill, and contained two spears, a few poles, and a lower proportion of shields. Team C was a collection of fighters who don't practice together very often, and had a low number of shields, but no spears.
As for tactics, team A would typically want to perform a coordinated and cohesive charge in each fight. Team B would normally want to spread out, keep their spears alive, protect the flanks, and try their best to draw their opponents into a kill pocket. If team A would go for a flank, team B would need to drag out that flank while attempting to envelop on the other. Both tactics are good. The winner would be determined based on skill, commitment to the initiative, and whomever performs more effectively in that battle.

In theory, Team C should be able to play the envelop tactic against A, and the charge tactic against B. I was on team C, and we struggled with either tactic. Our best showing was in our last fight where Sir Tash had asked me and Galfred to be a flanking kill team and commit to hitting the flank hard and scoring some kills. We were actually fairly successful. We ran hard and found two quick 2v1 opportunities, which we won, and then were able to get back into the fight behind our enemy.
Lessons Learned:- Groups that train together and train often will have an advantage regardless of the tactics used.
- Weapon mix should largely determine what kind of tactics you'll use.
- Sometimes you have to think outside of the box and look for mismatches to take advantage of.
- I really need to build an Atlantian legal polearm that is longer than six feet!
Final Thoughts
I really like this style of practice, and it is very similar to what we do up in the East Kingdom. Many years ago I attended a practice where we got in half the amount of fighting, and each side was micromanaged and told exactly what tactic to follow. Yes, sometimes you do need to take some time to work on a specific drill or technique, but I also strongly believe that there needs to be a certain amount of free play. Let each team figure out what to do on their own. If they lose, maybe they'll adjust. If they keep losing, give them some hints. And with the limited amount of melee practice that any of us actually get, helmet time is really important.
I'd also like to add a big thank you to our commander, Baron Cormac. Being commander is a thankless job and it tends to take on all the blame (we lost because of a bad plan) and none of the credit (we won because Me/Myself/&I got so many kills!). I personally don't think I'm a great commander, but rather a better analysts and teacher. I can tell you what you should have done after you already did it, but not always what we should do. Regardless, every army needs an executive decision maker and I'm always happy when someone steps up to take on that role.
Finally, I'd like to thank absolutely everyone who helped make this happen. That includes the organizers, the marshals, the people who came to watch and socialize, the fighters, the people who helped set up, break down, pick up trash, etc. etc.
Until next time!
Sir Bari of Anglesey, East Kingdom