Who here discusses tactics with their house hold over dinner? How often? Is it a regular part of the conversation?
Where I live, tactics are rarely discussed. Of course, what's to discuss? Form a shield wall and go right, what else is there to say? Who ever hits first and hits the hardest, wins.
The Anglesey approach is much different than what standard units around these parts do. It has its plusses and minuses. The plus is that its more effective. It really is, at least more effective than most. Its like playing college basketball offenses against high school basketball defenses. The downside is that it takes time and dedication to learn. Forming a shield wall and going right can be learned in a day. What I'm about to describe takes years to understand the nuances of more advanced melee fighting.
Stages of a Fighter
There are stages of fighting that one must progress through in order to master the melee. In my opinion, most fighters never really get past the first stage.
1 - One on One
2 - Supporter
3 - Leader
Most people begin at the one on one stage. What this means is that if you see a person, you go and fight him with no concept of how it fits into the bigger picture of the battle. This also means that if you see a friend fighting someone, you tend to leave him alone and either watch until the fight is over, or look for someone else to fight. Often times in this stage, the fighter will charge at any one person on the field, even if that person has three friends backing him up. At other times, fighters will actually grab each other's attention and give a little nod like, "Hey, are you ready? You are? Okay, lets fight."
For some people, this stage lasts forever. If you are a unit or army commander with no interest in actually developing these fighters within the context of a melee, the best you can hope for is to teach them to "stick together" and listen to commands (usually either "charge," or some other phrase which means "don't charge").
I've come to expect new fighters, with proper training, to exit out of this stage within 10-15 events (counting each day at a multi day event has its own event). The next stage is the supporter. This is a fighter that doesn't really know what to do, but they know who does. Instead of running out and trying to find a one on one fight, they start watching the experienced fighters drawing attention, and then they run in and kill their opponents when the opportunity arrises.
Great examples would be when I fight with a sword and shield and have either Yangus or Rygus as my wingmen. Now to be clear, no one tells them to be my wingman. They just know by now to look for fighters to support, and we often find ourselves next to each other. Now, since I'm not a particularly great sword and shield fighter, I am often out matched when an enemy shield presses me. What I like to do is draw him in to me with my body movement and get him to turn the back of his head to my wingman who's fighting with a pole, giving that pole fighter an easy kill.
The final stage is to be a leader. This doesn't mean unit commander, but rather one who knows how to make things happen on the field. At this point, he should have other "supporters" watching and helping him out. Typically it takes probably 50 - 100 events to truly get to this level.
5 Fundamentals
This is what I wrote out at Denny's after practice.
1 - Support the Flanks
This is job #1. If your flanks drop, you're dead. So many units make fighting easy because they "stick together," which allows us to form a kill pocket. Keep enemy fighters out of your backfield, or if they do get into your backfield, contain them. Personally I prefer having the two best shieldmen on the flanks.
2 - Even Balance of Weapons and Strength
Spread your weapons and your strengths out evenly unless there is some clear objective that calls for a specific strategy (like the gate you need to defend is on your left and they are lining up a big bubba shield wall to crash into it). Clumping spears together allows the other side a weakness to run over. Clumping shields together in a static battle will give their spears easy targets. Putting all of your new fighters on the same flank will cause that flank to collapse. Etc.
3 - Asses Range Advantage
If they have archers and you don't, you need to press the attack before they can pick your line apart. If you have 4 veteran spears, and they have 2 novice spears, lull them into a static fight and pick them apart.
4 - Push at Least One Flank
Almost always you want to try to get them into a kill pocket. Ideally I like to use a pincer attack and move at both flanks, but sometimes it makes sense to only push on one side while trying to keep the other side stable. Sometimes you don't have the ability to push either side, so you do your best to control both sides, or reposition your unit somewhere else.
5 - Can you win, or will you lose?
Not every battle can be won. If their right flank is stacked with more talent than your left flank, then you have to do your best to draw out the fight and attempt to keep the flank stable. If you can win quickly, then win as quickly as you can because you might be losing somewhere else on the field. If you can't win, then try to survive. If survival is futile, then try to drag out the fight as long as possible and die in a position on the field that sets up the rest of your side for the greatest odds of winning.
When tourney fighting, you have to believe that you can beat anyone in front of you. In melee fighting, you want to avoid any situation where your odds of winning are not greatly in your favor. Stall the knight, kill his squires.
Tactics Cheat Sheet
#5 leads to a simple tactics cheat sheet that our warlord, Arundoor, put together. Its a nice way at looking at the decisions you should make given your tactical situation on the field.
Final Note
Anglesey has been going through a growth phase, which is a good thing. A lot of this growth has occurred within the borders of the East Kingdom. "Kinsmen" are our leaders, and lately we've been getting ~8-12 kinsmen fighting at Pennsic. Ideally we are strongest when at least half of our unit are kinsmen. We only have 2 kinsmen in the East, and until recently, 5 of our other 6 fighters in the kingdom were in stage 1. Anglesey tactics don't work well for that kind of mix of talent, but we always believe in the long game. I fully expect this same group of guys to "hold their own" this year and develop into some real killing machines in just a few short years.
For several years, now, Duke Timothy has been putting on a fantastic event in a corn maze. We fought from 11:00 to 4:00 with zero breaks, and then many fought again from 6pm to midnight. As our warlord said, "He seems to have cracked the code for putting on fighting events. Now if he can only write the instructions to the rest of the SCA and get them to follow suit."
Most of the scenarios mainly played out kind of like a woods battle, and there wasn't much in the way of tactics that presented itself to be of any interest, but I did find one glaring hole in some of the smaller 5 man teams.
Rule number 1, as far as I have always been concerned, is to first identify who has the range superiority. If your side has more spears and/or archers, then you want to lull the other side into a static fight. Any shields that you have should stay out of the way and only step up when the other side is threatening a charge, in which case their job is to stop the charge and keep the spears and archers alive.
On the other hand, if your side has fewer spears and/or archers, or if your overall range strength is less due to experience and/or talent, you have no choice but to charge and to do it quickly. The 5 man teams that understood this rule were very difficult to beat, but there were many who didn't seem to understand (or care).
Warlord Tourney
There were several warlord tourney's that were run starting with 5 man teams. A 5 man team would seek out another 5 man team and fight it out. After the fight, everyone instantly resurrects and the losing team gets absorbed by the winning team, who then goes on to fight a 10 on 10 fight. The final battle was a 20 on 20 on 20 three way fight, which was quite interesting (it actually worked out well).
Personally I feel that the ideal 5 man team in a corn maze would consist of 2-4 shields with some poles and, at the most, 1 spear. Interestingly, one of the warlord tourney winners was a team of 4 spears and 1 shield. In fact, 3 of the 5 fighters had less than 2 years of experience, each. In my opinion, despite the talent of the other two fighters, there's no reason why this team should have won the first fight (some of the team members said as much to me). How did they win? The first group they ran into failed to recognize the need to charge. They stood there and let the spears pick them apart. After winning the first fight, the team now head a spear heavy 10 man squad which is actually tactically strong.
Spear vs Shield
In one of the 5 man scenarios I found myself across from our warlord Arundoor. Anyone who knows him knows that he is incredibly dangerous in a melee. As soon as our two teams met, I got a quick kill with my spears against one of his teammates. Understanding rule #1, he immediately made a charge at me. Normally I'd flee and let someone else take him on, but I knew that we had no shields to back me up and that I would not be able to swing out into a position where I could get my spear into action. So I slammed my body into his shield hoping to prevent him from getting into our backfield.
As a result, I lost an arm, but I made him swing 3 times to get it, and he ended up getting killed by one of our poles in the process. In this exchange I believe we both made the correct tactical decision.
Being without an arm, I charged their archer hoping to keep him from being able to reload his crossbow. I was more interested in neutralizing him than I was in killing him.
Unrelated: Melee vs Singles Practice
So that's all I really had to write on that subject, but while I have the blog open I thought I'd bring up another topic:
A recent conversation came up about whether or not one should practice melees or singles in order to get better at melee fighting. The literal argument was made that one should practice singles 100% of the time, and that the refined killing skills would translate well to melee. The context was not practicing singles versus not practicing at all, but rather singles versus melee.
Now, truth be told, I don't really believe that the argument was meant to be taken literally. I think there are lots of reasons to spend the bulk of one's time practicing with singles, with the top two being 1) its easier to get a singles practice going and 2) you will improve both tourney and melee skills while melee practice does nothing for tourney. But I can't disagree more with the idea that one should practice singles instead of melee if the goal is to improve melee.
This is my 61st post on melee tactics, very little of which can actually be learned in a singles practice, and I don't think I'm running out of things to write about. Does anyone think that the players on basketball, soccer, and hockey teams spend the bulk of their practice in one on one situations? Of course not. The bulk of the success in a melee comes from positioning, communication, leadership, knowing how to read your opponent, assessing your strengths and weaknesses, knowing what weapon to bring to what kind of fight, knowing whether to press, stall, or run away, etc. and to do all of this while spending the least amount of time thinking. This can only come from training those specific skills.
Sure, a given fighter with improved singles skills is going to be more dangerous fighter, all else being equal, which is why a portion of practice should be dedicated to fighting 1 on 1 (in fact, I'd probably recommend that at least 50% of a melee fighter's practice be spent practicing singles or pell work). But given the choice, I'd much rather have a pole arm on my side who's skills are limited to a basic over hand chop to the head who knows his role on our team rather than a quarter finalist in crown who has little clue of how to fight in a melee. As a friend once said, "I like fighting with you guys. On Saturday, I couldn't die because your poles beat off anyone who tried to kill me. The next day, fighting with that other group, they just let people run me down."
I'm sure some reading this will disagree, and to that all I can say is to trust me. I've been doing this for over 20 years and have specifically focused on melee. Its not a skill that can go unpracticed. Like anything else, you have to pay for your education in bruises. Its not something you can just figure out by thinking about it on the day of the battle.
EDIT: (this post is considering skirmish situations, or any situation where a small group of fighters find themselves detached from a larger unit)
Spear is my best weapon and I've been fighting primarily with it since 1995 or so (started off with great sword). One of the things I picked up early on, as well as my friends in Anglesey, Concusare, Galatia, KF, Head Clan, and the other melee groups in our region was that spears don't need to hide behind shields as is often taught in the SCA.
There has been this prevailing philosophy in the SCA that you want to bring all of your points to the enemy at the same time. This would mean, for example, that your shield should be within 3 feet of the enemy, your poles 7 1/2 feet, and your spears 9 feet. In theory, this combination of attackers should have three weapon ends on the opponent at the same time. There's also a belief that shields offer the best defense and spears offer the worst defense, so shields should stand in front of the spears to keep the spears safe.
This philosophy is missing the forest through the trees. The BEST defense is being out of range of your opponent while your best offense is to hit an enemy who can't hit you back. For this reason, I like to have most engagements begin with the long weapons out in front and the short weapons waiting in quick reserve, waiting to see what the opponent is going to do and then attacking him when he is blinded or focussed on someone else.
What if the opponent charges your spear? The spear has feet, does he not? Your poles have feet, do they not? Certainly your shieldmen have feet as well. If a shield begins one full step behind his spear, in the time it takes one step, a spear can take a step backward while the shield takes a step forward, and the spear is now behind the shield.
Experiment
I didn't need to do this experiment because I already knew the answer from 20+ years of experience, but I did it anyway to help our new guys to understand. We had a newish sword and shield on the left, a newish pole fighter on the right, myself in the middle with a spear, and we faced a young, athletic, well practiced shieldman with 4 years of experience. The shield merely had to get into position to kill me to with the scenario. I was only allowed to move at walking speed (this prevents me from just turning and running away and winning by cardio rather than by tactics).
We tried three different scenarios, each one doing 3-5 times.
1) Spear behind the pole and shield
2) Spear even with the pole and shield
3) Spear in front of the pole and shield
Results:
1) Opponent used our shield to pivot around to get into the back field
2) Opponent used the same strategy as in 1, but with significantly less success (50%?)
3) Opponent said after several tried that it wasn't even worth trying anymore because he was getting overwhelmed. He repeatedly either got stabbed in the face, stabbed in the belly, or hit on teh left side of his head by the pole.
The big difference was that in the first scenario, the enemy could get close enough to our line before our weapons got into range that he could block both the pole and spear with his shield as he made a dash to pivot around our shieldman. He would be blinded briefly, but could see the fee of our shieldman to make the turn.
In the 3rd scenario, he would have to begin his charge 6-7 feet further out. This put him charging 14 feet away from our shieldman instead of 8 feet, which meant that he couldn't see the feet of our shield, and it gave our entire side time to react and maneuver so that he couldn't pivot around our shield and into the backfield. At some point he would have to take a peek to see where we were, and he'd either look over his shield and take a shot to the head or face, or he'd look past the side of his shield and take a stab at the face or belly.
The gif below compares the two scenarios:
After doing several of these drills, our pole fighter, Rygus, had employed these very same tactics at the next couple of events with astounding success. Attacking to the left side of the head of the enemy shieldmen before he can get within weapons range sets up the rest of our team for success.
I've been collecting ideas for a few months now and decided to just make this a big brain dump. I think there's a lot of good stuff here.
Exploiting Range Advantages
I noticed that some of our newer fighters don't understand the value in exploiting a range advantage. With 1-2 years experience, they have managed to figure out mostly how to key off of the veteran fighters, which is a good thing. Being the least experienced people on the field generally means that they are going to lose most 1 on 1 engagements, so they have learned to let the veterans set up the situation, stay alive, and then come in and help when needed.
What I've noticed they are now missing is understanding when they have a clear, safe advantage regardless of experience level.
Two examples stick out in my mind. "Rygus, start throwing shots at him. You have a 7 1/2 foot pole arm, he's fighting with a 6 footer. Throw some shots. Don't worry, he won't charge while I'm here. Okay, you still aren't throwing shots. You should have thrown 5 shots by now." Rygus just would not attack.
The second was an interesting battle where they only allowed great weapons. Spears were allowed only if you didn't bring a great weapon (made me wish I left my pole at home). We were in a situation where we were facing nothing but poles and we had one spear and he wasn't throwing any shots. After some cajoling, he finally threw a shot, and it hit a pole fighter in the arm. "See? The worst that can happen is that you actually hit someone."
As a veteran fighter, I generally won't throw spear shots unless I see something I think I have a good chance to hit. However, there's usually enough targets that I think I can hit that the shots will come often enough. Also, I know how to make things happen on a field even when not throwing anything.
Less experienced fighters, on the other hand, don't often have those tools. They can either attack, or wait. Waiting accomplishes nothing. Attacking does a few things:
1) It might kill someone 2) It makes the enemy concerned that an attack is coming 3) It might blind them for a second 4) It might make them throw a defense which then tells you something about their defenses 5) It might set up one of your veterans for an attack of opportunity
Containing His Majesty King Amos le Pios We fought some 5 on 5 battles at War of the Wings. In one of the battles we faced Mountains Keep, who brought a variety of fighters, however Amos was the only knight who chose to fight in this scenario. Amos was certainly the most experienced and effective fighter on their team and was fighting with a Dane axe. I believe the other 4 had shields.
We, on the other hand, had two shields, two spears, and one pole (me). The field had a boundary on one side (our left) and was open on the other.
Our initial plan was to have our strongest shield (and probably our strongest fighter) on the open side, and our other shield on the inside (in this case the left). The spears were in between, with the pole floating in the back. Our set up was to initiate the attacks with the spears expecting them to charge at the spears, and then the other three of us would have to react. We also thought that we might be able to keep Amos out of the fight because he wouldn't want to face 2 spears and a pole.
Amos, however, being very melee savvy, made an adjustment before the battle began and moved onto the open flank and took a shield with him. At lay on, they both moved around our right flank. Our right shield went out to meet him with our right spear staying beside him.
I made a quick read on the situation and thought that I was better suited to fight Amos with my pole. I didn't need to win, only to contain him, while freeing up our most dangerous fighter to go and kill the rest of his team. I moved to the outside and told our team "I'll get Amos."
Why did I feel I was the better match for Amos? Generally speaking, the shield should have the advantage on an axe in a 1 on 1. However, the shield needs to close. In this situation the shield would have to close on an axe and a shield, which puts him at a disadvantage. Or, this might free up the shield to run down the spear. More importantly, Amos is almost a duke and has far more experience fighting Dane axe vs shield than our shieldman does. I, on the other hand, fight great weapon on great weapon all the time.
After making the switch, our shield ran off and attacked the others, Amos made a B line for our spear and I chased, placing him in the center of the fighting and a bad position.
Learning Other Weapons Forms
One might ask, "Why were you fighting with a pole instead of a spear?" Of the five people on our team above, four of us are best with spear, but four spears and a shield is not a very good 5 man team weapons mix. With that said, some people need to pick up other weapons to make it a better mix, and there's an art to figuring out whether its better to use the weapon that you are better fighting with, or the weapon form that is better for the occasion.
With this mix of people, Titus is the second best shield and the shield is a critical piece to anchor the left flank, so he took shield. Out of what's left, I'm the best pole, so that's what I took. Had we been in a larger melee, El Kabong might have taken a pole and I'd move to spear based entirely on the different dynamics of larger fights.
Additionally I've been working on left hand center grip shield over the last two years. Had Titus not been there, I may have taken a shield to try to secure the left flank. I'm not great with a shield, but I'm good enough to neutralize most average / slightly above average fighters.
Avoiding Fair Fights
Whether I'm fighting pole against King Amos, or shield against a decent shieldman, I have no intentions of fighting any of them 1 on 1. The odds just aren't good enough for me to do so. I focus more on holding the position, and trying to draw them into a 2 on 1 fight. There's no need to put myself at risk.
In most scenarios you need to identify if you are a killer, or a supporter. A spear in a line facing a bunch of poles is a killer. A great fighter against a bad fighter is a killer. Two people against one are killers. A shield running down a spear is a killer.
A shield with 2 years of experience against another shield? That's a supporter.
Having said that, the Bog was very successful at Battle on the Bay last month. As observed by an East Kingdom friend who fought with us for the first time, "I don't think I ever saw you guys engage with someone unless you had a 3 on 1 advantage." We are constantly looking for those kinds of advantages!
Bridge Battles
Bridge battles have become much more fluid over the years. There was a time when we would just dominate bridges because the prevailing philosophy was to keep the spears behind the shield wall. We'd bring all of ours to the front and literally decimate the other side. Every now and then they'd mount a charge, and we'd just fall back behind our shields, let the carnage happen, and then come back out and pick them apart.
Now it seems that at least in the East and in Atlantian, most battles turn into meat grinders with a constant back and forth between the shields and spears. Two walls will charge at each other resulting in deaths and fatigue. Once things settle down a bit, bodies pile up, and people get tired from the push, a few spears start to trickle out to fight over the gap. Once one side finds that they are at the range disadvantage, or they start losing ground, they will mount a charge.
Its been a while since I've seen two full ranks of spears going at it for any length of time.
The most successful units are the ones who can get organized. If the spears are fighting, get the shields out of the way. No spears should be standing around in the second rank. If a shield is not actively fighting in a press, he should be giving up his spot for a 3rd rank spear. etc.
3 on 1 Drill. Spear to the Front Wins
I did a drill a while back that was a 3 on 1, with an experienced shield being in the 1 position. On our side we had a veteran spear, and two relatively new fighters (a lefty shield on the left, and a pole on the right).
The single shield had only one goal; get to the backfield and touch the spear (spear could move but not run).
We did 3 scenarios:
1) Spear behind shield and pole 2) Spear even with shield and pole 3) Spear ahead of shield and pole
Most people tend to think that 1) would be the most successful and 3) the least successful, but the opposite was actually true (as I knew it would be). The thought is that you want to bring all three fighters into the fight at the same time, and that a spear out front is unprotected.
What they don't realize is that in scenario 3, the spear forces the shield to commit a good 6 feet further than he does in scenario 1. It also forces an angle of attack that is much easier to adjust to for the team of 3. The spear doesn't get run down because he only needs to take a step or two back while the others take a step or two forward to meet the opponent.
In scenario 1), the single shield made it around the flanks every time. In scenario 3), the shield said that the scenario seemed unwinable no matter what he tried.
2 on 2 Rez Battle with 360 Degree Friendly Engagement
Keeping the rez points close, we did this 2 on 2 fight, with one catch. If anyone gets hit from behind, that person has to run a lap. The point of the drill was to promote situational awareness while also trying to get people to think about getting behind the enemy.
Another great lesson was learned, however. At one point my partner was killed. As he began to jog back to the rez point, the enemy turned to face me. They paused for a beat or two, and then watched me as I jogged behind my dead friend and met him at the rez point.
Never fight a 1 on 2 fight when you can easily make it a 2 on 2 fight.
Had a wet and rainy River War, but fun nonetheless. Captains were determined through a series of Roman melees, and teams were picked. There were three small units, and a bunch of unattached fighters. The units were Hrafnox, Bloodguard, and Anglesey. Though to be more specific, I'd like to call it Hrafnox Travel Squad, Bloodguard South, and Anglesey East. I say that because anyone of our groups can be amazing or less impressive, depending entirely on who shows up. In this case, Hrafnox had their most practiced fighters (and they are looking really very good these days), Bloodguard had a mix of high end and newer fighters, and Anglesey had mostly fighters with 1-2 years of experience (plus myself).
Once teams were picked, Hrafnox and Bloodguard ended up being one side while Anglesey East and a mix of unattached fighters made up the other team. The field was wide enough to do a small amount of maneuvering, but narrow enough that both flanks can be easily controlled (maybe 15 - 20 yards wide?). There was a slight hill from one end to the next, with a steeper hill from flank to flank.
Strategy/Tactics
The first thing I looked at was weapons mixes and what we could do with them. Our opponent had, in my opinion....as well as everyone else's opinion, the better units and the better fighters. Whenever that happens, I think about the game rock, paper, scissors. There are two ways to win this game. 1) If their side throws rock, then you throw paper. 2) If their side throws rock, you throw a bigger rock. Whatever they were going to throw was going to be bigger than ours, so the only chance we had was to throw something else. Looking at the weapons mixes, I noticed that they had 4-5 spears, so we went with no spears (something that is very rare to see out of Anglesey). If we could press them in the fight, then we stood a chance.
The Big Picture with Newer Fighters
I often get stuck in this paradigm trying to figure out what is THE best method, or style, or strategy that is a one size fits all best way of doing things. Likewise when a lot of people learn to fight in the SCA, they think that the way that they were taught is THE right way to do things. There are actually lots of right ways to do something (though even more wrong ways) and much of it depends on the makeup of the fighters involved.
This also largely depends on the experience of the fighters, both individually and collectively. When I used to be a high school varsity basketball coach, I read up on systems of play. I found it very interesting that at the very lowest levels, the plays were very structured and very simple. Once you got to the high school varsity level, the structure stayed, but the plays got more and more complicated. By the time one got to the pro level, a lot of the structure went away.
You see, the least experienced players need to know where to go and where everyone else is going to be, and they need to be able to process this while playing a fast paced game. An offense might, for example, always have someone standing in the corner. So you know there's always going to be someone there to throw the ball to. At the high school level they can handle more complicated plays, and be able to process the movements of their teammates more quickly. At the pro level, OTOH, there is this very advanced sense of play where each player has a myriad of things that he can do, and his teammates can anticipate which one he's going to do and generally know where to go and what to do, all in a fraction of a second.
Applying this to the SCA, newer fighters generally need a lot more structure while experienced fighters can feel the flow much more quickly and can have room to improvise on the fly.
Our Approach
Opponents who are any good generally come up with one of two systems for what is essentially a 10 man team battle. They will either set up one big unit, often as a shield wall, and try to steer that mass at a flank or a weakness that they can spot, or they will split off a small flanking unit (usually no more than 3 flankers) and try a hammer and anvil approach (the main unit press forward while the flankers pinch on the outside). In my personal opinion, I think the former approach is easier to teach and more appropriate for less experienced fighters, but that the hammer and anvil approach is more effective if implemented well.
Lately I've been using a different approach that looks to exploit either of the above approaches. Instead of a main unit and a flanking unit, I set up two equal strength units that both move onto the flanks. I then set myself as a floating commander in the backfield between the two units and call out which unit to press the attack based on their positioning.
At this point, its a pretty easy read for me. If we are facing a single large unit, either pinch on both flanks (giving us the better position in the fight) or charge at the big unit's flank with whichever unit has the flanking position. If we are, instead, facing a main unit and a flanking unit, one of our units will likely be across from the flanking unit, while the other will be across from the main unit. In this case, you attack the flankers and stall the engagement against the main unit. If you allow some flexibility in the units, some fighters can peel off and hit the flank of the main unit as they are pressing forward onto our other unit.
Initial Problems and Improvements
In our very first engagement we got slaughtered. Our left unit went after the flankers and they plain just ran around us. The fight was over very quickly.
So we corrected that by moving much more aggressively to the flanks. Over the course of the next several battles I was realizing that Anglesey East, with very little experience in the unit, was not doing a good job of stalling. The first couple of fights they charged when the other group charged. Then, even when they stopped doing that, they would still walk toward the enemy quickly when the other group charged. It took me a while to get the idea across, but they finally figured out to literally try to stay out of the fight as long as possible and to pull Bloodguard with them. We went from killing very few people in these fights to killing over half of their side.
Always remember: Kill quickly, die slowly.
At one point a member of the other team suggested giving us the uphill advantage. It wasn't much of an advantage, but it wasn't insignificant. So after switching sides we started doing a little better. The knight on our team suggested trying a different strategy. Instead of attacking the flankers, the mixed unit turned down the hill and slammed into the main unit on the oblique. This worked out well, with one problem. Anglesey East stalled and tried to stay out of the fight. I explained at this point that with the oblique attack on the main unit, they needed to charge with them so that we could attack with higher numbers and a flanked position.
By the end of the day we were able to take a group of people who don't fight together, 8 of whom have 1-2 years of experience, and go from getting slaughtered to actually being able to hold our own. Someone told me we even won 1 or 2 battles. I don't know if that was true, but if we were close enough to even believe that to be the case, then I consider it a moral victory. If anything, we were definitely delivering 7 or more casualties by the end of the fights toward the end.
Taking the Initiative
Successes in any of these formats come from taking the initiative when opportunity presents itself. Anglesey East was struggling because they were committing 70%, both when it came time to get engaged, or when it came time to refuse engagement.
The Skirmish Approach
The eventual goal is to be able to win battles like this without units and commands. We can fight under that system when we have our veterans on the field, even with 40-50% new fighters. When the new fighter ratio is literally at 83%, some organization needs to be applied.
Lessons Learned
Two constructive criticisms I got from the other side was that I left Anglesey East leaderless and they both recommended that I should have stayed with the group. The problem was, our entire side didn't have an experienced leader, so had I done that, we might have had the same problem with the other group. I'm not certain that *I* needed to be the leader, but that someone should have been. I think that's going to be the next step in our training. They didn't need a great leader, they just needed someone to make the calls that needed to be made, and I need to start asking some of the newer guys to take this on.
Having said that, I thought we did very very well given the lack of experience on our side.
This year we had, to the best of my knowledge, ~1200 fighters in total on the battle field to fight the four field battles. In this blog post I'll do my best to give an overview of the fighting, but its going to be largely from the perspective of my unit and where we were situated on the field.
Anglesey and The Bog
My unit is Anglesey (green and gold), and this year we brought 23 heavy fighters to the field. Galatia (black and white) brought 6, The Concusare 12, Red Branch 4, and Mountains Keep 9 (rough guesses).
Rough totals (54 fighters):
25 Sword and Board 17 Spears 8 Polearms 4 Archers
~22 newish fighters, and 32 solid veterans (mostly 15+ years exp)
Our unit, for the most part, is a collection of early period celts who fight as free (no fealty to the crown) fighters based mostly out of the D.C. area with a small contingent of Anglesey out of Philly, and Mountains Keep (not traditionally part of the Bog) being an Atlantian Household out of N.C. Our fighting style is much more wolf pack / skirmish than most SCA units.
In short, we hate politics and we love to fight!
Organization
This was a task for us this year. Its been a long time since we've really had to worry about this. In a good year, we'll bring 25 fighters to the field, with at least 20 being long time veterans. We had a lot of growth this year, which doubled our numbers and brought our inexperienced ratio to over 40%.
We don't fight in a classic SCA style (and we hope to never have to) which means we couldn't just pile then new people in the 4th rank, or intersperse them into a shield wall. We also like to bring as many fighters to the point of killing as possible, which means our front gets spread very wide which is difficult to command.
To tackle this, we did a handful of things:
1) We trained our new fighters to fight within our system. This involved lots of small drills when we only had 3-4 people at a practice, on line guides explaining our system, and a lot of feedback at battles from the new people.
2) The buddy system. We gave each new fighter a veteran to follow around and explained to them how to fight with that veteran. For the most part what we really wanted to accomplish was to have our new fighters spread out evenly within the unit, rather than to have a clump of them creating a weakness somewhere in the line. I learned this lesson at a Battle on the Bay field battle where three new guys entered the field from the left and stood on the left flank. In the next fight our left flank got horribly rolled in quick order.
3) A three commander approach. Each unit had its own commanders, but we put three key commanders on the left flank, center, and right flank (I was right flank). The three of us have a long history of fighting with each other, so intentions can be communicated without needing to be vocalized. Some of it is the way a person moves, some is actual hand signals, and some is simply a psychic link that you pick up from years of fighting together.
4) Spreading out the talent. We essentially made sure that we identified a few key veterans and placed them, again, on the right, left, and center appropriately.
Field Battle #1
First person view
There's not really much to talk about tactically in this one. From my perspective, both sides more or less marched across the field and met in the middle. It looks like there might have been some good flanking going on on the south side of the field from the allies, but its hard to tell.
On the north side of the field, the Tuchux formed a block on their right flank with two units, about 4 ranks deep. Across from them was a large contingent of the East Kingdom in a mass that appears to be maybe 6 ranks deep.
The Bog is the next unit over from the Tuchux and in a line 25 wide and 2 ranks deep with some archers behind that. Behind us was the Atlantian Army and another large group, while across from us appeared to be the Barony of the Cleftlands and Mid Royal along with maybe another group.
In this battle the Tuchux marched up the right flank while hugging the right boundary, and the East Army came down directly across from them and met in the middle. We moved forward and met the unit directly across from us.
From here it appeared that the Tuchux and the East were more or less holding ground against each other. We were able to whittle the unit in front of us down as Atlantia came around our left from behind and started pushing hard on the flank. I didn't see any real tactical plays in this battle, we just simply out fought (Skill? Numbers?) the other side without making any big mistakes.
What Could Have Gone Wrong?
As I said, the fight pretty much came to us with an even front. Had we held back, we would have kept Atlantia (behind us) out of the fight too long, and the Tuchux left flank would have been exposed. Had we pushed forward, we would have worked ourselves into a kill pocket. Had Atlantia not moved around us to get into the fight, our left flank would have been exposed. In this fight, everyone on our side did their jobs well.
Command Errors
I was the Vice Warlord for Anglesey. Our Warlord and myself were two of the first people dead in our unit. I can't speak for her, but I got stupidly aggressive, over extended myself, and got hit by a well known spear expert (right at 1:50 of the second video).
After watching the rest of our unit fight well on their own, it gave me confidence that I can let them do the fighting and win while I focus on watching the field and directing traffic. A lesson well learned.
Field Battle #2
First person view from the left flank (Atlantia)
In this battle we (the allies) were told to reverse the field. Anyone on the left moved to the right, etc. That seemed to take more time than we expected. The Tuchux were still on the right flank when the cannon fired, and for whatever reason we were about three to four units in from the left (no idea why). Atlantia was hugging the far left.
A veteran in our group yelled out, "prepare to distract the best we can," which was another way of saying we are out numbered and probably won't survive the fight.
Immediately the Plastic Romans (scutums with 6 castles on the front), Darkyard (black tree on a white shield) and Dark Moon (black and gold sun pattern) pressed pretty hard on their right with another large unit pressing forward kind of in the middle. On the other side of the field the East stayed at the top of the hill while our right flank held off for a bit at the bottom to see the battle unfold.
My unit stayed as far back as we could, and in fact walked backwards a bit, in order to stretch the battle out so that we'd have time for the Tuchux to march across the field and get into the fight. The initial engagement looked liked this with the fronts outlined and my unit circled, and the Tuchux path marked across the back of our side of the field.
Tacitcal Notes
Darkyard and the Plastic Romans appeared to make un uncoordinated charge straight into Atlantia. Two thoughts: 1) If you are going to charge, you need to get your shields together and form a wall and press into the enemy all at once. 2) Even if you did that, its not going to be effective against an army thats formed up 6 ranks deep. Charges are only really effective at wiping out a weaker force. If the force is stronger, you just die faster.
Drawing the fight backward seemed to effectively pull our enemy into a kill pocket. From the picture above, it appears that a unit is moving in on the flank of whomever is pressing us.
Commanding the charges: I managed to stay alive through this whole battle. As a commander, I mainly watched the flow of the battle, and any time I saw we had an advantage on our enemy, I called a charge. Usually this was when we came up on a unit that started to turtle themselves up with the "deer in the headlights" look. THAT is when you want to charge and wipe them out so that you can move on quickly to the next fight.
The Result
We out fought our side, no better way to explain it. The Bog then swept back into our backfield and moved north toward what was left of the East Army. The Tuchux took a direct route across the field and hit them from the other side. They took a more direct approach with respect to the direction that the East was fighting, while we came in looking for a flanking position. We were able to clean up and win the battle by a small margin.
Field Battle #3 The field battles got a little more interesting as the day progressed.
First person view from allies' left flank
In this battle, the Allies stacked the left flank and left the right flank pretty empty. Maybe they expected the East wouldn't come down off the hill? Purple, on the other hand, did the same, which meant they had a large force on the north side of the field while we had a large force on the south side.
We lost this battle, and here's what I think happened. For starters, Iron Lance and another group marched up the hill and engaged the larger East and Mid units and lost without delivering many casualties. Remember what I said earlier? Don't charge if you are out matched, you just die sooner. Right off the bat we lost almost 10% of our forces. Meanwhile our left flank was really far out of the fight. In general, you want to hit early where you can win, and delay where you will lose. This was working out better for purple than for us.
The Tuchux left the right to move around to the left side of the field, only to come back and try to pull the East and Mid armies into the corner of the field. Had the East and Mid shot through the gap in an attempt to fight the rest of the allies, the Tuchux would have been in a good position to attack from behind. Instead the East and Mid came down the hill right at the Tuchux, and were able to defeat them in a short amount of time due to a big numbers advantage. Hindsight being 20/20, if I was the Tuchux, I would have kept going into the fight in the middle of the field and make the East and Mid chase. Sure, they'd be coming up from behind, but before they got into action, the Allies would have about a 4/3 advantage, and a good flanking position. If they can mop it up early enough, the battle is won.
Meanwhile on our left, we took too long to get into the fight, and when we did, purple did a really good job of stuffing us. The Bog ran into the plastic romans, who did a much better job of sticking together than in the previous battle, and it took us way too long to get through them. If you look at the videos about half way through, there's a line on the South side of the field that is just one big static fight. The East and Mid were able to charge across the field and clean it up after they had finished with the Tuchux.
Command Mistakes
We needed to get into the battle quickly, so we started moving out ahead of the rest of the army. I thought this was a safe play because we could move onto the left flank and then allow the rest to come at the front and we'd be in a good spot. One of our veterans in the back was yelling for us to not do this as he had a different vision of how we should engage. This caused a lot of confusion in our unit, and we got very disorganized.
I over estimated how fast the unit could move. I'm a distance runner and often forget that we have a lot of bigger and older people in the group who really can't move faster than a fast walk for any great distances in armor, so a "light jog" across the field doesn't suit us.
We needed to pull out of a bad situation late in the fight, and I yelled "Bog Troopers out!" quickly a few times, and then ran. No one responds to that name, and its not very recognizable on the field (it sounds kind of garbled and generic). I also moved much faster than necessary, and didn't take the time to gather everyone. I forgot that units move pretty slow at the 5 minute mark of a field battle, so I can take a little more time to grab people. Also, "Anglesey," is a much better word as it has a very unique, distinguishable sound that can be heard over all the chatter. The non-Anglesey groups will hear it and respond if they want, or not.
Field Battle #4
For some reason this video won't load, but you can easily find it by searching for Renegade Paladin, or Pennsic XLVI - Armored Field Battle 4.
This was my favorite battle, tactically.
The battle begins with the Allies moving fast and early on the south side of the field to establish a flanking position (correcting the mistake from the previous battle). Our initial set up was the same as the first battle, with the Tuchux, Bog, and Atlantia back on the North side of the field and across from the East and Mid big units. As the flanking occurred on our left, there was no engagement on the right. The East and Mid wanted to hold the high position on the hill, and we refused to come up after them.
At this point it appeared to me that we had a good flanking position in the south and what seemed to be a numbers advantage. With a large gap to our left, a hill in front of us, and what looked like a small numbers advantage for the other side on top of the hill, I was content to stay out of the fight for the time being. Again, fight them where you can beat them, stall the engagement where you can't.
Early on I think purple was gambling that we'd come up the hill after them, and then realized that we weren't coming. Needing to get into the fight before their right falls, two units march quickly down the hill to position themselves around our right flank (probably a smart move).
(correction: I believe Edward stuck with the Mid group)
In response, Atlantia moved out to meet them before they could envelop us. Meanwhile, we pressed forward to both keep the East from following down the hill and onto our flank, as well as to put flanking pressure onto the East if they were to go straight into the Tuchux.
This placed us in a risky position, but we had a few outs if things got too dicey. Mountains Keep was protecting our left/rear in an attempt to hold the Mid off of us if they tried to change direction and come straight at us. The worst that could have happened to us would have been if the East would have come straight at us, but I believe there was a low % chance of that happening, because that risks leaving their left flank open to the Tuchux (FWIW, Balthazar, our left commander, made the call on this move).
After moving forward, the Mid stopped and changed direction to move straight into our backfield. Fortunately the presence of Mountains Keep was strong enough to slow them down just enough to allow us to pull back out of the kill pocket and into one of our own.
Ultimately Atlantia was able to push through their opponents as we were able to fight the mid back up the hill with some of Atlantia coming around us, ultimately enveloping the East to finish the battle.
Command Mistakes
Ultimately I don't think there were any major mistakes from either side. Purple gambled that they could hold the high ground, while Red gambled that they could send the bulk of their army around the left flank. The final results of the battle was just a matter of not making any big mistakes and out fighting the enemy.
Final Thoughts
I am far from an expert on any of this. I'd probably fought in field battles in 12 different Pennsics, and this is maybe the second year I'd put any thought into what the units on the field are doing. Before that, I was a fire and forget kind of fighter. Show me the enemy and I'll point my spear at them.
Anglesey and the Bog supported Atlantia and largely fought over the center banner in the woods. A commander gave us a bad idea to run straight at the banner in one particular instance, which prompted one of my kinsmen to say this about him:
"He doesn't understand tactics. All he knows is that if you hit something and it didn't kill it, hit it harder."
I've found that time and time again, many tourney fighters in the SCA don't understand the power of flanking, nor do they understand how and when to execute a charge.
Controlling the Flanks
Given the choice to take an objective, its almost always going to be easier to overpower the flanks than it is the middle. Now this certainly has a lot to do with the specifics of the situation, and the makeup of the units. If you have a very tight, organized shield wall full of scutums, then you can risk going straight at the flag and setting up a defense on the other side of it.
In most cases, you are just going to find yourself surrounded once you punch through.
Charging a Weakness
Charges can be effective. Some units are built such that the only thing they can do is charge. But charging won't solve all problems. Charges accomplish exactly one of two things:
1) Winning the scenario quickly when you are stronger than your opponent
2) Losing the scenario quickly when you are weaker than your opponent
During field battle #2, the biggest thing I did as a commander was call charges when I saw we had a weakened enemy. We have a very strong spear unit, and tend to lead in with our spears up front and attempt to pick apart our opponents. Our shields and poles stand behind us ready to support us if we get charged. Once the the opponent's line has been weakened, however, its time to get really aggressive and run them over so that we can move on to the next fight.
Charging into a stronger opponent just makes their job easier.
Getting Organized
The most difficult aspect of fighting at Pennsic is that ultimately you end up fighting with random collections of fighters. I've found that the biggest challenges in the woods, bridge, and wall battles is getting these random fighters to work well with you.
Having said that, the biggest factor is getting shields off of the front lines and out of your way. In the past, I used to just stand there frustrated that they are in my way and not accomplishing anything. I've since learned that if you simply ask them to move out of the way so that you can take their spot, they are usually more than happy to oblige. "Hey, shield. I've got a spear. Let me have your spot."
When a shield is standing up there, he has no idea what is going on behind him. All he can do is stand there and hold the line until he sees or hears something different happening. This is where you tell him what's going on.
If you are a shield, understand that you generally have two jobs. You are either charging, or you are repelling a charge. Once that is done, its time to get out of the way and let the spears work. There are exceptions where a gate or flag must be held, and a tight shield wall will do a better job than a line of spears and polls, but these are the exceptions, not the rules.
Clearing the Beachhead
In the very beginning of this video until about the 1:20 mark, you can see a breakout occur followed by fighters filtering into the other side of the wall.
Generally speaking, once this occurs, fighters need to make a conscious effort to move past the break and take ground on the other side. I walked up to the lane at about the 1:00 mark and started telling people to funnel through to the other side. Often times people will stop right at the hole and plug it up.
Something similar occurred on the northern most bridge in bridge battle #3, but no one followed the knight who broke through and the advantage was lost.
So much to write about Pennsic and so little time, so I thought I would just put these together in small pieces.
I overheard fellow Kinsman Seamus give some advice to a newer fighter, and I think it really summed up possibly the most important factor regarding large scale melees. You need to be able to recognize when you are in a bad situation and figure out how to get out of it.
Field Battle #4
The bog started off on our far right flank, we were identified in the following video as "aaaaaand who are these people?" at the 3:40 mark.
Pictured here with Atlantia in the background:
The Tuchux took the far right, we were next to them, and Atlantia and a smaller group were behind hind us. The Bog consisted of Anglesey, Galatia, The Concusare, and also had Red Branch and Mountains Keep in with us.
The above picture represents a little more than 1/3 of our side. The rest of our side, moved quickly to engage on the left flank. We were content to stay where we were as the East Kingdom as well as other units were holding the top of a hill and appeared to have us outnumbered.
The Bad Situation
Eventually the East marched down the hill and into the Tuchux. Their right flank was exposed to us, so we started to move in on it. However, at the same time, another unit started to pinch in on us from our left, which placed us in a very bad position sandwiched between two large units.
Above you can see us positioned in an arc on the bad side of a kill pocket. This is a very bad situation. How do you get out?
Getting Out
Ultimately we pulled our line back so that we were even with the Tuchux. As this happened, Atlantia marched around us on our left and into the middle of the field (or maybe around us to envelop the East). Its unclear to me if they engaged any of the units that were threatening our left, or if they merely posed a threat to them, but it seems as though they went into the middle of the field. Nevertheless, by pulling pack, we managed to turn their kill pocket into our kill pocket.
Ultimately after we pulled back to redraw the front, we were able to sweep all the way around them and envelop them with another unit (Atlantia?).
The Tuchux commander saw our maneuver and thanked us for securing victory in this fight by giving as a rarely used Tuchux salute, which was pretty cool. =)
I've spent some time recently watching a series of battles and I found two that really stood out to me. Each battle had pretty much the same fighters, but very different results. Some may figure out who, when, and where these battles happened, but my point here is not to call certain individuals or certain groups out for their ineffective fighting, especially when the fight itself may not be a good example of their capabilities (not to mention, I could be completely wrong in my assessment, and that ain't fair!).
Seizing the Initiative
I wrote about this in my last blog. In a quick moving battle with no limit to the frontage, you need to get yourself involved in the fighting as quickly as possible. This doesn't mean to charge head first into the first group you see, or to leave a giant hole in your line so that you can run somewhere else and start pounding on someone's shield. It means that you need to be having an effect on the battle. This includes:
- Running over a weaker opponent
- Taking free shots with a spear or pole when the opponent is out of his range - Moving in on a flank and getting the enemy to curl in on itself - Holding off a unit of equal or greater size
- Running to a place on the battle field where fighting can/will occur
- Defending a weakness that could be exploited if you were not there
What I like about the two specific battles I'm referring to is that I believe a lack of seizing the initiative had a large impact in how the battle turned out, and it happened for each side in different battles.
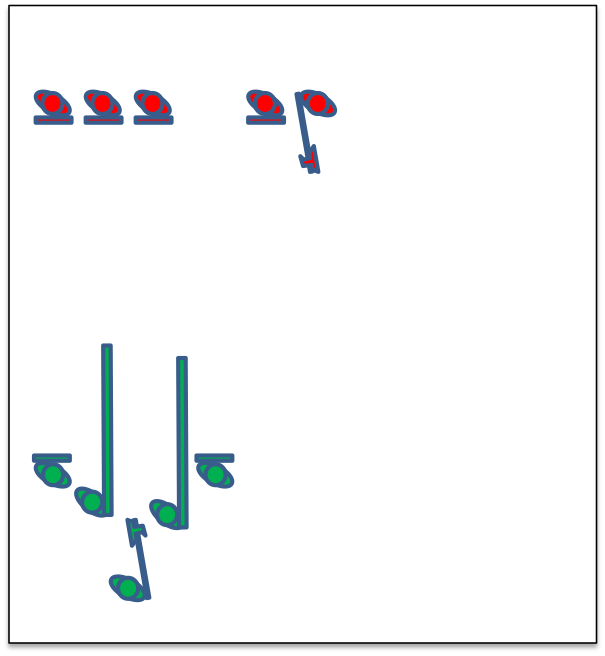
First Battle
This one was pretty straight forward. Red team sent its right flank hard and fast into green's left flank and attacked well into green's backfield. Green's center and right flank pressed forward at a much more moderate pace. Green's center was expecting to engage red's center, but red's center followed its right flank. As a result, green's center unit stood in the middle of the field unsure of what to do, all while taking on archer fire.
While some of green's center slowly moved right to get involved in the fighting, a good chunk stayed together in the middle of the field waiting for a fight to come to them. 23 seconds passed until that happened, and that was with both units who returned from the flank at pretty close to full strength.
If 23 seconds doesn't sound like a lot of time for you, sit there and count 1 Mississippi, 2 Mississippi, etc. until you get to 23. Half of the people on the field were dead by this point.
In my opinion what needed to happen here was one of two things. That center green unit should have either moved left and engaged the red unit that moved to join the other unit on their right flank, or green should have quickly put a lot of pressure on the unit to their right in an attempt to finish them off before the flanking red units returned.
Second Battle
The second battle is a little more complicated, yet for this reason I think its more important. The above battle, in my opinion, is pretty straightforward and obvious. You make that mistake once and then you fix it in the next fight.
Its the subtleties, IMO, that gets someone to really understand tactics.
For this battle, I'll focus on green's left flank (about 50% of their army). The right flank is not pictured. Shown below, red begins with a unit of 13 fighters, and a unit of 11 fighters. Green begins with 18 and 4, for a 24 to 22 fight (red has slight advantage in numbers). Green began the series of fights with 4 more fighters, so in theory, they have a 6 man advantage on the right flank. Given the routing of the previous battle, green hopes merely to contain the left flank (though winning would be a bonus).
Green moves out hard to the left and red moves out to meet them. Red's central unit (pictured in the upper left) begins to move to meet green, which would have put them in a great attacking position with a 24 to 18 advantage plus a flanked position, but green sent a 4 man suicide squad straight at them, causing red's center unit (all but 2) to pull out and deal with them.
Now its hard to say what the better play would have been. In fact, upon assessing this battle after several times over, I don't think red made any bad plays. I just think there were small tweaks that could have made the difference. In this case, I think red would have been better off leaving 4-6 people to deal with green's 4 man suicide squad, and send the other 5-7 guys hard and fast into the flank of the larger unit. Instead, it took them a while to deal with 4 guys, all while turning their back the the larger green unit.
As the red center unit finished off the 4 man suicide quad, green's left unit slowly started to move in on the backs of red's center unit. I don't think this was a great idea, but it did keep a sort of slow chaotic mess happening on the left half of the field while the right half was, hopefully, winning their engagement. Keep in mind, green went into this assuming that it was the inferior unit on the left side.
I'd also like to point out that when this happens, its not usually a commander yelling, "you six, move that way.....but meander a bit and kind of slowly reform over there somewhere." What happens, instead, is one guy sees someone he thinks he can kill, and then it draws the attention of one of his friends, which draws the attention of two more friends, etc. until half the unit ends up fighting somewhere else.
Something else I'd like to point out. As this was happening, there were a lot of people on red team that were meandering in the background, not really engaged in the fighting. There was one point were I saw 4 fighters facing a lone spearman. It shouldn't ever take 4 people to deal with a lone spearman!
Having said that, red hasn't lost a fighter, yet, so I can't fault them for fighting "poorly." But I do think they were winning much more slowly than they could have.
Once enough green had moved right, red's right unit made a big charge. At this point they had a 12 on 8 advantage and probably more talent.
Red's right unit charged as green's left unit retreated. When the engagement had resolved itself, I don't believe red lost a single fighter while only one green fighter escaped. As this happened, the toilet bowl continued in the other engagement.
At this point in the battle, red has hardly lost anyone on the left half of the field, while green is down at least 11 fighters. You might ask, how can I possibly think that red wasn't doing everything perfectly? Believe me, I had to ask myself that same question.
But here's what I've got:
1) Red waited a full 16 seconds after green had split off 10 of its fighters to go and fight the other unit.
2) It took them another 20 seconds to run down 7 of the 8 remaining fighters, which drew them 15-20 yards further away from the fight.
At this point, green's right units had just finished up on the right side of the field. Unlike red's flank, who fought until the last man was killed, green's right flank left a few stragglers and moved quickly (running) to engage in the bigger fight. Red's flank was slow to get back into the fight.
As a result, green was able to hit the left flank of red's center unit very hard. In just a few second, red was completely enveloped, and within 10 seconds, 6 red fighters were killed.
The last mistake that I believed red to make was that when their flanking unit came back to the fight, many ran to the center of the battle field looking for a fight rather than taking a direct line at one of green's flanks to bail out their enveloped friends.
Still, at this point in the fight, red is pretty much even with green. Green ended up winning with only a handful of fighters left alive, but what allowed them to clean up in the end was having a number of advanced spear fighters left alive, who usually have the advantage once the shieldmen are worn out from the initial charges, and green also had a handful of younger, faster fighters who had the stamina to stay strong at the end.
If you had asked me at the 90 second mark who was implementing the better tactics, I would have said red. However, red allowed green to stay in the game. I think red made three small mistakes, any one of which could have won them the battle had they been more assertive about their advantages.